User:Separ
I played GW from 1 month after it was introduced. I have been a frequent user and sometime contributor to the unofficial GW Wiki and until I get this one figured out will keep notes on my game here before adding to this wiki.
Dailies[edit]
- Map Bonus
- Pact Supply Network Agent
- SAB: Guide_to_Daily_Super_Adventure_Festival_achievements
- SAB: Unintended Coursework
- Guild Hall Harvest
- Home Instance Harvest
- Daily Achievements
- Blood in the Water/Master Diver
- Iron Marches, Frostgorge, Snowden, Harathi, Gendarran, Kessex, Bloodtide Coast, Lornar's Pass, Timberline Falls, Mt. Maelstrom
- [&BOEBAAA=] NNE, [&BOcFAAA=] SW, [&BJAAAAA=] ESE, [&BKEAAAA=] E, [&BOQAAAA=] S, [&BCMAAAA=] W, [&BKcBAAA=] WNW, [&BEwGAAA=] WSW, [&BD0CAAA=] ESE, [&BI0GAAA=] SE
- Provisioner Tokens
- Skritt Trader / Commodore's Quarter Waypoint — [&BAwEAAA=]
- Ash Legion provisioner / Diessa Gate Waypoint — [&BKgDAAA=]
- Warden Eve / Reckoner's Waypoint & ENE — [&BLsEAAA=]
- Scavenger Rakatin / Scavenger Rakatin Wanderer's Waypoint — [&BNYHAAA=]
https://wiki.guildwars2.com/wiki/User:Jowjowjow/npcids
Players of Interest[edit]
- HoT HP Train: Zander.9836, Athelix.4791, Flamzios.3850, KaNeSaDaZ,3961
- Brazil: Issato.9748
- Australia/NZ: threeplay.7163,
- Looking for aus guild: EjNova.1283
- Dry Top:
- Triple Trouble:
https://www.reddit.com/r/guildrecruitment
Roleplay:
- Flynn Darkbloom (LFGuild);
- Marissa Soulfyre (Black Moa Syndicate)
TaCo Guide[edit]
User:Lady_Elyssa/Guide_to_GW2_TacO_Markers_and_Trails
Precise Leaps[edit]
| Name | Y/N | Type | Range | Comments |
|---|---|---|---|---|
| Experimental Rifle Skill 2, Shadow Leap (Item sold by Agent Livilla) |
Y | Specific Point | 900 | |
| Engineer's Rifle Skill 5, Jump Shot | Y | Specific Point | 800 | |
| Experimental Teleportation Gun | N | Radial | 900 | If you hit something solid, you slide off it |
Game Message Options[edit]
There are 9 types of Game Messages. This list shows Channel Names, Channel tags, some samples of each type and perhaps a conclusion about what is included in each area
Miscellaneous[edit]
Character[edit]
Contacts [Contacts][edit]
- (Name) is now Online/Off-line/Away)
Guild[edit]
Inventory [Inv.][edit]
- You receive # (item(s))
Open World [PvE][edit]
- You are entering an area where mounts are not allowed
Player vs. Player[edit]
Squad[edit]
- You cannot set or clear markers without the commander present in this map
- (Name) set location marker (marker name).
World vs. World[edit]
- (World) has captured/claimed (Place)!
- (Place) has been secured/reinforced/fortified.!
- (Guild) has claimed (Place)!
Not in a Category[edit]
Some messages appear (on all chat tabs) even if all Options are unchecked
- Screenshot saved as (folder\filename)
In Dragon Mission[edit]
- Mission Complete! Challenge Rank: Bronze(0/3 challenges) [in yellow]
In WvW[edit]
- Your world has claimed Borderlands Bloodlust! Use it to deliver a crushing defeat.
In PvE[edit]
- (name) has begun looking for group.
- (name) has listed the party as LFG under Dragonfall.
- (name) has ended the party's search for new members.
Master Diver[edit]
- Master Diver: Iron Marches - Spentlung – [&BOEBAAA=] NNE
- Master Diver: Frostgorge Sound – Iron Horse Mines - [&BOcFAAA=] SW
- Master Diver: Snowden Drifts – Urgulp - [&BJAAAAA=] ESE
- Master Diver: Harathi Hinterlands – Koofooloo - [&BKEAAAA=] E
- Master Diver: Gendarren Fields – Mellaggan Shrine [&BAAEAAA=] NNE
- Master Diver: Kessex Hills – Krait's Larder [&BCMAAAA=] W
- Master Diver: Bloodtide Coast – Sullivan's Wake - [&BCwAAAA=] W
- Master Diver: Lornar’s Pass – Dwarves' Gloaming - [&BEwGAAA=] WSW
- Master Diver: Timberline Falls – Whispering Falls - [&BD0CAAA=] ESE
- Master Diver: Mount Maelstrom – Aquabase Terror Seven - [&BI0GAAA=] SE
[&BOEBAAA=] NNE, [&BOcFAAA=] SW, [&BJAAAAA=] ESE, [&BKEAAAA=] E, [&BAAEAAA=] NNE, [&BCMAAAA=] W, [&BCwAAAA=] W, [&BEwGAAA=] WSW, [&BD0CAAA=] ESE, [&BI0GAAA=] SE
Skyscale Rift Locations[edit]
Fractal Achievements (Masteries)[edit]

| Name | Description | Levels | 1 R.A. | 3 S.S. | 4 S.T. | ||||||||||||||||||
|---|---|---|---|---|---|---|---|---|---|---|---|---|---|---|---|---|---|---|---|---|---|---|---|
| Carrier Cacophony | 8 | X | X | ||||||||||||||||||||
| Falling! Screaming! Diving! | (1 AP) (Hidden) Mistlock Observatory Jumping Puzzle | 0 (All) | X | ||||||||||||||||||||
| Fancy Footwork | 5 | X | |||||||||||||||||||||
| Flawless Fins Foil Foes | 7 | X | |||||||||||||||||||||
| Hollow Victory | 87 | X | |||||||||||||||||||||
| Holo-Hornpipe | 14 | X | |||||||||||||||||||||
| Hop, Skip, and Jump | 2 | X | X | X | |||||||||||||||||||
| Horrik's Horror | 18 | X | X | ||||||||||||||||||||
| If We Only Had Marshmallows | 3 | X | X | ||||||||||||||||||||
| Open Grave | 20 | X | X | ||||||||||||||||||||
| Out of Cluck | 4 | X | X | ||||||||||||||||||||
| Shockwave Skipper | 10 | X | |||||||||||||||||||||
| Subject 6 Deep-Sixer | 15 | X | |||||||||||||||||||||
| Take a Bow | 6 | X | |||||||||||||||||||||
| The Floor Is Lava. Don't Step In It. | 1 | X | X | ||||||||||||||||||||
| Nightmare Fractal |
|
23, 48, 73, 98 | |||||||||||||||||||||
| Shattered Observatory Fractal |
|
24, 49, 74, 99 | |||||||||||||||||||||
| Sunqua Peak Fractal |
|
25, 50, 75, 100 | |||||||||||||||||||||
| Weapons Tester | 9 |
Wiki Markup Help[edit]
| Cheatsheet | Text Formatting, Links, Images, Headings, Lists |
| Templates | row 2, cell 2 |
| Maint Templates | row 2, cell 2 |
| wiki discord | row 2, cell 2 |
| Icons | Icons (d'oh) |
| Welcome | Things to do |
- [[File:Ember Bay Routes.jpg|800px|alt=Alt|Map of Ember Bay showing Lava Tube, Ley Line & Sequential Updraft Routes.]]
- [[User:Separ#Caledon_Forest_Unfinished_Jumping_Puzzle|unfinished puzzle]]
- Talk:Table_of_necromancer_combo_skills
- https://en.wikipedia.org/wiki/Wikipedia:Extended_image_syntax
- [[image:Dragon's_End_Underwater_Passage.png|80px|thumb|alt=Alt|Underwater Passage to two POIs]]
- https://www.mediawiki.org/wiki/Help:Tables
- https://en.wikipedia.org/wiki/Help:Link#Wikilinks
- [www.example.org/ link text]
Guild_Wars_2_Wiki:General_formatting#General_page_layouts_by_content_type
| Character Level | Zone Level | Leather |
|---|---|---|
| 80 | 40-50 | Coarse |
| row 2, cell 1 | row 2, cell 2 | row 2, cell 3 |
| header 1 | header 2 | header 3 |
|---|---|---|
| row 1, cell 1 | row 1, cell 2 | row 1, cell 3 |
| row 2, cell 1 | row 2, cell 2 | row 2, cell 3 |
| First header | Second header | |||||
|---|---|---|---|---|---|---|
| upper left | upper middle | right side | ||||
| lower left | lower middle | |||||
| ||||||
| Character Level | Zone Level | Leather |
|---|---|---|
| 80 | 40-50 | Coarse |
| row 2, cell 1 | row 2, cell 2 | row 2, cell 3 |
Enter and replace the word "Comment" with the hidden text you wish to enter.
Materials Cost[edit]
Upgrade or Sell[edit]
http://gw2lunchbox.com/MaterialUpgrades.html
Gatherable (Selling Price)[edit]
| Tier | Metal | Ore | # | Ingot | Leather | Section | # | Square | Wood | Log | # | Plank |
|---|---|---|---|---|---|---|---|---|---|---|---|---|
| 1 | Copper | … | 2 | … | Rawhide | … | 2 | … | Green | … | 3 | … |
| Bronze | … | 10 Cu+ | … | |||||||||
| 2 | Silver | … | 2 | … | Thin | … | 2 | … | Soft | … | 2 | … |
| Iron | … | 3 | … | |||||||||
| 3 | Gold | … | 2 | … | Coarse | … | 2 | … | Seasoned | … | 3 | … |
| Steel | … | 3 Iron+ | … | |||||||||
| 4 | Platinum | … | 2 | … | Rugged | … | 2 | … | Hard | … | 3 | … |
| Darksteel | … | 2 Plat+ | … | |||||||||
| 5 | Mithril | … | 2 | … | Thick | … | 4 | … | Elder | … | 3 | … |
| 6 | Orichalcum | … | 2 | … | Hardened | … | 3 | … | Ancient | … | 3 | … |
Charm & Symbol[edit]
| Component | Cost |
|---|---|
| Charm of Brilliance | … |
| Charm of Potence | … |
| Charm of Skill | … |
| Symbol of Control | … |
| Symbol of Enhancement | … |
| Symbol of Pain | … |
Armor Rune / Charm[edit]
Weapon Sigil / Symbol[edit]
Nifty Tips[edit]
Using Stacked Banners[edit]
- Sometimes multiple banners are placed in the same spot. In the Targeting section of the Control Options (F11) bind keys to Nearest Ally and Next Ally. (I use Ctrl+F9 and Ctrl+F10).
- Stand next to the stacked banners and use Nearest Ally then F to claim a buff then repeat Next Ally and F to claim each other stacked buff.
Triple Portal[edit]
   Place a portal (1st use)
   Pre-Cast Mimic
   When the cast is about to end (the yellow bar) enter your continuum split
   Wait for the CS to run out.
   Open the portal (2nd use)
   First portal done
   Place a portal (1st use)
   Mimic
   Place the portal (2nd use)
   Second portal done
   Place a portal (1st use)
   Place the portal (2nd use)
   Third portal done
Triple Blink[edit]
Mimi(CS)c → CS ends → Blink → Mimic → Blink → Blink. (https://forum-en.gw2archive.eu/forum/professions/mesmer/How-to-triple-blink)
[&Cv8FAAA=][&Cv0FAAA=]
Typing Items for Destruction[edit]
Easy way to delete items that require typed in confirmation is to ping that item to your textbox . Copy that nameand when you destroy item just paste the name in the box and delete the brackets.
SAB[edit]
Bauble (1 ![]() • 5
• 5 ![]() • 10
• 10 ![]() • 20
• 20 ![]() • 50
• 50 ![]() ) •
) • ![]() Bauble Bubble
Bauble Bubble
Continue Coin • Infinite Continue Coin • ![]() Fancy Furniture Coin
Fancy Furniture Coin
| Skills and Upgrades |
• Purse
|
|---|---|
| Hub | World 1 House • World 2 House • World 3 House • World 4 House |
| World 1 | Z1: Sunny Glade (TM) • Z2: Dark Woods (TM) • Z3: Kingdom of Fungus (TM) • B: Cart |
| World 2 | Z1: Rapids (TM) • Z2: Pain Cliffs (TM) • Z3: Storm Top (TM) • B: Robbers |
| World 3 | Z0: Test Zone • Historical: Sparkling Pools |
| Adventures | Super Adventure Hub Super Adventure 1-1 • Super Adventure 1-2 • Super Adventure 1-3 Super Adventure 2-1 • Super Adventure 2-2 • Super Adventure 2-3 Super Adventure Test Zone |
| Achievements |
Map Completion Check[edit]
- 4 BLC Key; Harathi; Siren's Landing; Ember bay; PoF(1,Thief)
- 17 Transformation; Malchor's Leap; Cursed Shore; Southsun; Bloodstone Coast; Brisban Wildlands; Lake Doric; Queensdale; Ember Bay; Verdant Brink; Siren's Landing; PoF(5,Thief); POf(2,Thief); Desert Highlands
Run 2 GW2 Accounts on 1 Computer at the Same Time (Updated 11 Nov 2018)[edit]
Easiest: https://github.com/TheCheatsrichter/Gw2_Launchbuddy
A bit harder: For this example the GW2 directory is: F:\Program Files (x86)\GW2
- 1. Download Handle.zip from https://technet.microsoft.com/en-us/sysinternals/handle.aspx
- 2. Unzip to GW2 directory.
- 3. Create GW2 2nd Instance.bat file in GW2 directory (file path is written oddly in next line for use by batch FOR command):
- --------------------------------------- GW2 2nd Instance.bat --------------------------------------
- REM address to Handle PathNameExt written this way to be acceptable to batch FOR command
- REM set "_handle=F:\\"Program Files (x86)\GW2\"\handle64.exe"
- set "_handle=F:\\"GW2\"\handle64.exe"
- for /F "tokens=3,6 delims=: " %%I in ('%_handle% -accepteula -a "AN-Mutex-Window-Guild Wars 2"') do if not "%%J" == "" %_handle% -accepteula -c %%J -y -p %%I
- REM "F:\Program Files (x86)\GW2\Gw2-64.exe" -shareArchive
- "F:\GW2\Gw2-64.exe" -shareArchive
- -----------------------------------------------------------------------------------------------------
- 4. Create shortcut GW2 2nd Instance to GW2 2nd Instance.bat and set to run as adminstrator with:
- Right-Click | Properties | Shortcut | Advanced | Run as Administrator
- 5. Create a shortcut to run the 1st instance of GW2: GW2
- "F:\Program Files (x86)\GW2\Gw2-64.exe" -sharearchive
- "F:\Program Files (x86)\GW2\Gw2-64.exe" -sharearchive
- The -sharearchive command line argument must be used, other CLI may be used in GW2
- 6. Run the GW2 shortcut then the GW2 2nd Instance. Login to each with a different account.
- 7. 2 instances start.
- 8. When done close the second instance first so its login defaults do not get saved. This does not always occur. Have not figured out why.
Sources that helped me develop the above:
- https://sites.google.com/site/romzombie/home/guides/guild-wars-2-multiaccount-setup
- https://www.reddit.com/r/Guildwars2/comments/47r9ku/multiboxing_an_updated_howto_for_running_two/
- http://forums.ttsgamers.com/topic/2313-multiboxing-guild-wars-2/
- http://gw2thaifotm.blogspot.com/2016/12/guild-wars-2-multi-account-setup.html
PM me in game (Separ Alluriaed) if there is any problem with this. Separ (talk) 16:01, 11 November 2018 (UTC)
Running Multiple Accounts on 1 machine[edit]
While it is usually quite easy to just enter the correct username and password it sometimes becomes annoying especially when switching between accounts multiple times in short order. I used the following method to make using multiple accounts a bit easier:
1. Prepare a folder for each account. I used numbers for my folders and so placed each of the 1, 2, 3 folders in the folder where Guildwars 2 placed its Local Data file during install: %Appdata%/Guild Wars 2 for my install, it may be different for your install. You can, of course, use whatever legal folder names you wish, but be sure to make appropriate changes in the batch files that are shown below.
2. Start Guildwars 2 to show the login screen for the first account. Be sure the save password and account name boxes are checked. Continue to the game to ensure the account and password were correct. Make sure the F11 settings are what you desire. Close the game.
3. Copy the Local.dat & GFXSettings.Gw2-64.exe.xml files from the Guildwars 2 folder to the folder for the first account that you prepared in the step 1.
4. Repeat steps 2 & 3 for each account.
5. Create a batch file for each account:
Format:
- Copy <"First Account folder/Local.data"> to <"Install Folder/Local.dat">
- Copy <"First Account folder/Local.data"> to <"Install Folder/Local.dat">
- Start "" "F:\GW2\Gw2-64.exe" -maploadinfo
Example (watch for word wrap):
- Copy "C:\Users\17577\AppData\Roaming\Guild Wars 2\1\Local.dat" "C:\Users\17577\AppData\Roaming\Guild Wars 2\Local.dat"
- Copy "C:\Users\17577\AppData\Roaming\Guild Wars 2\1\GFXSettings.Gw2-64.exe.xml" "C:\Users\17577\AppData\Roaming\Guild Wars 2\GFXSettings.Gw2-64.exe.xml"
- Start "" "F:\GW2\Gw2-64.exe" -maploadinfo
6. If you want to update the Graphics and other F11 settings made during the last session, also create a batch file like this for each account to copy those 2 files back to the account folder and run it after you complete a session.
Format
- Copy <"Install Folder/Local.dat"> <"First Account folder/Local.data">
- Copy <"Install Folder/Local.dat"> <"First Account folder/Local.data">
Example (watch for word wrap):
- Copy "C:\Users\17577\AppData\Roaming\Guild Wars 2\Local.dat" "C:\Users\17577\AppData\Roaming\Guild Wars 2\1\Local.dat"
- Copy "C:\Users\17577\AppData\Roaming\Guild Wars 2\GFXSettings.Gw2-64.exe.xml" "C:\Users\17577\AppData\Roaming\Guild Wars 2\1\GFXSettings.Gw2-64.exe.xml"
7. Finally, after NCSOFT updates the game with changes that update the game local.dat file, this batch file will update each account's local.dat file. This may cause some of your saved settings to change.
@Echo off
Echo Opening 1...
Echo
Copy "C:\Users\17577\AppData\Roaming\Guild Wars 2\1\Local.dat" "C:\Users\17577\AppData\Roaming\Guild Wars 2\Local.dat" > nul
Start "" "F:\GW2\Gw2-64.exe" -maploadinfo
Echo.
Echo ...Wait, Click Login, Click Play, Exit Game at character screen.
pause
Echo Updating 1
Copy "C:\Users\17577\AppData\Roaming\Guild Wars 2\Local.dat"  "C:\Users\17577\AppData\Roaming\Guild Wars 2\1\Local.dat" > nul
Echo Local.dat -> C:\Users\17577\AppData\Roaming\Guild Wars 2\1\Local.dat

Echo.
Echo.
Echo Opening 2...
Echo.
Copy "C:\Users\17577\AppData\Roaming\Guild Wars 2\2\Local.dat" "C:\Users\17577\AppData\Roaming\Guild Wars 2\Local.dat" > nul
Start "" "F:\GW2\Gw2-64.exe" -maploadinfo
Echo.
Echo ...Wait, Click Login, Click Play, Exit Game at character screen.
pause
Echo Updating 2
Copy "C:\Users\17577\AppData\Roaming\Guild Wars 2\Local.dat"  "C:\Users\17577\AppData\Roaming\Guild Wars 2\2\Local.dat" > nul
Echo Local.dat -> C:\Users\17577\AppData\Roaming\Guild Wars 2\2\Local.dat


Echo.
Echo.
Echo Opening 3...
Echo.
Copy "C:\Users\17577\AppData\Roaming\Guild Wars 2\3\Local.dat" "C:\Users\17577\AppData\Roaming\Guild Wars 2\Local.dat" > nul
Start "" "F:\GW2\Gw2-64.exe" -maploadinfo > nul
Echo.
Echo ...Wait, Click Login, Click Play, Exit Game at character screen.
pause
Echo Updating 3
Copy "C:\Users\17577\AppData\Roaming\Guild Wars 2\Local.dat"  "C:\Users\17577\AppData\Roaming\Guild Wars 2\3\Local.dat" > nul
Echo Local.dat -> C:\Users\17577\AppData\Roaming\Guild Wars 2\3\Local.dat
Nifty Places[edit]
Outside Bloodstone Fen[edit]
From Ground Zero waypoint. Drop down for 2.5 seconds glide SE to the right side of and above the pair of large bloodstone stalactites. Scrape down the wall until you see a rounded rock dome. Land on the dome. Climb above the large bloodstone crystal, walk 10 feet South. Glide to the right end of the rock platform to the NE (glider skill 5 will help). Run North along the ledges to the outside. Limited area to explore to the left. Go to right for most to see. This is no longer accessible.
Tangle Depths & Dragonstand Bosses[edit]
Tangle Depths
- Champion Bat Matriarch - Ogre Camp Waypoint, West to Cave Entrance marker, make right turns
- Champion Chak Crown - SE of Ley-Line Confluence Waypoint
- Champion Mushroom Queen - Rata Novus WP, S to Rata Novus Command Center POI, up to top floor through hole in West wall, fly all the way down.
- Treasure Mushroom - (Need stealth detection mastery) Teku Nuhoch WP, Wallow to Grub Pit, West
- Champion Mushroom Emperor - [&BA4IAAA=] ESE, Down hole to [&BBUIAAA=]
- Join Shrael Backstab on his recon mission - Scar Camp WP WP then SW to cave entrance and W along Eastern Confluence Tunnel
Dragonstand
Crafting[edit]
| Discipline | Equipment | Upgrades | Other |
|---|---|---|---|
| Heavy armor (Used by soldiers — guardians, warriors and revenants) |
Runes | Metal boxes | |
| Magical weapons (Foci, staves, scepters, and tridents) |
Sigils | Potions Tonics Tuning crystals | |
| - | - | Food and dyes | |
| Projectile weapons and off-hand utility items (Short bows, longbows, pistols, rifles , harpoon guns, torches, and warhorns) |
Sigils | Maintenance oils | |
| Trinkets (Amulets, rings, and earrings) |
Jewels | - | |
| Medium armor (Used by adventurers — engineers, rangers, and thieves) |
Runes | Leather packs | |
| - | Sigils | Decorations and consumables | |
| Light armor (Used by scholars — elementalists, mesmers, and necromancers) |
Runes | Cloth bags | |
| Melee weapons and shields (Axes, daggers, swords, greatswords, maces, hammers, spears, and shields) |
Sigils | Sharpening stones |
| Name | Areas | Exotic | Ascended | Mats |
|---|---|---|---|---|
| Rothgare Ablewise | 500 |
Sinister Armor | Verata's Armor | |
| Separ Majalekai | 500 |
Sinister Armor | Verata's Sinister Insignia; Verata's Armor, , Gift of Blades | |
| Separ Aikidota | 500 |
Weapons: Sinister, Celestial Inscription: Celestial | Inscription: Grizzlemouth's, Keepers, Theodosus', Verata's, Wupwup, Zojja'a; Weapons: Verata's Staff |
|
| Separ Alluriaed | 500 |
Sinister Armor | Zojja's Light Armor
Keeper's Insignia |
|
| Separ Obscurio | 500 |
|
Verata's Claymore; Chorben's Claymore; Zojja's Reaver, Claymore, Warhammer, Impaler, Blade; Ventari's |
|
| I M Ingo Montoya | 500 |
|||
| Ayam Inigo Montoya | 500 |
Sinister Weapons | Stonecleaver's (Valkyrie) Inscription,
Chorben's Greatbow, Grizzlemouth's revolver, Verata's Revolver, Zojja's Brazier, Stonecleaver's Herald, |
Legendary Weapons[edit]
https://wiki.guildwars2.com/wiki/Legendary_weapon/table
Have[edit]
2-Handed[edit]
 Eternity
  Twilight
  Sunrise
  The Juggernaut
  The Bifrost
  The Predator
1-Handed[edit]
 Incinerator
  Bolt
Bolt  The Minstrel
  Meteorlogicus
  Rodgort
  Astralaria
  HOPE
HOPE  Howler
  The Moot
Underwater[edit]

Want[edit]
2-Handed[edit]


1-Handed[edit]

Underwater[edit]


- This item varies with each legendary weapon.
- Obsidian Shards are bought in multiples of three, costing three Laurels each. You would end up purchasing a total of 252 shards.
- Also requires you to have characters that have mastered the respective crafting disciplines. The finished Gifts are account bound, which allows you to craft them on different characters.
- Chance to get a precursor varies with rarity and level.[1]
Attribute bonuses[edit]
http://wiki.guildwars2.com/wiki/Item_nomenclature
Trading Post Free Items[edit]
Gathering Tools[edit]

During Wintersday I traded various things for Giant Wintersday Gift and opened them to collected a bunch of stuff including many Frostbitten Toolboxes which when opened randomly provides one of the orichalcum-quality harvesting tools. Get a stack for each of your characters and you should be set until next Wintersday.
How to Get Tier 6[edit]
I was about 80% of the way to creating a timeline showing recommended team assignments for T6, when I googled it to see what other people had done. I found a nice guide here: http://whiteside-ridge.enjin.com/forum/m/17254048/viewthread/13642547-favour-zephyrites-tier-6 which I incorporated with some of my ideas to produce the following. The above site has good graphics and a different approach to some events.
| Make Up | Assignments | Notes |
|---|---|---|
| Team 1(3-5 People. No more to prevent scaling) |
|
|
| Team 2 (at least 10 people, more is OK) |
|
|
| Team 3 (at least 10 people, more is OK) |
|
|
| Team 4 (at least 10 people, more is OK) |
|
|
| Team 5 (3-5 People. No more to prevent scaling) |
|
|
| Team 6 (at least 10 people, more is OK) |
|
|
Dry Top Chat[edit]
Can be pasted into chat window
Events Schedule Chat Codes[edit]
Modified from: http://www.reddit.com/r/Guildwars2/comments/2auf8b/updated_dry_top_events_timer_with_positions_and/
- xx:00 *Tendril A[&BHMHAAA=],*Tendril B[&BIYHAAA=],*Race[&BHIHAAA=],CrashVictims[&BIwHAAA=],Shaman [&BIsHAAA=],Moa [&BHYHAAA=],Thieves[&BJcHAAA=],Rustbucket[&BJYHAAA=]
- xx:05 Serene[&BHUHAAA=],LightGolem[&BIMHAAA=],InquestLeader[&BIwHAAA=],VineBridge [&BIkHAAA=],FrogSpar[&BHkHAAA=],Colocal[&BHwHAAA=],S.Mine[&BHsHAAA=],Beetles[&BJcHAAA=]
- xx:10 *Basket(1-2 people only)[&BHUHAAA=], Town [&BH4HAAA=],*N.Mine Rescue/Escort [&BH0HAAA=], Ley Line [&BIMHAAA=],AspectSuit[&BJMHAAA=]
- xx:15 *Tendril A[&BHMHAAA=],*Tendril B[&BIYHAAA=],*Race[&BHIHAAA=],CrashVictims[&BIwHAAA=],Shaman[&BIsHAAA=],Moa[&BHYHAAA=],Thieves[&BJcHAAA=],Rustbucket[&BJYHAAA=]
- xx:20 Serene[&BHUHAAA=],LightGolem[&BIMHAAA=],InquestLeader[&BIwHAAA=],VineBridge[&BIkHAAA=],FrogSpar[&BHkHAAA=],Colocal[&BHwHAAA=],S.Mine[&BHsHAAA=],Beetles[&BJcHAAA=]
- xx:25 *Basket(1-2 people only)[&BHUHAAA=],Town[&BH4HAAA=],*N.MineRescue/Escort [&BH0HAAA=],LeyLine[&BIMHAAA=],AspectSuit[&BJMHAAA=]
- xx:30 *Tendril A[&BHMHAAA=],*Tendril B[&BIYHAAA=],Shaman[&BIsHAAA=],*Race [&BHIHAAA=],CrashVictims[&BIwHAAA=],Moa[&BHYHAAA=],Rustbucket[&BJYHAAA=]
- xx:35 Serene[&BHUHAAA=], LightGolem[&BIMHAAA=],InquestLeader[&BIwHAAA=],FrogSpar[&BHkHAAA=],Colocal[&BHwHAAA=], S. Mine [&BHsHAAA=],Beetles[&BJcHAAA=]
- xx:40 CullMites[&BHUHAAA=],Haze[&BHIHAAA=],Stop Skritt[&BI4HAAA=][&BIkHAAA=][&BIwHAAA=][&BIgHAAA=],SkrittBurglar(call chest location),CaveIn[&BH4HAAA=],Eway[&BJcHAAA=],Giant[&BIwHAAA=]
- xx:45 Devourer Queen ground level under [&BHkHAAA=]
- xx:50 CullMites[&BHUHAAA=],Haze[&BHIHAAA=],DMTwister[&BHoHAAA=],SkrittQueen[&BIoHAAA=],StopSkritt[&BI4HAAA=][&BIkHAAA=][&BIwHAAA=][&BIgHAAA=],CaveIn[&BH4HAAA=],Chickenado[&BI4HAAA=],Eway[&BJcHAAA=]
- xx:55 Dust Monster[&BHoHAAA=](south from WP)
Other Chat[edit]
- Pasteable Event List (one shown above), event tips, and suggested assignments for Dry Top Tier 6 are in the wiki at 'Favor of the Zephyrites' talk page, 'How to Get Tier 6' section.
- Max Geodes: CullDustMites->CaveIn->Haze->Devourer->CullDustMites->CaveIn->Haze->DMTwister->SkrittQueen->Chickenado. For CaveIn just do 1 explosion to allow others to gain
- Max Geodes(xx:40): CullDustMites->CaveIn->Haze->SkrittBurglar->Devourer->Stop Skritt->For CaveIn just do 1 hit & allow others to gain
- Max Geodes(xx:50): CullDustMites->Dust Monster->CaveIn->Haze->DMTwister->Chickenado->Stop Skritt->Giant Beetle
- Cull Dust Mites event (times xx:40, xx:50) on my tag. Many players present at start==more dust mites==more drops.
- Cull Dust Mites event (times xx:40, xx:50) on way to [&BHUHAAA=] before lightning crystal. Many players present at start==more dust mites==more drops.
- Stack and concentrate DPS => More dust mites appear => more loot
- If you see "Chest" not "Buried Locked Chest" call out its location and let others get close. Then open and hit Skritt Burglar once for credit & let others get 1 hit too.
- Fight outside of ring so shaman will cleanse more quickly.
- Kill small tendrils first for extra Favor of the Zephyrites (also, big one will respawn).
Jump Puzzle Chat[edit]
Chat Link Map Codes Jump Puzzle
Ascalon[edit]
- Plains of Ashford
- Loreclaw Expanse, southeast.
- Porting to end of Loreclaw Expanse jump puzzle. PM/Join squad and come to me East of [&BMcDAAA=]
- Running Loreclaw Expanse jump puzzle. PM/Join squad come to me Southeast of [&BMcDAAA=]
- Loreclaw Expanse, southeast.
- Diessa Plateau
- Crimson Plateau, rock structure south of Redreave Mill waypoint, southeast corner of it.
- Porting to end of Crimson Plateau jump puzzle. South side of the hill South of [&BMYDAAA=]. PM/Party me and come to my personal waypoint. Tiger Den above chest -- see 'Spirit of the Tiger (achievement)' in wiki.
- Grendich Gamble, just north of The Blasted Moors waypoint. This ends with a Rich Silver Vein, no chest.
- Wall Breach Blitz, southwest of the Breached Wall waypoint (part of nearby vista). This ends with a Skill Challenge, no chest.
- Crimson Plateau, rock structure south of Redreave Mill waypoint, southeast corner of it.
- Fields of Ruin
- Branded Mine southwest of Varim's Run.
- Porting to end of Branded Mine jump puzzle. PM/Party and go to [&BNcAAAA=] then West then South to cave entrance on West side of path then further West.
- Branded Mine southwest of Varim's Run.
- Blazeridge Steppes
- Behem Gauntlet, behind the spider cave east of Behem Waypoint.
- Porting to end of Behem Gauntlet jumping puzzle. Come to [&BP0BAAA=] and be prepared to run East quickly
- Craze's Folly, northeast of the Terra Carorunda Waypoint.
- Running/Teaching Craze's Folly jumping puzzle. PM/Party me and come to Heart Northeast of [&BAECAAA=] if you want to do puzzle.
- Porting to end of Craze's Folly jumping puzzle. PM/Party me and come to below tag North of heart near [&BAECAAA=].
- Behem Gauntlet, behind the spider cave east of Behem Waypoint.
- Iron Marches
- Chaos Crystal Cavern, just west of Old Piken Ruins Waypoint
- Porting to end of Chaos Crystal Cavern jump puzzle. PM/Party me and come to my personal waypoint Northwest of [&BOQBAAA=].
- Chaos Crystal Cavern, just west of Old Piken Ruins Waypoint
- Fireheart Rise
- Pig Iron Quarry is northeast of Severed Breach Waypoint on top of the island
- Porting to end of Pig Iron Quarryjump puzzle. PM/Party me and come to me East of
- Pig Iron Quarry is northeast of Severed Breach Waypoint on top of the island
Kryta[edit]
- Lion's Arch
- Troll's Revenge Start off at the Fort Marriner waypoint, run along the bridge until you reach the last archway on the right side. The jumping puzzle starts after jumping over the barrels to the wooden planks on the left. (G)
- Running the Troll's Revenge Jump puzzle with bunny & griffon takes 2 minutes. Starting from NE of [&BN4GAAA=]. PM/join on Tag.
- Urmaug's Secret in the northeast, starting behind Urmaug. (G)
- Weyandt's Revenge in the Sharkmaw Caverns, starting behind Tokk's Mill.
- Running the Weyant's Revenge (Sharkmaw) jump puzzle. PM/party me and come towards me South from [&BDMEAAA=]
- Porting to end of Weyant's Revenge (Sharkmaw) jump puzzle. PM/party me and come towards me South from [&BDMEAAA=]
- Troll's Revenge Start off at the Fort Marriner waypoint, run along the bridge until you reach the last archway on the right side. The jumping puzzle starts after jumping over the barrels to the wooden planks on the left. (G)
- Queensdale
- Demongrub Pits, southeast
- Running the 3 small loots and the end chest in the Demongrub Pits jumping puzzle. PM me and join tag near [&BIwAAAA=].
- Gliding
- Demongrub Pits, southeast
- Kessex Hills
- The Collapsed Observatory, southeast
- Gendarran Fields
- Swashbuckler's Cove, roughly south of [&BHoAAAA=].
- Porting to end of Chest of 'Swashbuckler's Cove' jumping puzzle. Join squad & come south of [&BHoAAAA=].
- Not So Secret, Follow the noises south of Broadhollow Waypoint to a mechanical jump pad.
- Porting to End Chest in 'Not So Secret' jumping puzzle. Join squad & come to [&BOEAAAA=] Waypoint and head WSW (~255°R) to the notch in the hillside. If inside, get under chest for port.
- Legendary collections for Astralaria III & Predator I have items here.
- Porting to Dive Platform in 'Not So Secret' jumping puzzle. Join squad & come into jump puzzle and wait under the airship on ground near target pool.
- If anyone wants to use one of their [&AgHQBgEA] to get to the Dive Platform in 'Not So Secret' jumping puzzle join on my squad.
- Legendary collections for Sunrise III (Illusory Light - down one platform, drop to platform with 4 wavy beams) & Bolt III (Secretly Overcharged Quartz - Drop down 2 platforms, use Energy Conflux there) have collection items that can be reached from here.
- Don't move after the port - I will talk you through the dive.
- Stand exactly where I am.
- Stay at this spot. I am going to move, but you stay here.
- Go to first person view. (F11: General Options: Enable First-Person Camera) & zoom all the way in.)
- Move your point of view so the top center of the health orb is on the blue square I am standing on.
- Ensure no swiftness trait/skill/boost in effect.
- Put on goggles and press V to dodge backwards. (V is default you may have changed it)
- This dive is part of the Dive Master Achievement (Kryta #8). There are 37 other dives -- most much easier)
- Porting to End Chest in 'Not So Secret' jumping puzzle. Join squad & come to [&BOEAAAA=] Waypoint and head WSW (~255°R) to the notch in the hillside. If inside, get under chest for port.
- Swashbuckler's Cove, roughly south of [&BHoAAAA=].
- Harathi Hinterlands
- Porting to End Chest in Fawcett's Bounty jumping puzzle. Join squad & and come to [&BLIAAAA=] Waypoint.
- Fawcett's Bounty, north of Arca Lake (if you fall into a pit near the start, you will earn the Fawcett's Revenge achievement).
- Bloodtide Coast
- Professor Portmatt's Lab is just west of Sorrowful Waypoint underwater, has an underwater entrance
- Southsun Cove
- Skipping Stones, in the cave south of Lion Point Waypoint. (NG)
- Porting to Skipping Stones Jump Puzzle chest; also Champ(3+ to kill), Tiger Den & small chest. PM/Party me and come way West from: [&BNAGAAA=]; _ Blooming Passiflora.
- Tiger Den here -- see 'Spirit of the Tiger (achievement)' in wiki. _ Blooming Passiflora here.
- Under New Management, east of Pearl Islet Waypoint
- Skipping Stones, in the cave south of Lion Point Waypoint. (NG)

Heart of Maguuma[edit]
- Verdant Brink
- Verdant Brink Insight: Canopy Over Pact Encampment, in the canopy near Matriarch's Perch.
- Auric Basin
- Egg Bearer, in the Inner Chamber of Tarir.
- Highest Gear, just past the Ancient Golem Part Hero Point.
- Tangled Depths
- Disco Dancing Delver, underneath The Great Tree, accessible through the underwater tunnels. (no chest, but the achievement requires reaching the top)
- Master Mushroom Spelunker, starting at Rata Novus Command Center, jump/glide through the wall from the stairs to mushroom area far below.
- Porting to Master Mushroom Spelunker mini jump puzzle end chest. PM/party me and come to mushroom area below [&BNoHAAA=] by Mushroom Queen HP.
Maguuma Jungle[edit]
- Caledon Forest
- Dark Reverie, just behind Morgan's Leap inside the Dreamdark Enclave. (NG)
- Porting to end of Dark Reverie jump puzzle. PM/party me and come to North of me by running West, North, West from [&BDUBAAA=]. Tiger Den below JP chest -- type: /wiki Spirit of the Tiger (achievement)
- Tiger den on ledge below me next to the right wall.
- Morgan's Leap, at the Morgan's Spiral skill point. (G)
- Porting to end of Morgan's Leap jump puzzle. PM/party me and come to me at [&BDUBAAA=]
- Spekks's Laboratory, (Lava filled) In Sandycove Beach, follow the river west from Bay Haven to its source. (G)
- Porting to end of Spekks's Laboratory jump puzzle. PM/party me and come towards me due west of [&BDgBAAA=] to cave at end of river.
- Spelunker's Delve, South of the Point of Interest Danador's Kennel. Follow the road south through the level 3 Jungle Trolls.
- Porting to end of Spelunker's Delve jump puzzle. PM me and come to Southeast corner of map.
- Unfinished Jumping Puzzle
- Porting to the start of the unfinished jumping puzzle. PM/Party me and come to the squad marker (red cross) south of [&BDsBAAA=].
- Dark Reverie, just behind Morgan's Leap inside the Dreamdark Enclave. (NG)
- Metrica Province
- Goemm's Lab, is south of the Cuatl Waypoint, hidden by trees; entrance between rocks. (G)
- Porting to end of Goemm's Lab jump puzzle & Mad Cache Aetherblade achieve chest. PM/party me and come SW towards me from [&BLIEAAA=]
- Goemm's Lab, is south of the Cuatl Waypoint, hidden by trees; entrance between rocks. (G)
- Mount Maelstrom
- Conundrum Cubed, through a small passage directly north of the Govoran Waypoint. (G)
- Hidden Garden, accessed through mysterious portal, after killing one of four "keepers"
- Defeat a keeper (15 min respawn) & use the portal that opens. Earth [&BMkCAAA=]>SE to fork; Light [&BM8CAAA=]>N to rock pair; Water [&BJEGAAA=]>W to pond; Wind [&BLsCAAA=]>NE>E of Heart.
- Porting into Hidden Garden Jump Puzzle. Join squad. WP to [&BNQCAAA=] then run to Swirl squad marker E of [&BMICAAA=] and SE of [&BL0CAAA=].
- Stay on tag if you want help with jumping puzzle (collecting 4 elemental cantles).
- Cluster of Earth->Cantle of Earth (Under Tree); Cluster of Waves->Cantle of Sea (South Cliff); Cluster of Winds->Cantle of Sky (North Cliff); Cluster of Light->Cantle of Sun (Top of tree)
- Sparkfly Fen
- Hexfoundry Unhinged, southeast
- Porting to Hexfoundry Unhinged jumping puzzle. PM me and come to POI SE of [&BM0BAAA=].
- Starting Hexfoundry Unhinged jumping puzzle from southeast of [&BM0BAAA=]. PM and come to the waypoint if you want to do the jumping puzzle. (G)
- Hexfoundry Unhinged, southeast
Maguuma Wastes[edit]
- Dry Top
- Prospect Valley Crash Site, at the center of Crash Site.
- Porting to end of Dry Top jumping puzzle. PM/Party me if you want to get it.
- Porting to Dive Platform at end of jumping puzzle. PM/Party me. Put your personal waypoint in the pool then come to ladder at start of jump puzzle near hero point.
- If you are trying to get the dive put your personal waypoint in the pool so you have something to aim at.
- To the West is a beam with a long rag hanging from it.
- Follow that beam to the left to where it makes a V with another beam. You will be jumping over that V.
- Apply speed boost. Put on goggles. Run to west, crossing over the beam. Keep forward motion to west to clear the ledge.
- As soon as you clear the ledge, turn a left to a bit East of due South aiming at the pool where you left your waypoint.
- Go when ready. Good Luck.
- Prospect Valley Crash Site, at the center of Crash Site.
- The Silverwastes
- Go for the Gold' badge pickup order (25 min with Skyscale, 60+ walking)
- 24 25 26 24 25 > (Skyscale Up) > 26 23 (Hard)
- 06 07 22 23 Ship 07 22 06 23 (Easy)!
- 30 04 09 [1] 30 (on tower) 04 (in hole) 09 (on path)
- 01 02 03 [2] 03 (underground) 02 (just outside) 01 (outside north)
- {Can enter from Camp Resolve)
- 17 27 [3] 17 (next to MS 3) 27 (Hard) (Chest) 27 (Easy - above)
- {Can enter from Central Silverwastes)
- 28 29 [4] 28 (off path above ground) 29 (off path underground)
- 05 21 [5] 05 (Hard) 05 (Easy-above chest) (Grand Chest) 21 (below chest)
- 18 19 20 [6] 20 (glide from MS 6) 19 (wall) 18 (in cave) [POI]
- [7] Splendid Chest
- 13 15 16 [8] 16 (in cave) 15 13 Magnificent Chest
- 08 14 [9] 14 08
- 10 11 12 Dive Platform 12 10 11
- Lost Badge Pickup Order from [Camp Resolve Waypoint] Clockwise
- 20 29 10 -- 28 24 11 -- 12 27 -- 13 30 16 -- 17 18 15 22 --
- 08 26 07 23 25 09 -- 21 05 06 14 -- 04 03 02 19 01
- Search for [ reddit 2tgy37 ] to review an excellent Silverwastes Guide
- Waypoints
- [&BLoHAAA=] Dry Dock Grotto Waypoint
- [&BH8HAAA=] Camp Resolve Waypoint
- [&BKwHAAA=] Hidden Depths Waypoint
- For LFG:
- Silverwaste MP/AP >>> helping with: Jumping Puzzle(MP/10AP), 'Go for the Gold'(MP/30AP), 'Lost Badges'(30AP), Divemaster: Drydock Scratch (5AP) achievements; Alpha Beetle
- For Map Chat/Squad Message:
- Purple tag helping with: Jumping Puzzle(MP/10AP), 'Go for the Gold'(MP/30AP), 'Lost Badges'(30AP); Divemaster: Drydock Scratch (5AP) achievements; Alpha Beetle
- Jumping Puzzle speed run. 7 min with fully trained skyscale. Start at [&BLoHAAA=] at xx:
- For Squad/Say:
- Hi. What achieve(s) do you need help with?
- Which badges do you have/need (whichever list is shorter) ?
- Need any of these achievements: 'Go for the Gold', 'Dive Master: Drydock Scratch' or 'Lost Badges' ?
- Parts of the 1st one can be done during this JP. The 2nd is at the end of the JP. I can help with the 3rd after the JP.
- Mounts/Glide not req'd, but make faster run. What is your #?: 1)Fully Trained Skyscale 2)High Jump Bunny & Griffon 3)Bunny & Gliding 4)Bunny 5)Gliding 6)Walk
- There are 4 chests along the way. Getting them will add a few minutes to the trip. Skip or not?
- At each [&BmFmAAA=] I will call out its number (first is not numbered). Verify your [&BmFmAAA=] buff has incremented and type that number into chat.
- If [&BmFmAAA=] was not incremented, dismount & run back 50 feet then run to the flag.
- In Puzzle
- Talk to this skritt for background
- [Do ready check]
- This is first [&BmFmAAA=] flag. It shows on buffbar without a number in it.
- Take Portal, get badge, take portal back
- Glide to 19
- Anyone need POI
- Bunny/Skyscale up to top of cliff.
- At Chest
- Try to open chest then search rubble piles for Key Parts - DO NOT USE SKRITT HOLE
- Collect [&AgHtCQEA][&AgHsCQEA][&AgHuCQEA]
- Open chest again -- you should get a Patchwork Knapsack as a drop from chest
- Do you need achieve: Dive Master: Drydock Scratch ? It starts close to here.
- Don't jump yet. You have to miss the ship and gangway then steer to drop into the tiny triangular pool far below. Follow me down.
- Alpha Beetle
- No mordrem events in Northern SW
- In Northwest corner of Northern SW, kill the 'Giant Beetle' surrounded by the tiny beetles 2 or 3 times (respawns in about 2 min).
- After each kill check if the alpha beetle spawned in teh west Half of SW. Usually spawns in NW corner, but not always.
- Event name is 'Kill the Alpha Beetle' but the beetle name is 'Champion Giant Spotted Beetle'
Ruins of Orr[edit]
- Straits of Devastation
- Vizier's Tower, on the island directly east of the Lone Post Waypoint. This ends with a Skill Challenge, a Vista, and, if it's not on cooldown, an Orrian Chest that can be triggered to activate an event that spawns a Grand Chest.
- Malchor's Leap
- Antre of Adjournment, a tunnel in the water north of the bridge directly east of the Valley of Lyss Waypoint.
- Porting to end chest for Antre of Adjournment jumping puzzle. Entrance is East of [&BKoCAAA=] in the water. PM/Join. Don't move till portal clears. Get some small chests on way down.
- Scavenger's Chasm, south of the map near Hope Falls Point of interest you can drop down to a Mithril Ore.
- Running Scavenger's Chasm jump puzzle (using Springer) in 5 minutes. Join Squad and come to me Southwest of [&BKYCAAA=]
- If you are following me for jumping puzzle, please join squad.
- I will mark each orb and put its number in squad chat. Use the Squad ready function to indicate that you have gotten each orb.
- Many holes in the floor. Be careful.
- Hug the walls easy to slip here.
- Antre of Adjournment, a tunnel in the water north of the bridge directly east of the Valley of Lyss Waypoint.
- Cursed Shore
- Buried Archives, on the west shore of Mausollus Sea, about midway between the Cathedral of Silence and Mausollus Sea.
- Anyone that wants to complete the Buried Archives jump puzzle PM/party me, come to [&BOQGAAA=], and swim west towards the vista.
- Buried Archives, on the west shore of Mausollus Sea, about midway between the Cathedral of Silence and Mausollus Sea.
Shiverpeak Mountains[edit]
- Wayfarer Foothills
- Shaman's Rookery, north of The Osenfold Shear
- Porting to end of Shaman's Rookery jumping puzzle. PM/Party me and come North of [&BAEEAAA=].
- Shaman's Rookery, north of The Osenfold Shear
- Snowden Drifts
- King Jalis's Refuge, central east area
- Porting to end of King Jalis's Refuge Jump Puzzle. PM/Party me and come to cave due south of [&BLUAAAA=] East of 'Villmark Foothils' on map.
- King Jalis's Refuge, central east area
- Lornar's Pass
- Griffonrook Run, southwest of False Lake waypoint. Entrance is in the water South of the waypoint - look for the purple glow to the right of the wooden house ruins
- Dredgehaunt Cliffs
- Tribulation Rift Scaffolding, southwest corner at the Vista
- Porting to end of Tribulation Rift Scaffolding jump puzzle. PM/Party me & come to [&BPMEAAA=].
- Running Tribulation Rift Scaffolding & Tribulation Caverns jump puzzles (needed for step 11 of Chuka and Champawat I: The Hunt). PM/Join me and meet near [&BPMEAAA=].
- Tribulation Caverns after Tribulation Rift Scaffolding a cleft west of the Vista
- Porting to end of Tribulation Caverns jump puzzle. PM/Party me & come to dungeon entrance west of [&BD8FAAA=].
- Tribulation Rift Scaffolding, southwest corner at the Vista
- Timberline Falls
- Coddler's Cove, inside Mellagan's Grotto: the entrance starts directly south of the Okarinoo POI.
- Porting to end of Coddler's Cove jump puzzle. PM/Party me and come to the entrance directly south of [&BDgCAAA=].
- Porting to end of Coddler's Cove jump puzzle. PM/Party me and come to .
- Only Zuhl, north of the Foundation 86 Waypoint.
- Running Only Zuhl jump puzzle in 2 minutes. PM/Party me and come to [&BE4CAAA=].
- Join green tag and come into mines east of [&BFMCAAA=] for port near to end of Only Zuhl jump puzzle (a back entrance).
- Boss killed. Chest opens for 3 minutes. Boss respawns 3-6 minutes after chest closes. Can loot chest each time boss dies.
- Boss respawn Time Data: 3,4)
- Boss killed. Chest opens for 3 minutes. Boss respawns 3-6 minutes after chest closes. Can loot chest each time boss dies.
- Coddler's Cove, inside Mellagan's Grotto: the entrance starts directly south of the Okarinoo POI.
- Frostgorge Sound
- Shattered Ice Ruins, east of the Ice Floe waypoint starting underwater.
- Porting to end of Shattered Ice Ruins jump puzzle. PM/Party me and come to me/my tag due west of [&BHwCAAA=] in water.
- Shattered Ice Ruins, east of the Ice Floe waypoint starting underwater.
Living Story[edit]
- Searing Ascent , 3 checkpoints are used to make traversing the puzzle safer. Not required to get credit/end chest.
- Checkpoints not required for credit/chest at end of 'Searing Ascent' jumping puzzle. Join squad above [&BL0JAAA=] & P2F.
Treasure Hunter Events[edit]
| Item | Type | Trading post | |
|---|---|---|---|
| Buy | Sell | ||
 Rhendak's Signet Rhendak's Signet |
Ring | … | … |
| Amulet | … | … | |
 Pendant of Arah Pendant of Arah |
Amulet | … | … |
 Ulgoth's Tail Ulgoth's Tail |
Accessory | … | … |
 Commissar's Manifesto Commissar's Manifesto |
Accessory | … | … |
 Rotbeard's Treasure Rotbeard's Treasure |
Accessory | … | … |
 Sam Sam |
Accessory | … | … |
Rhendak[edit]
- Porting to Rhendak. Come to [&BNwAAAA=], wait at waypoint, then PM/shout when you are there.
- The prizes here are [&AgE5mgAA] -- worth about 125 gold -- and [&AgF0BgEA] (Account Bound); both are Treasure Hunter collection items.
- Rhendak's Signet (#31); Chalice of Rhendak (#34)
- Chest resets 10 min after Rhendak last defeated.
- This is end of event chain called 'Flame Legion Battles' which starts near [&BNsAAAA=].
- There is a small chest immediately outside of gate to left. You can open gate, loot chest, and get back in.
- Porting to Rhendak. Come to [&BNwAAAA=], wait at waypoint, then PM/shout when you are there.
Ulgoth[edit]
Ogre Wars[edit]
- Prize is Sam
- Ogre Wars in Progress
- Ogre Wars Boss Phase in progress
Dredge Commissar[edit]
- 20 minute timer
Rotbeard[edit]
- 35 minute timer
Temple of Lyssa 1 [edit]
Temple of Lyssa 2[edit]
Pendant of Arah[edit]
- Doing precursor events for event chain that gives a (slight) chance for [&AgEzmgAA]
- Precursor events for event chain that gives a (slight) chance for [&AgEzmgAA] are finished. Event will continue at time xx:__ in swamp east of [&BPgCAAA=].
- Squad Message: Doing event chain that gives a (slight) chance for [&AgEzmgAA]
- Waiting for NPC to arrive to start event chain with chance for [&AgEzmgAA]
- Waiting to continue event chain with chance for [&AgEzmgAA] in swamp East of [&BPgCAAA=]. Est continue by xx:xx server time.
- Waiting for Nallandra to show and the anti-air cannon to be vulnerable.
- Event with chance for [&AgEzmgAA] in progress East of [&BPgCAAA=] en route to Zho'qafa Catacombs.
- Heroes banner at East entrance to Zho'qafa Catacombs (West of [&BPgCAAA=]).
- Event with chance for [&AgEzmgAA] in progress West of [&BPgCAAA=] in Zho'qafa Catacombs.
- Eye is invulnerable for ~15 seconds after it appears. Don't waste attacks, wait until its 'Determined' buff goes away. BunnyBomb as opening attack.
- Finishing escort so event chain can reset. It will restart 10 min after escort done.
- [&AgEzmgAA] event chain done. Can be restarted in 8 min, SE of [&BOcCAAA=]. See wiki (Zho'qafa Catacombs (event chain)) for details.
| # | Event | Time Until Next | Status Clues |
|---|---|---|---|
| 0 | Tactician Zynka lands @0, 7.5 minutes after the previous chain completed. While invisible Zynka goes to the large catacomb chamber (@1). Use mounts or get hung up on enemies Zynka passes |
0 | Exit Open, No AA Gun, Zynka & Coffins in catacombs, No Nallandra/Fallen Ally in swamp. |
| 1 | Destroy Orrian coffins with Pact flamethrowers or your weapons. Coffins are near @1 and @2. If soloing, be careful with AOE, do not open all coffins at once. | 0 | Exit Open, No AA Gun, No Nallandra/Fallen Ally in swamp. |
| 2 | Kill the Risen wraith which appears @2 as soon as coffins are gone. | 0 to 1 min | Exit Open, No AA Gun, No Nallandra/Fallen Ally in swamp. |
| 3 | Kill the Risen noble in the catacombs which appears @3 | 0 | Exit Open, No AA Gun, No Nallandra/Fallen Ally in swamp. |
| 4 | Kill the Risen abomination at the catacombs exit @4 | 22-25 min | Gun Appears @5, cannot be targeted`1, No Nallandra/Fallen Ally in swamp. |
| 5 | Destroy the Risen anti-aircraft gun so Nallandra can signal her team to land | 0 to 1 min | Gun becomes vulnerable & Nallandra appears. If no players help she will quickly become "Fallen Ally". |
| 6 | Escort Warmaster Leddron and his team to Zho'qafa Catacombs | 30 sec | Gun Down, Exit closed, Nallandra/Fallen Ally in swamp. |
| 7 | Defend the Pact team as they search Zho'qafa Catacombs for artifacts. Fights along the way with short 2-3 min stops @3 & @2. | 0 | Gun gone, Exit closed, Nallandra/Fallen Ally in swamp. |
| 8 | Destroy the Eye of Zhaitan | 0 | Gun gone, Exit closed, Nallandra/Fallen Ally in swamp. |
| 9 | Escort Warmaster Leddron and his team to the extraction point (@9). Several fights along the way | 30 sec | Gun gone, Exit opened during this event, Nallandra/Fallen Ally in swamp until helo departs. |


Other Events[edit]
Home Instance Farm[edit]
- Nearly full home instance. Going in in 1 min. 4 spots left. Join or PM. Banner at entrance.
- Nearly full home instance. Going in in 1 min. 2 spots left. Join or PM. Banner at entrance.
- The other Separ toons are my alt accounts. Party chat if you want to get my attention.
Vexa's Lab MiniDungeon[edit]
- Anyone else need Vexa's Lab mini dungeon? PM/Party me and come Southeast from [&BCYCAAA=]
- Bolt III, Vexing Cache (Aetherblade Chest) achieve
- 10 minutes reset after Vexa leaves.
- Jump on edges of hexagons - centers can disappear.
- The little robots can knock you off from about 6 feet away. Avoid them.
- Escher Room Choices South/Down - N/W
- Anyone else need Vexa's Lab mini dungeon? PM/Party me and come Southeast from [&BCYCAAA=]
Giant Kills[edit]
- PM/Party for a few Giant kills - meet SW of [&BHYAAAA=] in the Toxal bog South of [&BFoAAAA=] for the Broken Golem event.
Open Augury Rock[edit]
- The Path to Ascension
- doing 'Open Augury Rock' event chain.
- Augury Rock is open -- come and help kill Josso Esshur
- Augury Rock is open, Josso Esshur dead. Flameseeker Prophecies are here!
- Ghostly Trio event starting when Augury Rock closes. Follow the ghosts' icon on your minimap stating from the West end of Augury Rock.
Temple of Balthazar[edit]
Caffeinated Skritt[edit]
- Caffeinated Skritt chest on tag. Will open when at least 5 present up (or when someone comes by and opens it unexpectedly).
- Most beneficial for those working on a PoF Elite Specialization Collections achievement.
- Don't open chest yet - waiting for more that need Caffeinated Skritt loot.
- CC (BunnyBomb/EMP/WarclawLance) after she starts moving (not as soon as she appears). Stay out of coffee stains - very toxic.
- If transformed, use the cubs speed to run ahead of her.
- Caffeinated Skritt loot present for 3 minutes/Coffee for 5 min on tag. Loot gives profession specialization weapon collection drop. Can be used by multiple toons on the same account.
- Skritt loot gone. Skritt chest will respawn in about 7 minutes.
Forsaken Fortune[edit]
Map Chat: Forsaken Fortune event chain will be able to be started at about xx:
- Entrance is big door West of [&BGUCAAA=]
- 15-19 minutes after the outer door closes from last event a note will appear on the Sealed Dwarven Door West of [&BGUCAAA=].
- Forsaken Fortune can restart about xx:xx
- When note appears read it and talk to Gerrvid at [&BDICAAA=] to start him moving.
- Read his three books and talk to him again. Escort to Sealed Dwarven Door.
- Gerrvid opens door
- Take torch to prevent skelk attack, watch for spike traps, falling rock puts out torch.
- Start escort in spike trap room (to sealed door). About 1:30 min) 3 min min till door is opened
- Collect Rubble, sealed door opens
- Escort Gerrvid to sealed door in dark maze room (a
- Find and pull 4 chains
- Kill Veteran Fleshgrazer in first (spike trap) room
- 00:00 VF collapses near chest
- 02:20 Gervid exits
- 04:00 Outer Door Closes
- 05:00 Folks ejected
- 15:00 -0/+3 Note appears (VF+ 18:44/16:50/15:50)
- Can get credit until shortly after kill.
Wintersday Orphan Run[edit]
- Doing Orphan Run in 5 minutes - Get your 30 wrapped gifts from merchants near green tag SW of [&BCwDAAA=]
- Orphan Run. Get Karma boosts & 30 Wrapped Gifts. Let me know if you DO NOT have gliding & Raptor mount.
Boss Blitz[edit]
Is this an organized map that splits into 6 squads & coordinates burndown?
Mark wedges as outlined in Squad Message
- -------------------------- Squad Message ---------------------------
1 Lobby
2 (NE) Sparcus Arrow
3 (E ) Boom Circle
4 (SE) Hablion Heart
5 (SW) Pyroxis Square
6 (W ) Wiggan Star
7 (NW) Kurai Spiral
Move to even out groups. Call out 25% dmg. Call & hold at 10%. When all at 10% kill. Waypoint to center.
- -------------------------- Map Chat ---------------------------
- Before Start (
- 6 groups of 7-12, call every 25% dmg, hold @10% till all others @10% then burn, Waypoint & DO NOT HELP OTHER GROUPS. If you can see boss health % you are scaling up that boss
Squad 1 - Read squad message and move to squad for boss you want to fight
- During
Please join squad & move to a sub-squad as outlined in the squad message.
- X at 75%
- X at 10% and holding
Review this entry in the wiki for a proven method to get gold reward: 'Boss Blitz! Defeat all the champions in the Queen's Pavilion'
Silverwastes[edit]
Legendaries[edit]


 The Tormentor Platinum attacks Blue Oasis
- The Annihilator Copper attacks Red Rock
- The Executioner Iron attacks Amber
- The Demolisher Gold & Silver attack Indigo
- The Be-All and the End-All
Lost Badges[edit]
Retrospective Runaround (Jumping Puzzle)[edit]
Go For The Gold (Lost Golden Badges)[edit]
- East of Dry Dock Scratch Waypoint: 23, 24, 25, 26 (23 difficult, 24 very difficult...use Springer)
- Inside ship: 6, 7
- West of Ship: 22, 30
- Inside the jumping puzzle: 23, [1], 4*, 9, [2], 3, 2, 1, [3], 17, 27, (Chest), [4], 28, 29, [5], 5, (Grand Chest), 21*, 20*, [6], 19*, 18*, [7], (Splendid Chest), [8], 16, 15, 13, (Magnificent Chest)*, [9], 14, 8, (Magnificent Chest)**, (Dive)
- Far Silverwastes: 10, 11, 12
Ambrite Weapon Crafting[edit]
| Hand | Type | Name | Preview | Recipe | Crafted |
|---|---|---|---|---|---|
| One-handed | |||||
| Main Hand | Axe |  Lepidoptera Lepidoptera |
R | C | |
| Dagger |  Blattodea Blattodea |
R | C | ||
| Mace |  Blattellidae Blattellidae |
R | C | ||
| Pistol |  Apidae Apidae |
R | C | ||
| Scepter |  Latrodectus Latrodectus |
R | C | ||
| Sword |  Cryptopidae Cryptopidae |
R | C | ||
| Off hand | Focus |  Spirobolidae Spirobolidae |
R | C | |
| Shield |  Coleoptera Coleoptera |
R | C | ||
| Torch |  Lampyridae Lampyridae |
R | C | ||
| Warhorn |  Orthoptera Orthoptera |
R | C | ||
| Two-handed | |||||
| Terrestrial | Greatsword |  Scorpiones Scorpiones |
R | C | |
| Hammer |  Diptera Diptera |
R | C | ||
| Longbow |  Odonata Odonata |
R | C | ||
| Rifle |  Mantodea Mantodea |
R | C | ||
| Short Bow |  Culicidae Culicidae |
R | C | ||
| Staff |  Hymenoptera Hymenoptera |
R | C | ||
Caledon Forest Unfinished Jumping Puzzle[edit]
This abandoned project is still worth looking at for the interesting scenery and partially working puzzle it contains.
Access was reasonably easy prior to addition of mounts; since then it has been made more difficult. I currently (2021-08-26) have a character in the puzzle; send an in-game message (Rothgare Ablewise.9046) if you want to visit it.
Google Search for Caledon Forest Unfinished Jumping returns several videos of the puzzle as well as many discussion posts.

Map Interface[edit]
Party Tools[edit]
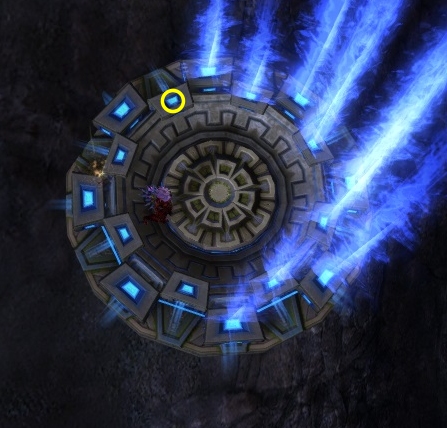
Add Permanent Map Symbol[edit]
- (Left-ALT+Left-click to add a personal waypoint, a single, permanent marker (white star) that is visible to others in the party as a blue star. What you see:
 , what party members see:
  When you mouseover another party-member's personal waypoint a popup displays the character's name and your distance from the waypoint.
| Your Waypoint | Party Member Waypoint |
|---|---|

|

|
Your personal waypoint can be moved by repeating the above key-mouse combination in a new location or removed with a Left-click at the waypoint's current position. It will remain in its place until moved or removed even between map changes or gaming sessions. It is character-based, each character on an account may have a different one.
Draw Temporary Lines with Cursor[edit]
- (Left-SHIFT+Right-click) on the compass or (SHIFT+Right-click) on the map then drag the mouse to draw temporary lines at the cursor.
Add Temporary Map Symbols[edit]
- (Left-SHIFT+Left-click) on the compass or (SHIFT+Left-click) on the map displays a radial interface that allows you to place one of 5 short-lived markers at the cursor.

| Radial Position | Description | Audible Tone, Visual Ping Pattern |
|---|---|---|
| Center | Red Dot Octagon | Low Tone, 3 slow expanding red circles |
| Top | Red Sword | Low Tone, 3 slow expanding red circles |
| Right | Blue Shield | Mid Tone, 3 fast expanding blue circles |
| Bottom | Yellow Caution | Mid Tone, 3 fast pulsating yellow circles |
| Left | Orange Circled X | Low Rumble, 3 fast expanding orange circles |
Call Target[edit]
- Call Target is a keybind ability (default: Ctrl-T or Ctrl+Left-click) that allows you to "mark" a target; ally, enemy or a structure, which creates a large red bull's-eye that hovers over the head of the target:
 floating icon over the character or object. It also displays the red dot octagon and pulsing red circles for a few seconds on the compass and map.
Alert Target[edit]
Alert Target is a keybind ability (default Shift+T) that plays a sound signal and an effect over the selected target's head that is visible to the target caller, as well as team or group members.

This floater icon appears above alive ally targets.
This floater icon appears above alive enemy targets.

This floater icon appears above downed or defeated ally targets.

This floater icon appears above downed enemy targets.


While in a group, the following messages will be displayed in the party channel of the chat panel:
- <Character Name> has targeted <Target Ally Name> for assistance. (if target is alive ally)
- <Character Name> has targeted <Target Enemy Name> for attacking. (if target is alive enemy)
- <Character Name> has targeted <Target Ally Name> for resurrection. (if target is downed or defeated ally)
- <Character Name> has targeted <Target Enemy Name> for finishing. (if target is downed enemy)
Party Chat[edit]
- Party chat ("/p") uses blue text.
Commander Tools[edit]
Map directives[edit]
ALT+Mouse1 on the main map (not mini-map) — Opens a context menu for adding special "order" icons visible to squad members (but not others). The available icons are:
 Squad Attack Order
 Squad Defend Order
 Squad Rally Order
- Personal Waypoint
Location and object markers[edit]
- Types
- Location markers create a marker and a colored pillar of light at the selected location
- Object markers create a marker that follows objects or characters
- Clear All removes all currently placed markers
- Alt + 9 — clear all location markers
- Alt + Shift + 9 — clear all object markers
| Icon | Default keybind | |||
|---|---|---|---|---|
| Location | Object | |||
| Arrow | lime | Alt + 1 | Alt + Shift + 1 | |
| Circle | purple | Alt + 2 | Alt + Shift + 2 | |
| Heart | red | Alt + 3 | Alt + Shift + 3 | |
| Square | blue | Alt + 4 | Alt + Shift + 4 | |
| Star | green | Alt + 5 | Alt + Shift + 5 | |
| Spiral | cyan | Alt + 6 | Alt + Shift + 6 | |
| Triangle | magenta | Alt + 7 | Alt + Shift + 7 | |
| X | yellow | Alt + 8 | Alt + Shift + 8 | |
Odds & Ends; Notes[edit]
Shimmering Auriora Cape Original Colors
| Royal Purple | Deep Lilac |
| Oasis | Lime Breeze |
Ascended Salvage Notes[edit]
Amulets
- Item: Stabilizing Matrices, Balls of Dark Energy; (Not showing 500 UBM for each Amulet Salvage)
7 Blood Ruby Pendants: Stabilizing Matrices: 10,0; 5,0; 20,0; 4,0; 10,0; 2,0; 3,0;
9 Coral Chokers: 3,0; 3,0; 10,0; 4,0; 2,0; 2,1; 20,1; 2,0; 4,0;
6 Coral Chokers: 3,1; 2,0; 5,0; 2,0; 3,0; 10,0
6 Fire Orchid Garland: 2,0; 4,0; 3,1; 3,0; 5,0; 3,0
Useful Bundles[edit]
2022 Profession Icons[edit]
Elementalist |
Necromancer |
Mesmer |
Ranger |
Engineer |
Thief |
Revenant |
Guardian |
Warrior | ||
Tempest |
Reaper |
Chronomancer |
Druid |
Scrapper |
Daredevil |
Herald |
Dragonhunter |
Berserker | ||
Weaver |
Scourge |
Mirage |
Soulbeast |
Holosmith |
Deadeye |
Renegade |
Firebrand |
Spellbreaker | ||
Catalyst |
Harbinger |
Virtuoso |
Untamed |
Mechanist |
Specter |
Vindicator |
Willbender |
Bladesworn |