Straits of Devastation
Straits of Devastation
20 30 12 6
- Levels
- 70 – 75
“The Straits of Devastation separate the Tyrian mainland from the dragon-corrupted wasteland that once was the human nation of Orr.
— In-game description
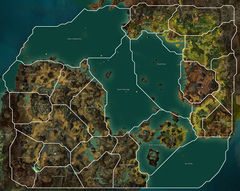
The Straits of Devastation is a high level zone in the Ruins of Orr. It straddles the Tyrian Mainland and the island nation of Orr. The events in the area focus on defending Fort Trinity and capturing the Temple of Balthazar, by moving pact reinforcements further into Orr. Three separate chain events are responsible for movement of the reinforcements to Rally Waypoint. Once at least one of the reinforcements has arrived, the Pact will start to rally towards the Altar of Betrayal. This triggers another chain of events, eventually leading to the capture of the Temple, the spawn of a Glorious Chest and the appearance of the Karma-merchant Tactician Deathstrider, one of the merchants in Tyria who sells Obsidian Shards.
Getting there[edit]
- From Mount Maelstrom: South of Murkvale Waypoint — , at Gloomirk Outpost — .
- From Sparkfly Fen: South of Brackwater Waypoint —
- From Malchor's Leap: Follow the path slightly northeast of Pagga's Waypoint —
- From Lornar's Pass: After completing the The Battle of Fort Trinity story step, you can use the asura gate at Durmand Priory to travel back and forth between the two maps.
Map completed[edit]
|
Crossing the Straits of Devastation Salutations, —Tyrian Explorers Society |
Locations[edit]
Interactive map[edit]
Events[edit]
- Clear the Pact field hospital of Risen (70)
- Clear the undead from Razorslide Bivouac (70)
- Clear the undead from Lightfoot Passage cave (71)
- Defend the Pact Megalasers and destroy the Orrian bone ship (71)
- Destroy the Risen galleon ship before it offloads its entire Risen crew (71)
- Destroy the Risen rotmouths corrupting Bramble Pass (71)
- Escort the supplies to Siegemaster Denbi (71)
- Destroy the Risen krait harpoons before the Pact are forced to turn back (72)
- Escort the PAC-7000 golem along its northern supply route (71)
- Help Pact Crusader Bodil find her missing companion, Alyxx (72)
- [Group Event] Kill the champion Risen krait nimross (72)
- Help Azzan hunt down the Risen krait arcanoss before it escapes (72)
- [Group Event] Kill the Risen megalodon menacing explorers between Fort Trinity and Orr (72)
- Clear Broken Spit of the Risen sea creatures replicating themselves (73)
- Escort Captain Guida and her team back to Cadrigan's Jetty (73)
- Kill the Risen wizard patrolling the Vizier's Tower (74)
- Protect Scholar Breandan while he examines the seabed near Broken Spit (73)
- Defend Blubloop against the swarm of Risen quaggans (73)
- Defend the Pact galleon from Risen sea life (73)
- Kill the Risen Captain rampaging beneath the sea (73)
- Free the Pact krewe members trapped inside Risen clams (73)
- [Group Event] Destroy the Risen krait nimross and free the trapped Pact crew (73)
- Defeat Risen guarding the Plaza of Lost Wisdom ruins (73)
- Kill the veteran Risen Acolyte of Dwayna (73)
- [Group Event] Defeat the Risen and free Agent Raia from her broken battlesuit (74)
- [Group Event] Protect Agent Raia from Risen as she salvages her broken battlesuit (74)
- Defend Conquest Marina against the Risen (74)
- Destroy the Risen catapults on Snipe Hill (74)
- Kill the veteran Risen Acolyte of Balthazar (74)
- Defend Agent Kurzz while he repairs the downed helicopter (74)
- Defend the Lone Post from the Risen hordes (74)
- Escort the Pact squad to the conservatory (74)
- Help the Pact reach the graveyard outside Zaishen Antheneum (74)
- Help the Pact team and clear the graveyard of the Risen (74)
- Kill the veteran Risen Acolyte of Grenth (74)
- Kill the veteran Risen Acolyte of Lyssa (74)
- Kill the veteran Risen Acolyte of Melandru (74)
- Kill the Risen acolyte leader attempting to perform an unholy ritual (74)
- Protect the Pact as they defend Brassclaw Landing from the Risen (74)
- [Group Event] Defeat the champion (74)
- [Group Event] Defeat the champion (75)
- Defend the tank as the Pact team secures the area (75)
- Protect the Pact choppers from the Risen anti-air cannons (75)
- [Group Event] Use the Pact weapons to kill the Risen giant guarding the area near the temple of Balthazar (75)
- Destroy Orrian coffins with Pact flamethrowers (75)
- Kill the Risen wraith (75)
- Kill the Risen abomination at the catacombs exit (75)
- Kill the Risen noble in the catacombs (75)
- Destroy the Risen anti-aircraft gun so Nallandra can signal her team to land (74)
- Escort Warmaster Leddron and his team to Zho'qafa Catacombs (74)
- [Group Event] Defend the Pact team as they search Zho'qafa Catacombs for artifacts (75)
- [Group Event] Destroy the Eye of Zhaitan (75)
- [Group Event] Escort Warmaster Leddron and his team to the extraction point (75)
- [Group Event] Destroy the Eye of Zhaitan (75)
- [Group Event] Defend the Pact team as they search Zho'qafa Catacombs for artifacts (75)
- Escort Warmaster Leddron and his team to Zho'qafa Catacombs (74)
- Destroy the Risen anti-aircraft gun so Nallandra can signal her team to land (74)
- Meta Events
- Central Invasion of Orr
- Northern Invasion of Orr
- Capture Stentor Cannonade from the Risen (71)
- Success: Defend Stentor Cannonade while ballistic technicians repair the golem cannons (71)
- Success: Sink the Risen armada blocking Pact submarines off the coast of Stentor Cannonade (72)
- Success: Destroy the Risen bone ships blocking passage to Brassclaw Landing (73)
- Success: Capture Brassclaw Landing from the Risen (74)
- Success: Protect the Pact as they defend Brassclaw Landing from the Risen (74)
- Failure: Defend Pact forces until all reinforcements have arrived (73)
- Success: Capture Brassclaw Landing from the Risen (74)
- Failure: Defend Pact submarines from the Risen until all reinforcements have arrived (72)
- Success: Destroy the Risen bone ships blocking passage to Brassclaw Landing (73)
- Failure: Hold Stentor Cannonade against Risen attacks (71)
- Failure: Defend Pact forces until all reinforcements have arrived (73)
- Failure: Defend Pact forces until all reinforcements have arrived (73)
- Success: Protect the Pact as they defend Brassclaw Landing from the Risen (74)
- Failure: Defend Pact submarines from the Risen until all reinforcements have arrived (72)
- Success: Capture Brassclaw Landing from the Risen (74)
- Failure: Hold Stentor Cannonade against Risen attacks (71)
- Success: Destroy the Risen bone ships blocking passage to Brassclaw Landing (73)
- Failure: Capture Stentor Cannonade from the Risen (71)
- Success: Sink the Risen armada blocking Pact submarines off the coast of Stentor Cannonade (72)
- Success: Defend Stentor Cannonade while ballistic technicians repair the golem cannons (71)
- Capture Stentor Cannonade from the Risen (71)
- Southern Invasion of Orr
- Temple of Balthazar
- [Group Event] Escort the northern invasion Pact squad to the Pact rally point at Triumph Plaza (75)
- [Group Event] Escort the central invasion Pact squad to the Pact rally point at Triumph Plaza (75)
- [Group Event] Escort the southern invasion Pact squad to the Pact rally point at Triumph Plaza (75)
- [Group Event] Help the Pact reach the Altar of Betrayal before their morale is depleted (75)
- [Group Event] Seize the Altar of Betrayal before Pact morale can be broken (75)
- [Group Event] Defeat the Risen Priest of Balthazar before it can summon a horde of Risen (75)
- [Group Event] Help the Pact hold the Altar of Betrayal from the Risen (75)
- [Group Event] Defeat the Risen Priest of Balthazar before it can summon a horde of Risen (75)
- [Group Event] Seize the Altar of Betrayal before Pact morale can be broken (75)
- [Group Event] Help the Pact reach the Altar of Betrayal before their morale is depleted (75)
Map bonus rewards[edit]
- Primary article: Map bonus reward
Pets[edit]
- Lightfoot Passage
- Thorn Pass - Southeast of Razorslide Bivouac
- Lightfoot Passage
- Lightfoot Passage
- Lightfoot Passage
- Lightfoot Passage
- Lightfoot Passage
Crafting resources[edit]
- Resource nodes
- Mithril Ore
- Cypress Sapling
- Artichokes (node farm) - on the eastern edge of Bramble Pass
- Asparagus
- Cayenne Pepper
- Coral
- Cluster of Herbs
- Orrian Truffle
- Bulk ingredients
- Mangos in Bulk from Agent Crandle


