Loreclaw Expanse (jumping puzzle)
Loreclaw Expanse
_map.jpg)
Map of Loreclaw Expanse
- Type
- Jumping puzzle
- Area
- Loreclaw Expanse
(Plains of Ashford)
| Image(s) |
|
Click to enlarge. |
.jpg)
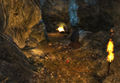
Loreclaw Expanse is a jumping puzzle located in the area of the same name in Plains of Ashford.
Getting there[edit]
Head southeast from ![]() Loreclaw Waypoint — to the cliffs. Look for a low point in the rocks, where a ledge slopes up to the south. Climb up it and head east into the cave to reach the puzzle.
Loreclaw Waypoint — to the cliffs. Look for a low point in the rocks, where a ledge slopes up to the south. Climb up it and head east into the cave to reach the puzzle.
Alternatively, head east from the waypoint into the water, and look for an underwater tunnel in the cliffs on the south shore. This path involves more jumping overall, but can allow you to skip the first two traps.
Walkthrough[edit]
| Search YouTube for videos related to Loreclaw Expanse (jumping puzzle). |
The initial platform you jump to from the cliff edge is a small safe area.
Falling during many stages of the puzzle will unceremoniously dump you in the skelk-infested waters beneath the puzzle. Optionally you can jump down on to the alternative path after passing the first spike trap, or at the end of the spike trap corridor.
Tips
Shortcuts
Gallery
|


Rewards[edit]
Related achievements[edit]
 Jumping Puzzles: Loreclaw Expanse — Complete the jumping puzzle. (10
 )
) Daily: Daily Loreclaw Expanse Jumping Puzzle — Complete the Loreclaw Expanse jumping puzzle in Plains of Ashford. (0
 ) (Historical)
 Chuka and Champawat I: Hunter's Journal:
  Hunter's Journal: Entry 15 — Consult your Hunter's Journal for instructions.
- Sunrise III: Dawn:
 Loreclaw's Light — Use the Illuminator to capture the sunbeam in the treasure room of the Loreclaw Expanse jumping puzzle in Plains of Ashford.
 - Chuka and Champawat III: Naturalist's Journal:
 Naturalist's Journal: Entry 13 — Consult your Naturalist's Journal for instructions.
Trivia[edit]
- Numerous references to the Indiana Jones franchise are hidden around the puzzle:
- The journal reveals that the dead archeologist's name is Haneri Jenos Sr.
- This is quite similar to Henry Jones, Sr., the name of the titular character's father.
- His skeleton wears a fedora, the hat usually worn by Indiana Jones.
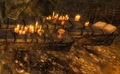
- In the passage to the final room with the chest, the player passes spiderwebs and there are two large saw blades against the wall, similar to the first trap shown in the movie.
- There is a selection of cups sitting on the stone table near the final Grand Chest.
- A 'leap of faith' from a lions head/statue is present in both movie and puzzle.
- The room with the Grand Chest will collapse (also done in the movie), killing you, if you do not leave fast enough.
- Captain Ravenwood is a reference to Marion Ravenwood.
- One of her quotes is "(grunt) You can't do this to me. I'm an Ascalonian!". This references a similar quote by Marion, "You can't do this to me, I'm an AMERICAN."[1] in Raiders of the Lost Ark.
- The journal reveals that the dead archeologist's name is Haneri Jenos Sr.
The rusty giant saw blades.
Selection of cups, and perhaps the Grail?

