Pain Cliffs/Tribulation Mode
Pain Cliffs
Tribulation Mode

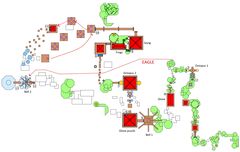
Map of Pain Cliffs
Tribulation Mode
- Tier
- World 2 Zone 2 Tribulation Mode
- Type
- Area
- Dungeon
- Super Adventure Box
- Connects to
- World 2 House, Storm Top, Hub
| Image(s) |
|
Click to enlarge. |
Pain Cliffs, or World 2 Zone 2, is the fifth level of Super Adventure Box. It contains 11 Hidden Rooms, 4 Shops, 2 Furniture Shops, 2 locked chests, 13 dig spots, and 38 baubles to collect.
Objectives[edit]
- Super Adventure Box
- Team Score: X (refers to the number of foes killed)
- Finished!
- Warping in: 0:15
Tribulation Mechanics[edit]
A high-level overview of the hazards in this zone:
Additionally, there are a few non-lethal mechanics:
- Balloon Pump: can be interacted with to acquire a Balloon.
- Cloud Flag: using a Balloon's Unlock skill next to it will turn it into a checkpoint. Unlocking the cloud flags is not required to complete the zone.
Walkthrough[edit]
- For Exploration and Normal Mode, see: Pain Cliffs
| Search YouTube for videos related to World 2 Zone 2 Tribulation Mode. |
Start to Cloud Save 1[edit]
A spear trap prevents you from ascending the hill near the shopkeeper. There are two options to progress:
- Perform a wall jump against the platform with the cloud flag to land on top of the platform between the cloud flag and balloon.
- Turn around at the starting location and jump around the backside of the cliff to the left.
When going around the cliff, half of the small platform right before the second tree is covered with a spear trap, but the edge is safe to walk on. The jump to the corner tree is tricky — the best way is to use a dodge jump from the previous higher tree. From here, there are three ways to reach cloud flag:
- Continue going around the cliff. This requires a dodge jump to reach the last tree. Then simply go straight to the cloud flag.
- Climb the shrubs and hills back towards the start. The open area in the center is covered with spikes and spears. You must jump onto the center shrub's left edge, then to the cloud flag platform.
- Climb the tall tree and then jump onto the rock close to the cloud flag or to the lower grassy area. The tree's lowest branch is covered with spears, but the edge is safe.
From the cloud flag platform, jump up to the balloon pump and use it to activate the first cloud save.
Cloud Save 1 to Cloud Save 2[edit]
The grassy area leading towards the next cliff is all covered with spear traps. You can either jump from the balloon pump towards the left-half of the small tree, or return to the tall tree to jump onto a cliff then onto the next cliff.
The left-most rock on the cliff is a jumping rock. After jumping from the cloud to the next cliff, there is a spear trap on the right half of the tree and another spear trap on the half of the grass platform closest to the tree (next to the wall). A spear trap is also found on the platform below the tree (near the big cloud wall).
A spear trap is between the cloud and balloon pump. You can stand on the edge of the balloon pump to gain enough height to dodge jump over the spear trap in front of it. Otherwise, you must jump around the trap using the trees to the left.
Cloud Save 2 to Cloud Save 3[edit]
The platform above the cloud flag has a spear trap in the middle, indicated by the grassy peak. The flower launcher at the top has a spear trap, requiring you to move around it and jump directly towards the next platform with the white assassin. All rocks on the next platform are angry rocks.
A spear trap is on the lower third of the cloud platform closest to the wall. A hand missile will also fire at you upon jumping onto the cloud. You must then hug the edge, then scale the tall tree to avoid the spear traps on the grassy floor. A balloon pump is at the very top. You can jump on top of the pump, then onto the lower leaf platform to reach the cloud flag.
Cloud Save 3 to Checkpoint 1[edit]
The grassy platform directly below the cloud flag has a spear trap. You should jump towards the lower trees to avoid additional spear traps, which cover the majority of the grassy area leading up to the checkpoint gate. A spear trap is right below the lowest tree on the platform with the checkpoint gate, requiring you to jump onto and away from the tree to avoid the trap below.
A hand missile will fire at you upon nearing the checkpoint gate. Aside from that and the explosive barrel, the entire area in front of the checkpoint gate has no traps.
Checkpoint 1 to Cloud Save 4[edit]
The first pagoda has no traps. However, a spear trap lines the path leading towards and away from the wooden arch in the middle. You must keep to the edges to avoid these traps. There is a safe zone behind the 1-Up that avoids the spear trap on the wooden path.
The next few elevated platforms have spear traps, requiring you again to keep to the edges. You can either jump towards the pagoda or jump around the cliff to reach the next cloud save. If ignoring the cloud save, you can jump onto the lower grass platform near the wall then jump out and around the spear trap on the lower trees. From then, you can jump towards the middle floor of the pagoda.
The explosive barrel must first be destroyed. The two rocks on the platforms are jumping rocks. Grab a balloon from the pump, climb the tree, then jump towards the cloud flag to activate it.
Cloud Save 4 to Checkpoint 2[edit]
You can either use the flower launcher to reach the top floor of the pagoda while avoiding the hand missile, or jump down directly from the cloud flag. The pagoda has no traps.
The entire grassy area around the spike trap are filled with spear traps. You must jump on top of the four raised structures around the fish pool to jump over these traps. No traps are present between the spike trap and checkpoint gate.
Checkpoint 2 to Checkpoint 3[edit]
Standing in any fish pool instantly defeats you in tribulation mode. The center of the wooden platform has a spear trap.
No traps are present on the lower platform with the trampolines. The octopus puzzle remains unchanged.
Checkpoint 3 to Checkpoint 4[edit]
Contains Shop 1 (Tough Customer 5)
A rectangular spear trap is on the center of the grassy area after climbing up a bit. Another square spear trap appears on the grassy area that juts out a bit. A small safe zone exists between both traps and between the square trap and edge of the platform. Another rectangular spear trap covers the grassy area in the center, requiring you to use the trees to jump up towards the platform with the flower launcher. The elevated platform next to this platform has a spear trap.
The shortcut eagle takes you to the start of the zone in tribulation mode.
After the jumping down from the cloud, you should hug the edges to avoid spear traps covering the side of the grassy area closest to the clouds. At the top of the the tree, the second rock is an angry rock with a spear trap below. You must jump on top of the angry rock, then quickly jump towards the grassy area in front. Afterwards, you must jump up the tree quickly and avoid the spear trap right next to the rock wall on the tree platform.
On the platform with the red assassin, there is a spear trap to the right of the tree before the hand missile. No more traps are present between here and the checkpoint gate.
Checkpoint 4 to Checkpoint 5[edit]
Contains Shop 2 (Tough Customer 6)
You can either defeat the mini-boss assassin or wall jump against the trampoline pillar to progress. The area surrounding the mini-boss assassin is filled with spike traps.
Once above, you must avoid pillars that shoot darts (indicated by a thin structure on the side of the pillar). A spear trap is also found on the platform in front of the destructible wooden barrier. You must thus jump towards the center then to the wall.
Checkpoint 5 to Checkpoint 6[edit]
Two hand missiles activate upon nearing the gate towards the pagoda. You can easily avoid both by dodging towards the pagoda, or if the bridge hasn't been lowered, dodge jump towards the pagoda from the checkpoint gate.
The cloud skip now has spear traps, but can still be used to skip the majority of the zone with a well-timed wall dodge-jump. A hand missile is at the end of the path when going around the pagoda. Another hand missile is near a cloud.
The block puzzle in the pagoda is otherwise the same as in normal mode, but the second level has a tribulation cloud, which makes it important to know the puzzle well.
Checkpoint 6 to Cloud Save 5[edit]
Cloud Save 5 to Checkpoint 7[edit]
Checkpoint 7 to Checkpoint 8[edit]
Contains Shop 3 (Tough Customer 7)
Checkpoint 8 to Checkpoint 9[edit]
Checkpoint 9 to Checkpoint 10[edit]
Contains Shop 4 (Tough Customer 8) Contains Tree Stump
Checkpoint 10 to Checkpoint 11[edit]
Checkpoint 11 to Cloud Save 6[edit]
Cloud Save 6 to Checkpoint 12[edit]
Checkpoint 12 to Boss[edit]
There is a spike trap directly in front of the checkpoint. Use a corner to jump to the lowered bridge.
The boss is the same as normal and there are no additional hazards.
Achievements[edit]
- For Normal Mode achievements, see: Pain Cliffs#Achievements
| Connoisseur of Pain | Super Adventure Box: Tribulation Mode | 75 |
|---|---|---|
| Complete Zone 1, Zone 2, and Zone 3 in World 2 in Tribulation Mode.When will it end? |
1 Zone Completed in World 2 in Tribulation Mode | 25 |
| 2 Zones Completed in World 2 in Tribulation Mode | 25 | |
| 3 Zones Completed in World 2 in Tribulation Mode | 25 |
| Tough Customer, World 2 | Super Adventure Box: Tribulation Mode | 25 | |||||||||||||||||
|---|---|---|---|---|---|---|---|---|---|---|---|---|---|---|---|---|---|---|---|
| Visit every World 2 shop in Tribulation Mode.You keep these merchants in business. |
1 Shop Visited in World 2 Tribulation Mode | 2 | |||||||||||||||||
| 2 Shops Visited in World 2 Tribulation Mode | 2 | ||||||||||||||||||
| 3 Shops Visited in World 2 Tribulation Mode | 2 | ||||||||||||||||||
| 4 Shops Visited in World 2 Tribulation Mode | 2 | ||||||||||||||||||
| |||||||||||||||||||
| Woodpecker | Super Adventure Box: Tribulation Mode | 30 |
|---|---|---|
| Destroy all tree stumps in World 2 Tribulation Mode.Take down the kingpin. |
1 Tree Stump Destroyed in World 2 Tribulation Mode | 10 |
| 2 Tree Stumps Destroyed in World 2 Tribulation Mode | 10 | |
| 3 Tree Stumps Destroyed in World 2 Tribulation Mode | 10 |


