Sunny Glade/Tribulation Mode
Sunny Glade
Tribulation Mode

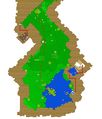
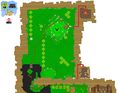
Map of Sunny Glade
Tribulation Mode
- Tier
- World 1 Zone 1 Tribulation Mode
- Type
- Area
- Dungeon
- Super Adventure Box
- Connects to
- World 1 House, Dark Woods, Hub
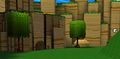
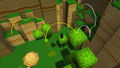
| Image(s) |
|
Sunny Glade Tribulation Mode |

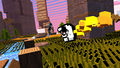
Sunny Glade, or World 1 Zone 1, is the first level of Super Adventure Box. It contains 7 Hidden Rooms, 2 Shops, 2 Furniture Shops, 2 locked chests, 2 dig spots, and 45 baubles to collect.
Objectives[edit]
 Super Adventure Box
- Team Score: X (refers to the number of foes killed)
- Finished!
- Warping in: 0:15
Tribulation Mechanics[edit]
A high-level overview of the hazards in this zone:
- Flower Bomb: static flowers will detonate when players get too close, resulting in instant death. Flowers will not respawn.
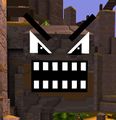
- Helping Hand: some will turn into Hand Missiles that will fire at players, resulting in instant death.
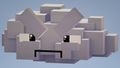
- Jumping Rock: some boulders will jump into the air and knock back players, but there is a short delay between attacks during which they can be used as a platform.
- No Cloud: these clouds will electrify themselves after a few seconds.
- Tribulation Cloud: these clouds will follow a player shooting electricity and creating large AOE fields if you get too close.
- Spikes: touching these will result in instant death.
- Spears: like Spikes, but invisible until players get close. They can sprout from walls as well as the ground. Spears stay visible after first activation.
- Intangible Floors: sometimes the ground may not be stood upon (often indicated by changes in texture or elevated) and players will fall through onto spikes or lava.
- Checkpoint: if there are multiple players in the instance, then any player standing on a locked checkpoint will be attacked by the pipe - resulting in instant death.
Additionally, there are a few non-lethal mechanics:
- Balloon Pump: can be interacted with to acquire a Balloon.
- Cloud Flag: using a Balloon's Unlock skill next to it will turn it into a checkpoint. Unlocking the cloud flags is not required to complete the zone.

Flower Bomb
Helping Hand Missile
Jumping Rock

No Cloud
Tribulation Cloud
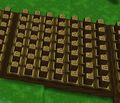
Spikes (World 1)
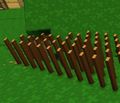
Spears (World 1)


Balloon Pump
Balloon

Cloud Flag


Walkthrough[edit]
- For Exploration and Normal Mode, see: Sunny Glade
| Search YouTube for videos related to World 1 Zone 1 Tribulation Mode. |
This walkthrough details the path through the zone in tribulation mode in addition to the locations of all shops and the honeycomb.
Start to Checkpoint 1 (First area)[edit]
Map

- Jump over the spikes in the direction of the lake.
- Climb up the large tree in the middle of the lake.
- Jump from the branch with the bauble onto the shorter tree below with the Balloon Pump.
- Jump onto the bush in the middle of the Spikes.
- Jump onto the grass next to the Cloud Flag.
Cloud Flag 1[edit]
- Head to the next set of spikes while taking care to avoid the flowers.
- Circumnavigate the spikes in either direction.
- If you choose to go left, beware the Jumping Rock between the cliff face and the spikes (e.g., by dodging through its attack).
- If you choose to go right, the sunken area next to the corner of the spikes opens up into hidden Spike Traps.
- Jump up the tree leading to Checkpoint #1.
- Hazard: Helping Hand on the wall.
- Hazard: Flower Bombs right before the checkpoint.
Checkpoint 1 to Checkpoint 2 (First shop; digspots)[edit]
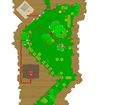
Map
(A) Hidden Room #3 (Shop #1): At last, a customer!
(B) Digging spots


- Jump along the tree tops that hug the left wall until you get to the ledge with 2 monkeys.
- (Optional) Drop down and enter the door to
 Hidden Room #3 (Shop #1 At last, a customer!) (A). Do note that the only way to get back on track will be to respawn at Checkpoint 1.
 - Jump onto the next tree and perform a long jump parallel to the wall on the left in the direction of the next checkpoint.
- (Optional) Drop down and enter the door to
- Pivot right and jump onto the slightly-raised grass (as the sunken grass will drop you into lava). There are 2 options:
- Head in the direction of the Balloon Pump to Cloud Flag 2.
- (Skip) Continue towards the large Jumping Rock in the middle of the spikes (to the right side of the next checkpoint), taking care to stay on the slightly-elevated grass.
- Jump onto the Jumping Rock to trigger the attack (and either jump back or use
 Health Potion to perform a stun break, or jump on the small rock and dodge into the jumping rock).
 - Jump off the rock onto the raised grass adjacent to the wall.
- Follow the wall to Checkpoint #2.
- Jump onto the Jumping Rock to trigger the attack (and either jump back or use
| Shop Item | Cost | Description |
|---|---|---|
| 20 |
Grants one extra life. | |
| 100 |
Dig anywhere for a 10% chance to find buried treasures. | |
| 25 |
Used for opening chests. | |
| 5 |
Restores one heart. |
Cloud Flag 2[edit]
If you choose to pass through the Cloud Flag:
- Go over the Balloon Pump (as the left wall has hidden spikes protruding through it).
- Jump from the rock to the bush then to the hill area in front.
- The top of this hill contains the flag.
- From here jump to the tree in in front and to the right following the trees left.
- From the small tree aim for the lowered section of the hill edge.
- Continue jumping from tree to edge until you can jump to the top of the hill with a ramp.
- Hazard: Flower Bombs A number of the flowers are bombs.
- Jump across to the larger hill with spikes on top.
- Once across jump to your right and up to the top.
- Jump to the right across the corner of spikes then continue forward jumping over an additional corner to a small safe green patch.
- Jump across to the tree and then up.
- (Optional) Jump right to digging spot #1 ((B)).
- Jump down to the smaller thin tree then across to the wall.
- Continue along the wall towards the checkpoint (left after jumping).
- (Optional) Digging spot #2 ((B)).
- Jump around to the left but hug the right wall to avoid spikes.
Checkpoint 2 to Checkpoint 3 (Chasm corridor)[edit]
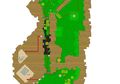
Map

- Immediately to the right of the checkpoint are spikes so lean left but avoid the bouncing rock just ahead on the left wall.
- Almost all of the platforms in the chasm section have bouncing rocks so you will need to continue moving or be knocked off.
- As you approach the edge you will need to do the next two jumps quickly as both of the yellowish rocks on the two next platforms are jumping rocks and will knock you off.
- From the tree, one jump ahead has a bouncing rock to the left, with the following ramp having two bouncing rocks, one obvious on the right and a second also on the right in a nook just before you jump to the tree.
- From the last tree, jump to the left side of the Checkpoint 3, as the right wall has spikes.
Checkpoint 3 to Checkpoint 4 (Maze; honeycomb)[edit]
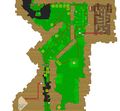
Map

- Jump from small block to small block to avoid falling in the lava. Then jump to the raised grass
- Take a left and go up the hill and climb the blocks.
- Jump down to the small block in the spikes and continue jumping over the flowers.
- (Advanced) Choose to continue left for tricky jumps straight to Checkpoint 4.
- Continue along the path to the left up the hill.
- Careful when jumping across as most of the platform is spikes. Land on the very edge of the platform.
- Grab the balloon and turn around to head into the maze.
Cloud Flag 3[edit]
- Get a balloon.
- Follow the beedogs through the maze.
- Activate the checkpoint cloud.
- (Optional) Slay the Queen Bee Dog and destroy
 Honeycomb for achievement Forbidden Honey.
 - Take the path to the right.
- (Alternative) You can use the platforms (excl. the first three) generated by activating the Glitch crystal to skip right to the trees with monkeys, as there are no traps up there.
- Walk on the ledge, jump over the trees to checkpoint 4.
Checkpoint 4 to Checkpoint 5 (Second shop; mountain)[edit]
For location of furniture shop view the Master of Decor guide.
Map

Shop #1 The mountain has a back door.


- Just to the right of the checkpoint are spikes to stay on the left edge.
- Jump across to the left and then again to the main platform.
- Most of the lowered area is actually lava so stay on the raised grass as you head towards the center mountain.
- Jump from the tree to the edge of the next level and then to the tree again in front. This can be tricky if you don't jump high enough before moving forward as there are spikes.
- Continue jumping up, taking a left up a pair of trees and the left side of the mountain.
- Go around the side and you will see a few small platforms jutting from the rock.
- Use those to go around and then up to the checkpoint.
- Although you cannot get back up you can jump down to Hidden Room #7 (Shop #2 The mountain has a back door) and then respawn at checkpoint 5.
- Although you cannot get back up you can jump down to
| Shop Item | Cost | Description |
|---|---|---|
| 5 |
Restores one heart. | |
| 20 |
Grants one extra life. | |
| 150 |
Stuns foes. | |
| 25 |
Used for opening chests. | |
| 100 |
Dig anywhere for a 10% chance to find buried treasures. |
Checkpoint 5 to Boss (Top of the mountain)[edit]
Map
- Climb to the peak of the mountain and begin wailing on the Cage.
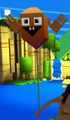
- Lord Vanquish's head will be floating above the Cage, and every so often he will point towards you and shoot at you with a laser. Side-step out of his way when he turns to look at you, and try to remain out of his field of view so that it becomes obvious when he turns to you to attack.
- (Optional) Alternatively, avoid climbing to the top of the mountain; instead, stand on the tallest hedge and attack the Cage from there. This will prevent Lord Vanquish from noticing you and targeting you with his laser attacks.
- (Note) There are no spikes or traps in the cage area.
Achievements[edit]
- For Normal Mode achievements, see: Sunny Glade#Achievements
| Forbidden Honey | Super Adventure Box: Tribulation Mode | 30 |
|---|---|---|
| Destroy all honeycombs found in World 1 Tribulation Mode.Sweet, delicious honey. |
1 Honeycomb Destroyed in World 1 Tribulation Mode | 10 |
| 2 Honeycombs Destroyed in World 1 Tribulation Mode | 10 | |
| 3 Honeycombs Destroyed in World 1 Tribulation Mode | 10 |
| Glutton for Punishment | Super Adventure Box: Tribulation Mode | 75 |
|---|---|---|
| Complete Zone 1, Zone 2, and Zone 3 in World 1 in Tribulation Mode.Serious fun amidst serious pain. |
1 Zone Completed in World 1 in Tribulation Mode | 25 |
| 2 Zones Completed in World 1 in Tribulation Mode | 25 | |
| 3 Zones Completed in World 1 in Tribulation Mode | 25 |
| Tough Customer, World 1 | Super Adventure Box: Tribulation Mode | 25 | |||||||||||||||
|---|---|---|---|---|---|---|---|---|---|---|---|---|---|---|---|---|---|
| Visit every shop in World 1 in Tribulation Mode.Hunting for adventure...and bargains. |
1 Shop Visited in World 1 Tribulation Mode | 2 | |||||||||||||||
| 2 Shops Visited in World 1 Tribulation Mode | 2 | ||||||||||||||||
| 3 Shops Visited in World 1 Tribulation Mode | 2 | ||||||||||||||||
| 4 Shops Visited in World 1 Tribulation Mode | 2 | ||||||||||||||||
| |||||||||||||||||
Bauble (1 ![]() • 5
• 5 ![]() • 10
• 10 ![]() • 20
• 20 ![]() • 50
• 50 ![]() ) •
) • ![]() Bauble Bubble
Bauble Bubble
Continue Coin • Infinite Continue Coin • ![]() Fancy Furniture Coin
Fancy Furniture Coin
| Skills and Upgrades |
• Purse
|
|---|---|
| Hub | World 1 House • World 2 House • World 3 House • World 4 House |
| World 1 | Z1: Sunny Glade (TM) • Z2: Dark Woods (TM) • Z3: Kingdom of Fungus (TM) • B: Cart |
| World 2 | Z1: Rapids (TM) • Z2: Pain Cliffs (TM) • Z3: Storm Top (TM) • B: Robbers |
| World 3 | Z0: Test Zone • Historical: Sparkling Pools |
| Adventures | Super Adventure Hub Super Adventure 1-1 • Super Adventure 1-2 • Super Adventure 1-3 Super Adventure 2-1 • Super Adventure 2-2 • Super Adventure 2-3 Super Adventure Test Zone |
| Achievements |