Pain Cliffs
Pain Cliffs
- Tier
- World 2 Zone 2
- Type
- Area
- Dungeon
- Super Adventure Box
- Connects to
- World 2 House, Rapids, Storm Top, Hub
| Image(s) |
|
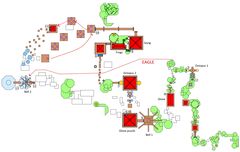
Click to enlarge. |
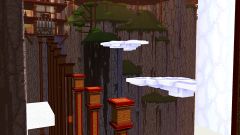
“Many adventurers have met their end falling from the PAIN CLIFFS.
— Loading screen description
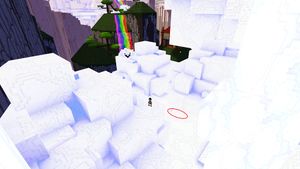
Pain Cliffs is zone 2 of world 2 of Super Adventure Box. There are 9 Hidden rooms, 42 Baubles to collect and 100 assassins to kill. This level introduces dissolving clouds and icy surfaces.
Objectives[edit]
- Super Adventure Box
- Team Score: X
- Finished!
- Warping in: 0:30
Walkthrough[edit]
- For Tribulation Mode, see: Pain Cliffs/Tribulation Mode
| Search YouTube for videos related to World 2 Zone 2. |
| Search YouTube for videos related to World 2 Zone 2 Tribulation Mode. |
- This was done on Exploration Mode to collect all Baubles, Hidden rooms, Furniture Shops, and to kill all the assassins. Additionally, players must have unlocked the Glove of Wisdom, the Mini Bomb, and the Wooden Whistle in order to collect all of the baubles. Killing all of the assassins is not required unless trying to obtain the Become the Master achievement.
Starting Area to Checkpoint 1[edit]
There is a shopkeeper at the start that sells health refills.
Shop #1 items[edit]
| Item | Cost | Description |
|---|---|---|
| Nice Scoop | 325 |
Dig anywhere for a 15% chance to find buried treasures. |
| Small Health Refill | 5 |
Restores one heart. |
| Slingshot | 250 |
Flings stones; requires ammo. |
The area behind the shopkeeper has #1. Continue forward towards a barrel and an exploding barrel, jumping to the nearby lone hill to reach #2. If needed, use the Speed Boost from the barrel at the start to reach the bauble. Return back to the slope to kill a red assassin and a white assassin (A-1 and A-2). Continue forward on the rainbow bridge until you see #3 on your left, and jump down off the bridge to reach it. From #3, head counterclockwise around the hill to find two white assassins (A-3 and A-4). Return to the rainbow bridge and continue on again until you spot a white assassin (A-5) by himself on a hill. Jump down and take him out, then use the nearby clouds to reach the grassy platform in front where another white assassin (A-6) can be found as well as #4 hidden in the corner. Use the Speed Boost found in the nearby barrel to jump to a nearby dissolving cloud and then quickly jump to the grassy area ahead. Head up the hill, and climb up the tree to find #5, then look down to your right to find a white assassin (A-7). Run up the hill towards the first checkpoint to find another white assassin (A-8) and #6 resting on a tree branch.
Checkpoint 1 to Checkpoint 2[edit]
After the first checkpoint you will find two red assassins (A-9 and A-10) on the ground level of a small pagoda and one red assassin on the second level (A-11). Use the nearby trampolines to get #7 at the very top the of the roof of the pagoda. Moving forward, the 1-Up looks pretty good, but don't run straight for it as there is a Dart Trap in the structure in front of it, so instead, go around the gate using the grass area to the right or left. Continue on until you find #8 as well as a Happy Cloud on your left and a path with a exploding barrel on your right. Head to the right, using either the Mini Bomb or the Slingshot to explode the barrel if you can't reach it with your stick/chain stick. You'll come upon a red assassin and a white assassin (A-12 and A-13), and after dealing with them, climb to the very top of this hill to kill to another white assassin (A-14). Climb up the tree where the owl spawns at and jump across to get the white assassin (A-15) located on the adjacent hill. before using the Flower Launcher to the pagoda.
Return back to the hill, and use the Flower Launcher to launch you to the roof of the nearby pagoda in order to reach #9. Drop down from the roof to find a red assassin (A-16), and if you have a key, use it here for the Locked Chest #1 inside the pagoda, otherwise ignore it for now. Drop down to the floor below to find two white assassins (A-17 and A-18), and then drop down again to find a red assassin (A-19). Drop down the pagoda one more time to find two white assassins (A-20 and A-21), and then use the nearby tree to climb up to reach the adjacent hill a white assassin (A-22) and #10. Return to the rainbow bridge and use either the Mini Bomb or the Slingshot to get a purple assassin (A-23) hanging out up on a high hill. (If doing this is normal mode, you can hit him with sling shot by jumping and using the sling shot at the same time, from the top walkway of the pagoda.)
Checkpoint 2 to Checkpoint 3[edit]
Hit the second checkpoint to find a red assassin (A-24) as well as four pools with piranha that jump back and forth across. A barrel found to the right of the checkpoint may help as it contains a Moon power-up, and make dealing with the assassins easier as the piranhas jumping from the pools will not hit you. The area below it is a platform with two more red assassins (A-25 and A-26), as well as another pool with a piranha and several trampolines. If you need a safe place to kill these two assassins, there is a recessed hill to the left of the trampoline you drop onto, which will allow you to damage the assassins without being damaged in return. While you do not need to feed the octopus in Exploration Mode (although it'll make respawns a lot easier), if you wish to do so, wait close to the pool and dodge the piranha as they jump out, attacking it in order to pick it up. From there use the trampolines to jump up to the octopus and feed it the piranha, repeating two more times per party members in order for the platform to be low enough to jump to and access the next checkpoint and area.
Checkpoint 3 to Checkpoint 4[edit]
Hit the third checkpoint and continue forward to find a white assassin (A-27). Head up to the grassy platform where he was located, make your way clockwise around the hill to find #11 (if you pass a toad, you've gone too far). After getting it, head back to the main area and climb up to the top of the hill to find a white assassin. (A-28) After dealing with him, continue forward again towards the next Happy Cloud, but instead of using it or the Flower Launcher, head to the right and carefully jump on the dissolving cloud to the grassy area, and use the Glove of Wisdom to push the block up against the tree. Jump up the tree to where the Shortcut Eagle is located and to #12 in front of him, but quickly jump up away from the eagle (you don't want to use it just yet, but if you end up taking the shortcut just jump off to be returned to the checkpoint) and up the hill to the right. Jump up to the area above the eagle and use a Mini Bomb in the middle of the leaves to reveal Hidden Room #1 (Bachelor of Secrets, World 2: In the middle of the trees).
Shop #2 items (above shortcut eagle)[edit]
| Item | Cost | Description |
|---|---|---|
| Small Health Refill | 5 |
Restores one heart. |
| 1-Up | 20 |
Grants one extra life. |
| Wooden Whistle | 250 |
Plays three notes. |
| Key | 25 |
Used for opening chests. |
| Nice Scoop | 325 |
Dig anywhere for a 15% chance to find buried treasures. |
Purchase a key here and go back to the pagoda and unlock the Locked Chest #1 for #13.
Warning: If playing on Normal and attempting Bachelor of Baubles, once you jump away from the island with the Eagle you will not be able to return. Instead, do the shortcut first and collect the 5 baubles on top of the final bell (these are counted later in this walkthrough). Then jump off into the abyss and back track from checkpoint 8 that the eagle unlocks for you.
Return back to the area before the Shortcut Eagle, and this time continue forward on the rainbow bridge until you spot #14 sitting on top of a tree on your left. Note that if you forget to trigger the exploration clouds here, you won't be able to return to the Shortcut Eagle island later, and will be unable to claim the baubles within the shortcut. Drop down and pick it up, then drop down to the bottom of this small area to find a white assassin. (A-29) Climb up the tree and back to the rainbow path for a short bit until you see an area on left with lots of tree branches and a red assassin (A-30). Jump back on the rainbow path and continue forward towards the fourth checkpoint to find two white assassins and one red assassin (A-31 to A-33). Hit the checkpoint, but do not enter the pagoda, instead, turn around look for a Flower Launcher to area below on the right. Take it to find #15, then take the next two Flower Launchers to find Hidden Room #2 (Bachelor of Secrets, World 2: Travel by flower). Upon leaving the shop, simply jump into the abyss to return to the checkpoint.
Shop #3 items (Flower Launchers)[edit]
| Item | Cost | Description |
|---|---|---|
| Nice Scoop | 325 |
Dig anywhere for a 15% chance to find buried treasures. |
| Key | 25 |
Used for opening chests. |
| Medium Health Bottle | 300 |
Health refills restore two hearts. |
| 1-Up | 20 |
Grants one extra life. |
| Small Health Refill | 5 |
Restores one heart. |
Checkpoint 4 to Checkpoint 5[edit]
Enter the pagoda to find the mini-boss Assassin (A-34). He can only be damaged when his glove is down, and the two nearby barrels may provide some help in dealing with him, with the right barrel having a Speed Boost and the left barrel having some food inside. After defeating him, push the nearby block to the trampoline and jump up to the second level of the pagoda where two white assassins and two red assassins (A-35 through A-38) are located. After dealing with them, head to the center of the floor, and carefully jump to the ledges to reach #16 and then continue outside using the Glove of Wisdom to find one more red assassin (A-39). Jump onto the nearby clouds and reach the area with the large bell (you may have noticed the there are still some baubles around, you'll come back for those later). Ring the bell by pushing a log from one of the poles in order to lower the wooden bridge behind the checkpoint, then hit the fifth checkpoint.
Checkpoint 5 to Checkpoint 6[edit]
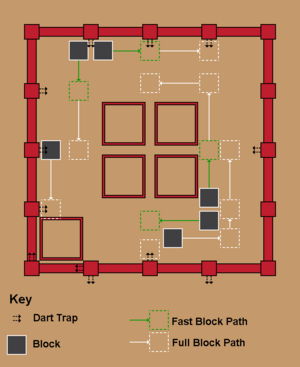
From the checkpoint you'll find a red assassin (A-40) running around in front of several openings at the base of a large pagoda. After dealing with him, head to the last opening on the right-hand side but do not enter it, as there is a Dart Trap overhead. Instead carefully use the Glove of Wisdom on the block found in the archway, then enter the pagoda via the opening that is second from the left (the only safe entrance) and push the block until it locks into place in front of a doorway with Dart Traps on the side. Jump up on the block, and over the Dart Trap to find another block that you must push, and again, use it to jump over a Dart Trap in the doorway.
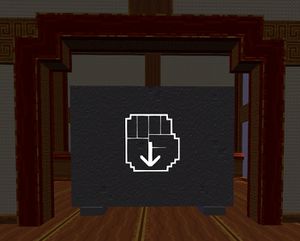
At the end of the maze is a hole in the ceiling surrounded by Dart Traps. While aimimg for the outer edge of the pagoda, use the trampoline and to do a high jump up through the ceiling and over the Dart Traps. Carefully push the blocks with the Glove of Wisdom until they block all the central dart traps by either pushing each of the four paired blocks once or pushing all blocks until they lock into place (refer to map at side). Use the trampoline in the middle to get #17 and to reach the top level of the pagoda. The top level has a red assassin and a white assassin (A-41 and A-42) as well as a toad who will likely try to inhale you as soon as you reach the top, so be careful of him. There is also one more white assassin (A-43) hiding in the small corridor near the grey panel with what appears to be a Glove icon, either attack him with the Pointy Stick or the Chain Sticks through the wall, or lure him out with the Whip.
Checkpoint 6 to Checkpoint 7[edit]
After hitting the sixth checkpoint, make a left and head towards the clouds near the corner of the building. Use the smaller clouds (the larger one dissolves) to reach the roof of the pagoda, then head towards the wooden framework that supports the bell found before Checkpoint #5. Carefully jump onto this framework and at the end of each corner, you'll find #18-24 in total. From there go to the third beam from the left (facing away from the pagoda you just left) and use the dissolving clouds there to quickly jump onto the pagoda directly in front of you to pick up #25-26 on its rooftop.
Return to the 6th checkpoint and this time head right from the checkpoint. If you have Mini Bombs, use them to easily take out the purple assassin (A-44) below, otherwise jump down, but try to stay out of range of his weapon. Once he has been defeated, the bridge will lower to the next platform to reveal another purple assassin (A-45), and you can either use the Mini Bomb or the Slingshot to take him out from a distance or melee him while trying to avoid his weapon. A third bridge will lower to reveal the third purple assassin (A-46), and if you are quick enough, it is possible to take him out with Mini Bombs before he sees you, but either way, take him out to lower the bridge to reach the pagoda in front of you.
Jump up on the little structure in the middle of the platform to reach the bridge (try to be quick in doing so as the piranhas jumping from pool to pool may knock you down), and you will encounter two white assassins (A-47 and A-48) hanging out in front of the pagoda. Try to avoid fighting them in front of the doorways as piranhas from the nearby pools are likely to jump out at you causing you additional trouble (hence the pagoda's name of Piranha Pagoda). You will need to feed another octopus, but before doing so, clear out the two red assassins and two white assassins (A-49 through A-52) on the second floor, and the three white assassins and the one red assassin (A-53 through A-56) on the third floor as then it will make feeding the octopus much easier. Use the clouds found at the rear of the building to reach the second floor, the trampoline to reach the third floor and the clouds again to reach the roof to feed the octopus. After the octopus has been feed three fish per party member, head to the roof again, but head in the opposite direction to hit the seventh checkpoint.
Checkpoint 7 to Checkpoint 8[edit]
From the seventh checkpoint, head towards the hill to find a red assassin (A-57). Bomb the area he was standing on and drop down into the hole to find Hidden Room #3 (Bachelor of Secrets, World 2: Past the piranha pagoda).
Shop #4 items[edit]
| Item | Cost | Description |
|---|---|---|
| Small Health Refill | 5 |
Restores one heart. |
| Wooden Whistle | 250 |
Plays three notes. |
| Medium Health Bottle | 300 |
Restore health. |
| 1-Up | 20 |
Grants one extra life. |
| Key | 25 |
Used for opening chests. |
Use a Mini Bomb on the wall directly behind the Shopkeeper to reveal an opened wall, and enter it for Hidden Room #4 (Bachelor of Secrets, World 2: Alternative shop exit), then return to the shop and purchase a key. Exit the shop via the trampoline and head back to Piranha Pagoda and get onto the roof, heading towards the front section to find the Locked Chest #2 with #27-28. Return back to the seventh checkpoint and either jump from the thin poles or the clouds to reach an area where a white assassin (A-58) can be found on top of a cloud. You will need to use either the Slingshot or Mini Bombs to get him as the cloud is too far away to jump to. Continue jumping from pole to pole until you reach the eighth checkpoint.
Checkpoint 8 to Checkpoint 9[edit]
Either use the boost from the checkpoint or jump to the bottom floor of the pagoda in front of you where two white assassins (A-59 and A-60) are likely waiting for you. From the right corner to jump to the hill to find a white assassin. (A-61) Climb up the tree to reach the second level of the Pagoda where a red assassin (A-62) can be found. From here you can either use the Glove of Wisdom to break open the panels and use the trampoline on the first floor, or feel free to climb up the tree again to the third floor to take out a red assassin (A-63), but from there you will need to climb the tree and jump to the top floor to find a white assassin. (A-64) Use the Glove of Wisdom to reveal a room with six toads. This room has Dart Traps. You will likely have to kill all the toads by either using the Slingshot or Mini Bombs on them if you want to get #29 safely. If you are going for the Become the Master achievement at the same time, you will simply have to subtract 6 from your total score, and as there are Dart Traps near the toads the bauble can be reached safely by hitting it with the Whip from the side of the room. Exit the room make a right to find a white assassin (A-65) on the outside, but try to hit him from a distance or lure him away from the side of the pagoda as he is usually located next to a Dart Trap found on the outside wall of the pagoda. Jump up the nearby tree to reach the ninth checkpoint.
Checkpoint 9 to Checkpoint 10[edit]
In front of the ninth checkpoint is the tallest, and deadliest pagoda in Pain Cliffs and has a large gong located at the top (often referred to as "Gong Pagoda"). On the first floor of the pagoda are two red assassins (A-66 and A-67), the first of which will be waiting by the checkpoint, with the second one usually running over to you a few seconds later. After taking them out, head clockwise around most of the building to find #30 located just before a block. Push it with the Glove of Wisdom to avoid being hit by the Dart Trap there, and go around it and back to checkpoint nine. Jump to the roof the pagoda that had the toads to pick up #31-32 on the roof. Drop down to where you originally exited the toad room. Head left from the toad room exit to the end of the wood pathway and drop down to the grassy area below. Use a bomb in the little nook under the pathway behind you to reveal Hidden Room #5 (Bachelor of Secrets, World 2: Below the deadliest pagoda).
Shop #5 items[edit]
| Item | Cost | Description |
|---|---|---|
| Medium Health Bottle | 300 |
Restore health. |
| 1-Up | 20 |
Grants one extra life. |
| Chain Sticks | 400 |
Sticks connected by a chain; has longer reach. |
| Key | 25 |
Used for opening chests. |
| Small Health Refill | 5 |
Restores one heart. |
Purchase a key here. Exit the store and head counter-clockwise around the rock face, jumping from ledge to ledge to return to the pagoda just after the eighth checkpoint, and from there return back to checkpoint nine. From there, head to the left side of the pagoda, climbing up the exterior using the trees on the left side of the building to scale to the higher sections, and then using the clouds on the opposite side of the building to reach the roof. From the roof, head to the left hand side of the building where you should see a tall hill with a Flower Launcher on it. Carefully jump from the top of the object at the corner of the roof to the tree on the edge of the hill and then put your key down in order to use a Mini Bomb on the ground revealing Hidden Room #6 (Bachelor of Secrets, World 2: On a tall, green mountain top). Pick up your key and jump down into the room, then use a Mini Bomb on the wall that should be directly in front of you to reveal an opening. Make sure you have your key in hand as you enter it, which counts as Hidden Room #7 (Bachelor of Secrets, World 2: Escape from the poisonous water), and carefully drop down below to the Locked Chest #3 with #33 in it. Drop down to return to the pagoda just after the eight checkpoint, and return to the ninth checkpoint, and return back to where Hidden Room #6 was, but go past it and make and running jump (or a dodge jump if you are able) onto the roof of the pagoda below to reach #34. (Alternately, if you have the boomerang, you can obtain bauble #34 by standing on the corner of the roof of the toad building, jumping, and throwing the boomerang.)
Return to where Hidden Room #6 was a third time, but this time use the Flower Launcher to be thrown to a grassy area, and then head straight ahead until you spot some Hillbillies. Wait until the Raccoons appear to steal baubles from them and follow them through the maze to where the Raccoon Kingpin and the stump are. You do not need to take them out, instead bomb the patch of darker grass found to the left shortly after exiting the maze to reveal Hidden Room #8 (Bachelor of Secrets, World 2: Near the raccoon hideout). Drop down into it, and carefully jump from rock to rock (using the Candle or the Torch will help to see as parts are a little dark) until you find a Mysterious Stranger. In front of him is a rock with a small flower on it, jump to it and click the option to "Contemplate" it, which will teach you the Gatekeeper Lullaby on the Wooden Whistle. Use the song to open an nearby wall and Hidden Room #9 (Bachelor of Secrets, World 2: Use the wooden whistle) with a #35 in it. Go back to where you fell in and use the trampoline to bounce back out of the cave.
If you are not doing the Become the Master achievement, requiring you to kill all the assassins, you can simply head to the back of the building, and jump to the Bonsai Pot and then jump to the pathway to reach the tenth checkpoint. If you are trying to get all of the assassins however, you will need to head inside the Gong Pagoda and carefully make your way to the top. Move slowly, moving your camera around in order to spot Dart Traps, as the obvious path is the deadly one and you will often have to jump up the ramp from higher up rather from the bottom to avoid being hit by Darts.
- Second floor.
- There is one white assassin (A-68).
- Third floor.
- There are two white assassins and one red assassin (A-69 through A-71).
- Fourth floor.
- There are two white assassins (A-72 and A-73).
- Fifth floor.
- There are two red assassins (A-74 and A-75).
- Top floor.
- There are four white assassins (A-76 through A-79).
After clearing the Pagoda, head to the back to the ninth checkpoint, then head to the rear of the building and head to the nearby pathway by leaping to the Bonsai Pot and then to the pathway where you will find a white assassin (A-80). Continue further down the path towards the tenth checkpoint and you will encounter two red assassins (A-81 and A-82) just before you reach it.
Checkpoint 10 to Checkpoint 11[edit]
After the tenth checkpoint, head to the portal on your left to be teleported to a platform with a red assassin on it (A-83). From the portal you exited from, use the portal on the right to be teleported to another platform with several exploding barrels and two white assassins (A-84 and A-85). Again take the portal on the right of the one you exited from to be placed on yet another platform with a single white assassin (A-86) and more exploding barrels, and after taking him out, head to the portal straight across from the one you exited from. You'll be put on a platform with one exploding barrel and two white assassins (A-87 and A-88), then head to the portal straight across from the one you exited from to be taken to a platform with #36. Jump down the clouds to the right to the nearby platform with four portals on it. Take the farthest one straight ahead, which will take you back to the beginning portals after the tenth checkpoint. This time, take the portal straight in front of the checkpoint. This will put you on a platform with a red assassin (A-89) and some exploding barrels. Take the portal to the left of the one you exited from to be put on the last platform with the eleventh checkpoint(don't activate the checkpoint if you are trying to collect all baubles, and doing so will make obtaining the last baubles very difficult) and a red assassin (A-90).
If you are trying to collect all of the baubles, jump off the edge to return to the tenth checkpoint and then run all the way back to the Shortcut Eagle (found just after the third checkpoint), and this time do take him.
For Ooze Herding, turn around from checkpoint 10 and backtrack to the walkway around the gong pagoda. (Note: To reach checkpoint 10 using the Shortcut Eagle; drop from its back after 10 waves of birds.) At the pagoda, head to the right and drop down between the tower and the room with six Toad (orange) to find the oozes. With an ooze in hand, head through the toad room (keeping to the left or right wall- bomb the toads first for safer passage) and backtrack past checkpoint 8 all the way across the pole platforms and clouds to checkpoint 7. Use a platform pole to hop over to the corridor of clouds leading to checkpoint 12. At the end of this corridor, there is a small house on the hill to the right. The Ooze Farmer is inside of the house (See also: Checkpoint 13 ).
Checkpoint 11 to Checkpoint 13[edit]
If you are not interested in bauble completion, activate the eleventh checkpoint, and if you aim your jump carefully, you will land in the area above which is Hidden Furniture shop #1 (Master of Decor, World 2: All together now!). If you miss the checkpoint jump, you can also access the furniture shop by jumping from the first trampoline onto the clouds and then into the shop. From there carefully jump from pole to pole until you reach the area with clouds and pools of piranha. Do not linger on the clouds too long, as some will crumble and the piranhas will jump out of you so make your way up quickly past them to an icy area. From there jump to the dissolving cloud below and then to the snowbank across from the cloud. You can either climb up to the top for the thirteen checkpoint, or use clouds found near the twelfth checkpoint to reach the clouds before it in order to get the remaining assassins as explained below.
Checkpoint 13[edit]
The eagle will drop you off on top of a wooden structure where you will find #37-41. This area introduces icy surfaces which can cause players to slide off platforms if not careful, whereas the snowy platforms that appear here as well, will not cause players to slip. There is another large bell here that must be rung, so head to a pillar to push the log with the Glove of Wisdom into the bell causing the wooden bridge behind the checkpoint to lower. Hit the final checkpoint.
If you are going for the Become the Master achievement, head backwards from the thirteenth checkpoint towards the twelfth checkpoint, and use the small clouds near it to get around the checkpoint (feel free to activate it) and jump to the area made up entirely of clouds. You will come across a white assassin (A-91) on your left, then another white assassin (A-92) up and to your right. From there, there will be and two red assassins nearby. (A-93 and A-94) and just beyond them is another white assassin (A-95). Climb all the way to the top of the clouds here to find a white assassin (A-96) waiting on top. Continue forward, heading further away from the twelfth checkpoint to a grassy hill where a small pagoda and two white assassins (A-97 and A-98) can be found. Climb back up to the top of the grassy hill to jump to the clouds nearby to reach a red assassin and a white assassin (A-99 and A-100).
Going even further back towards checkpoint 5 (or coming from checkpoints 5 via the cloud shortcut), shortly after reaching the cloud passage (from checkpoint 5 towards checkpoint 13), stand on the small patch of crumbling clouds to find Hidden Furniture shop #2 (Master of Decor, World 2: A fluffy trap door.).
Return back to the thirteenth checkpoint, and pick up the final #42 on the wooden walkway and then head up the icy hill.
Boss[edit]
Destroy the Cage on top the icy hill and save the villager to complete this area and the zone.
Digging spots[edit]
A total of 380 baubles can be dug up in Pain Cliffs per day. All chests can be dug up in tribulation mode
| # | Image | Last Checkpoint |
# of Baubles | Notes |
|---|---|---|---|---|
| #1 |  |
Start | (50) |
Just before the first checkpoint, head to the right and jump down to a small ledge. |
| #2 |  |
1 | (20) |
Past the first checkpoint, climb up the tree opposite the pagoda and from there jump to the flat hill area directly across. |
| #3 |  |
3 | (50) |
Right before the fourth checkpoint, drop down to the grassy areas under the house and head clockwise around to the back. Dig on the flat landing right before the narrow strip. |
| #4 |  |
5 | (50) |
Just after the fifth checkpoint, go to the left of the pagoda filled with traps and drop down to the grass area below the walkway. |
| #5 | 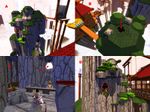 |
7 | (50) |
After the seventh checkpoint, cross the bridge and bomb the top of the mountain to reveal a hidden shop. Inside, throw a bomb into the area behind the Merchant to open up a "back door". Right outside the opening is the dig spot. |
| #6 |  |
8 | (50) |
After the eighth checkpoint, use the trampolines and/or tree branches to get to top of the pagoda tower. Just before crossing the small bridge, jump down to the grassy slopes below, and move forward along the narrow cliff edge and around the corner. Short jump to the short broken section of cliff ledge and dig. |
| #7 |  |
9 | (20) |
After the ninth checkpoint (on the bottom ledge of the huge pagoda), go to the left side of this pagoda, and use the trees and the small upright pagoda points to jump to the 2nd-from-the-top pagoda ledge. From there, move around to the other side of the pagoda and use the clouds to jump to the roof. Run across to the other side of the roof and jump from the pagoda point in the corner across to the cliff. Use the spinning flower to be thrown across to the mountain. Run along the side of the mountain to find two hillbillies below a cave. Dig on the ledge below and to the left of the cave. |
| #8 |  |
9 | (20) |
(Same as above) After ninth checkpoint, make your way to the top of the huge pagoda, and jump across to the cliff. Use the spinning flower to be thrown across to the mountain. Run alongside the mountain edge and run passed the hillbillies to the right (towards the Raccoon Kingpin). Upon entering the tree maze, take the first right and follow it all the way to a dead end and dig. |
| #9 | 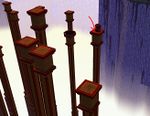 |
11 | (50) |
After the eleventh checkpoint, there are at two Exploding Barrels sitting on poles, one close to the checkpoint and one a further away. Head to the pole with the Exploding Barrel furthest away and dig on that pole. A carefully aimed Mini Bomb can clear the Exploding Barrel if you are worried about it. |
| #10 |  |
13 | (20) |
After the final checkpoint, dig under the wooden walkway. |
Glitch location[edit]
- Primary article: Unintended Coursework
If you use the shortcut eagle you will miss the glitch. The Glitch is located underneath checkpoint 11 you can use the checkpoint boost to enter the fancy furniture store then jump out to the balcony to reach the red crystal to start the timer. (If you miss the boost you can use the trampoline after the checkpoint then jump to the clouds to reach the same balcony.)
There is two methods for the glitch
Option 1 The traditional way by hitting the red switch then jumping on the wooden boards to reach the glitch.
Option 2 facing the checkpoint walk to the right then rotate your camera so you can see a large red crystal attached to the cliff face. above the crystal you should see the glitch. Line your character up facing the glitch then walk off the platform and at the same time throw a mini bomb. If you time it right you will hit the glitch. Note- If your doing this in tribulation mode you may lose a few lives here with this method. Infinite continue coin would be recommended.
Rewards[edit]
Exploration Mode[edit]
- 15 Baubles
Normal Mode[edit]
- 15 Baubles
- Glorious Chest (Once per day) containing:
- 2 Bauble Bubbles
- 1 Continue Coin
- A chance to get a Super Weapon Box
- A very rare chance to get a Kaiser Snake Weapon Box
- Glitched Chest (Once per day, only if this zones glitch has been destroyed)
- Bonus Reward Chest
- 25-75 Baubles (random amount)
Tribulation Mode[edit]
- 250 Baubles
- Glorious Chest (Once per day) containing:
- 4 Bauble Bubbles
- 1 Continue Coin
- A chance to get a Storm Wizard weapon skin
- A very rare chance to get a Kaiser Snake Weapon Box
- Glitched Chest (Once per day, only if this zones glitch has been destroyed)
- Bonus Reward Chest
- 1 Storm Wizard Z-2
- 25-75 Baubles (random amount)
NPCs[edit]
Allies[edit]
- Betty Bauble
- Cat
- Fancy Proprietor
- Gourdon the Racing Choya (Normal Mode only)
- Mysterious Stranger
- Octopus
- Shortcut Eagle
- Shopkeeper
- Villager
Foes[edit]
- Assassin (red)
- Assassin (white)
- Assassin (purple)
- Assassin (Glove of Wisdom)
- Hillbilly
- Owl
- Piranha
- Raccoon
- Raccoon Kingpin
- Toad (orange)
- Tribulation Cloud (Tribulation Mode only)
Objects[edit]
- Adventure Notebook
- Barrel
- Block
- Cage
- Dart Trap
- Exploding Barrel
- Flower Launcher
- Furniture
- Helping Hand
- Happy Cloud (Exploration and Tribulation Mode only)
- Jumping Rock (Tribulation Mode only)
- Picnic basket
- Portal
- Special Jug
- Spikes (Tribulation Mode only)
- Spears (Tribulation Mode only)
- Still
- Stump
- Trampoline
Notes[edit]
- If you are going for the Become the Master achievement, use the Team Score in the top right corner to keep track of how many assassins you've killed. Be careful not to kill any other foe, as the counter will increase by one each time a foe is killed.
- Feats 6-9 as indicated by the Explorer's Second Super Adventure achievement are not unlocked by going the full route. Instead, take a detour following the cloud path on the right of the building after the fifth checkpoint to hit these areas.
- In the 2017 update, dart traps outside of Tribulation Mode deal damage and cause a knockback, but do not kill on contact.
Trivia[edit]
- There is an object that can be seen, but not reached, in a small corridor found near sixth checkpoint with the wall indicating the unimplemented Glove of Power upgrade. Players are not able to access it, as the nearby block cannot be destroyed. While some were able to reach during the initial release of World 2 in 2013 as well as in 2017, it wasn't coded to do anything at the time, and as its creator Josh Foreman no longer remembers what the item was to be, its purpose is unknown.
- The rocks in this map are based on the rock textures from Contra. [1]
References[edit]
- ^ quote from Josh Foreman, twitch
