Graphical user interface
The graphical user interface (GUI) is the interface displayed on top of the player's view of the game world. The interface features overlay information, head-up display (HUD) elements (such as the skill bar), and movable panels. It is primarily mouse-driven, but certain functions may be assigned keyboard shortcuts in the Control Options, some of which are bound by default.
Note: All keyboard shortcuts provided in this article are the game's default bindings.
Overlay information[edit]
Overlay elements appear as a part of the game world and change position according to the player's view.
Nameplates[edit]

All NPCs and player characters in the world have nameplates denoting various bits of information about them, including their name and level. For players, the number can be yellow instead of green, indicating the number of unlocked Masteries instead of their level. NPCs have their role displayed along with their name (such as '[Merchant]' ), while players have their current title listed under their name if the player chooses to display one, and represented guild name and tag displayed. If a player's character has attained world completion, that character will have a small star displayed on their nameplate as well, to the left of character level. A miniature health-bar is also shown.
Unless a character is selected, only the name and guild tag portion of their nameplate is displayed. Holding Left Alt displays the whole nameplates of nearby allies. Holding Left Ctrl displays the whole nameplates of nearby enemies. Options exist to have nameplates be shown all the time for enemies or allies. When an NPC or a character is selected, they are marked with a small downwards pointing arrow above the head and a circle around the feet, green for allies, and red for enemies.
Certain special or functional NPCs have an icon displayed above their head, regardless of whether they are selected. These include vendors, scouts, NPCs with roles in events, key personal story characters, and many others. Downed players and pets also have an icon displayed above their heads. Players can choose to display a ![]() Commander tag or
Commander tag or ![]() Mentoring Badge above their heads to make it easier for other players to find and follow them.
Mentoring Badge above their heads to make it easier for other players to find and follow them.
Targets may be called on selected NPCs and players with Ctrl+T, which displays a large red ![]() target reticle above their head. Other players may then switch straight to this target by pressing T.
target reticle above their head. Other players may then switch straight to this target by pressing T.
During PvP League seasons players will have a badge next to their name depending on which division they're in. ![]()
![]()
![]()
![]()
![]() After a PvP season has ended, players will have the badge for the division they were in when the season ended.
After a PvP season has ended, players will have the badge for the division they were in when the season ended.
Character nameplates are color-coded based on their relationship with the player character at that time:
- ⬤ Red text — Hostile enemy.
- ⬤ Yellow text — Neutral (turns hostile if attacked). .
- ⬤ Green text — NPC ally.
- ⬤ Teal text — Player ally.
- ⬤ Gold text — Fellow player guild member.
- ⬤ Blue text — Party member, as well as one's pet or minion.
- ⬤ White text — Ambient creature, neutral and dies in one hit.
Nameplates on the NPCs and characters should not be confused with the target indicator, which is part of the HUD (heads-up display).
Combat indicators[edit]
 Critical hit floating text. |
 A skill combo icon with the name of the resulting effect. |
Floating combat text appears above in-world elements as damage is dealt or received. This text is color-coded as follows:
- ⬤ White text — damage dealt.
- ⬤ Yellow text — barrier damage dealt.
- ⬤ Red text — damage received.
- ⬤ Green text — healing provided or received.
- ⬤ Light blue text — barrier applied to allies.
- Critical hits are shown with slightly larger text in a red splash
- If a skill combo occurs, a heart-shaped icon and the name of the resulting effect are shown
HUD[edit]
Adjusting HUD elements[edit]
The position and size of certain HUD (heads-up display) elements can be changed. These elements include the chat panel and the compass. Both can be resized within certain bounds, and can have their positions swapped with other elements on the same respective sides of the screen.
The chat panel can be swapped with the party interface by dragging on the space to the right of the chat tabs. Drag it towards the party interface until a white rectangular outline appears. Then release the mouse button and the elements will swap places.
The compass can be swapped with the elements in the top-right corner of the screen in exactly the same manner.
Skill bar[edit]
- Primary article: Skill bar

The skill bar displays the icons of a character's currently equipped skills. Skills can be activated by clicking on their icon, or by pressing their assigned keyboard shortcut - which is displayed beneath the skill icon.
- 1–5 Weapon skills: Slots one to five activate weapon related attacks.
- By default, the first skill auto-attacks after attacking a foe.
- The auto attack skill can be changed by pressing Left Ctrl+Right-Click while the cursor is over a different skill icon (except for targeted skills).
- 6 Healing skill: The sixth slot (immediately to the right of the health orb) is a designated healing skill.
- 7–9 Utility skills: Slots seven through nine represent the character's utility skills.
- 0 Elite skill: The last slot is for the character's elite skill.
Skills that require the player to target them have a red target reticule around the keyboard shortcut, below the skill icon.
The skill bar indicates whether the selected target is out of range of a skill by showing a red line beneath that skill's icon.
Profession mechanic bar[edit]
- Primary article: Profession mechanic
The profession mechanic bar (F1—F5) appears above the weapon skills (to the upper-left of the health orb). Its features depend on the character's profession mechanic:
 Guardians: three virtues; it is lit by blue flames whenever Virtue of Justice is ready to cause burning on attack.
 Warriors: the yellow bar shows the character's current adrenaline relative to their maximum and marks the three stages. To its right is the burst skill for the currently equipped main-hand weapon.
 Revenants: two legends the player can swap between by invoking the other legend
 Engineers: a tool belt which shows skills which depend on the equipped healing, utility, and elite skills.
 Rangers: the commands to manage the ranger's pet.
 Thieves: the steal commands are on the left; the bar shows the amount of initiative points accumulated.
 Elementalists: the four elemental attunements.
 Mesmers: the four different ways of shattering illusions and shows the number of illusions active.
 Necromancers: the green life force bar fills as creatures near the necromancer die. To its right is the command to enter Death Shroud.
Some elite specializations modify the contents of the profession mechanic bar.
Special action skill[edit]
- See also: Special action skill
In certain content, a special action skill will appear above the profession mechanic bar. This button follows the same principles as typical skill bar skills.
Active effects monitor[edit]
- See also: Effect
The active effects monitor shows current conditions, boons, and other effects on the character. This appears above the right-hand side of the skill bar - the healing and utility skills.
Weapon swap[edit]
- Primary article: Weapon swap
The weapon swap button (to the left of the skill bar) switches between the two equipped weapon sets. The feature is unlocked at level 10, it is bound by default to `. Both the elementalist and engineer professions, who have access to attunements and kits respectively, can't swap their weapon sets while in combat or inside a started PVP match.
After picking up a bundle (or other non-weapon items) the weapon swap button changes to a drop button. In addition, holding a bundle changes your available weapon skills (1–5). Clicking the drop button drops the held item and restores the currently equipped weapon's skills.
Template select[edit]
- Primary article: Template
The template select is located directly above the weapon swap button. This selection provides quick access to changing character's available build templates and equipment templates.
[edit]
- Primary article: Mastery skill
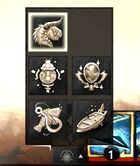
“You now have access to the Mastery Skill menu. Clicking this button will bring up a list of mastery skills you can use.
— in-game hint
The Mastery Skill menu is located directly below the weapon swap button. It provides quick access to the mastery skills unlocked by training the End of Dragons and Secrets of the Obscure expansions' masteries.
Right-clicking one of the skills sets it as the current for the "Activate Mastery Skill" keybind (default J). Individual keys can be assigned to each of the skills in the Control Options as well.
Mount button[edit]

- Primary article: Mount
Left-clicking the mount button (to the right of the skill bar) summons and mounts the currently selected mount. Right-clicking it allows to change the selected mount. Alternatively, mounts can be activated (mounted) , or by pressing their assigned keyboard shortcut - which is displayed beneath the mount icon.
When mounted, weapon and utility skills are replaced by mount skill bar, while the mount button changes to the dismount button.
Novelty button[edit]
- Primary article: Novelty
The novelty button is directly below the mount button. The button is a generic symbol with a select adjacent to it. The button activates the currently selected novelty. The select allows you to change the type of novelty activated by the button (e.g. tonic, toy). Individual novelties must be changed in the hero panel.
Health orb[edit]
- See also: Health
The red health orb divides the skill bar into two halves. It is a visual indicator of the player character's current health relative to their maximum health. The current health value is also displayed as a white number in the center of the orb. Hovering over the orb displays a tooltip showing the character's current and maximum health.
Endurance bar[edit]
- See also: Endurance
The endurance bar is the yellow arc above the health orb. It shows how much endurance the player character has available for dodging. A player is able to dodge twice without waiting for endurance regeneration, which is indicated by the line through the center of the arc.
Experience bar[edit]
The experience bar runs along the entire bottom edge of the screen, beneath the skill bar. Hovering over the bar displays a tooltip showing the current progress towards the next level.
On the left end is the player's current level. This number is accompanied by the player's effective level in green, if the player character's level has been dynamically adjusted.
The amount of the bar filled with experience depicts the character's progress towards the item displayed at the right end of the experience bar. If the player character is below level 80, the right end of the experience bar shows the next level. If the player character has reached level 80, the experience bar shows progress on the current mastery track while playing Heart of Thorns or Path of Fire material.
During structured PvP the experience bar is replaced with a PvP Rank bar, which shows your progress to the next rank increase. During World versus World the experience bar is replaced with World Experience bar, which works the same way as PvP Rank bar.
Target indicator[edit]
The target display is located in the top center of the screen and provides information about the currently selected enemy or ally. Displayed are the target's name, a portrait, current health, effects, level, rank, abilities and Defiance bar if any.
The color of the enemy NPC's level varies depending on the apparent or adjusted level of the player character. If the character is four or more levels higher than the enemy, the mob's level has a green tint to it. If the character's level is three or more levels below that of the mob, the mob's level has a red tint to it. If there is a greater level difference, the mob's level appears as purple-red.
Player interaction[edit]
Players can interact with each other by right-clicking their name or portrait in the target display, a member of a party, contacts, guild panel, or chat. This will bring a dropdown list of actions for the targeted player account/character:
- Whisper – Start private conversation in the Chat panel
- Invite to Party – Send an invite to your party or join their party
- Inspect Cosmetics – Open Cosmetic Inspection window displaying currently applied skins
- Send Mail – Mail a message
- Add Friend – Add to your friends list
- Guild Invite – Invite to your guild (requires member rank with proper privileges)
- Block – Add to your block list, you will not see what they say in chat and they cannot contact you in any way.
- Report – Report target player for improper conduct.
Compass[edit]
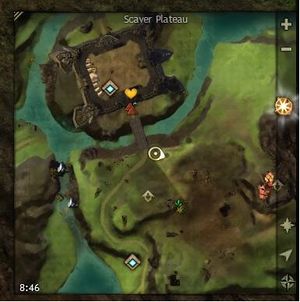
The compass (often referred to as a minimap) shows an overhead view of various features centered around the player character. Locations obscured from above are revealed after the character travels nearby - this applies primarily to underground and underwater passages.
UI elements on the right hand side of the compass are normally hidden and only show when the mouse cursor is hovered over it. The entire compass section can be moved to either bottom-right or top-right corner of the screen by clicking and dragging its UI section on the right. Fully zoomed in, the horizontal and vertical range of the compass is 4250 units and the diagonal range is 6000 units.
On the right-hand side are the following icons:
- Zoom In - Zooms in by one notch.
- Zoom Out - Zooms out by one notch.
- Pan to Story - Pans the view of the compass to the location of the next personal story step.
- Toggle Rotation / Pan to Character - Toggles whether upwards on the compass is always north, or the direction the camera is facing in. If the character is not in the central position on the compass, pans the view to the character.
- World Map - Opens the fullscreen world map; shortcut M.
The compass can also be configured to display a clock in the corner, either displaying local time, server time or Tyrian time. Whether the clock is in 12 or 24-hour format depends on the system time settings - configured outside of the game. Tyrian time refers to the in-game time cycle as seen by the in-game day/night cycle.
The compass shares much of its information and graphical markers with the larger map interface. In addition to the icons shown on the world map, the compass also shows:
- - Ore nodes.
- - Logs.
- - Ingredients.
 - Downed allies.
 - Downed enemies (in PvP and WvW).
- Certain events and map occurrences, like reward chests spawning, will produce map pings. These are indistinguishable from those done by players.
Many of the compass icons will display a symbol next to it to show the relative altitude between it and the player character:
Like with the world map, holding down Shift allows a player to ping points,or draw white lines by clicking and dragging with the right mouse button. Clicking on the compass while holding Alt will place a personal waypoint that displays an icon for the player and all party members, both on the compass and on the world map. Commanders have the capabilities of placing additional icons for their squad members to see.
Content guide[edit]
“The Content Guide points the way to nearby events, renown hearts, scouts, and unexplored areas. Check here if you're ever lost and looking for something to do!
— In-game description.
The content guide acts as a compass that points towards the nearest story instance starting point, event or map completion objective, depending on its setting:
- Default - Will point only towards the next story objective until all available story is complete.
- Off - Disables the content guide altogether.
- Disable Personal Story - The content guide ignores story objectives, and prioritizes objectives as follows:
- Renown hearts based on distance to the character and character level.
- Nearest event within the currently revealed parts of the map.
- Other map completion objectives and unexplored areas.
- Disable Events and Personal Story - The content guide will only point towards map completion objectives, prioritizing hearts based on distance and character level.
When no more story is available and the content guide is set to default, it will behave the same when as when it's set to "Disable Personal Story". When no more story is available and all objectives in a map are completed, the guide will attempt to point towards zoning portals leading to other maps with missing objectives.
Event involvement[edit]
The event assistant shows the current objectives of the player, such as events in the area. The messages in the event assistant are color coded:
- ⬤ Green text — personal storyline steps
- ⬤ Yellow text — renown hearts/Adventures
- ⬤ Orange text — dynamic events
- ⬤ Red text — dungeon objectives
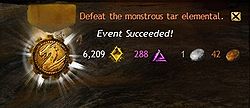
After each event's completion, a medal will appear showing the character's level of participation. (Successfully completed heart tasks will also show a filled heart.) Rewards are indicated as follows:
- — The amount of experience earned.
 — The amount of karma earned.

 — The number of coins earned - gold, silver, or copper.
Pinned achievements[edit]
Achievements can be displayed using the Watch List in the hero panel. If no achievements are selected and Daily Completionist has not be completed, daily achievements are shown depending on a player's current game type: PvE, WvW or PvP.
Chat panel[edit]
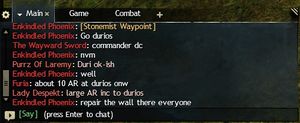
The chat panel contains a history of in-game chat for the duration of the login session. By default, it is situated in the bottom left corner of the HUD. If pulled upwards it will attach itself to the top left of the screen.
Menu bar[edit]
The menu bar is located in the top-left corner of the screen. The icons provide links to the various game UI panels.
| Icon | Name | Shortcut | Explanation |
|---|---|---|---|
| Game menu | Esc | Opens a panel with links for options, account settings, support, and to log out of the game. | |
| Contacts and LFG | Y | Opens a panel for contacts and the Looking For Group tool. | |
| Hero | H | Opens a panel with information about the character and account.
| |
| Inventory | I | Opens a panel to show items in the character's inventory. The icon is tinted red when the inventory is full. | |
| no default | Opens a panel to read or send mail. Displays a number when there is unread mail. | ||
| Guild | G | Opens a panel with guild information, shows currently active guild upgrades. | |
| World vs. World | B | Opens a panel with World versus World information and access to the game mode. | |
| PvP | no default | Opens a panel with Structured PvP information and access to the game mode. | |
| Wizard's Vault | Shift + H | Opens a panel with Wizard's Vault information and rewards.
| |
| Black Lion Trading Company | O | Opens a panel that includes the Gem Store, Currency Exchange and Trading Post.
|
Note: For new players, some of the icons will not be available until their first character reaches a certain level. See Level Rewards for more details.
Party and Squad[edit]
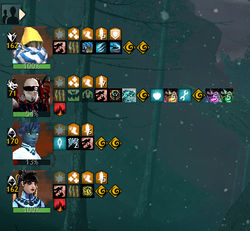
After joining a party or a squad, the party display appears on the top left and shows the avatars, health, professions, and levels of your party members. It also shows speech bubbles when party members send a chat message and effects currently on the party member.
- P, by default, brings up the party/squad panel.
Screen edge[edit]
When the player is under certain effects the edges of the screen is modified to indicate the effect.
- Normal damage is indicated with increasing shades of red.
- The blind condition is indicated by darkened and fading edges.
- The dazed condition is indicated by purple-pink edges.
- The stun condition is indicated by white edges.
Panels[edit]
Vendors[edit]
When you talk to a vendor, a vendor panel is opened.
Unclaimed loot[edit]
If auto-loot is disabled, an unclaimed loot window is displayed when a corpse is searched. This lists the items found on the body, which may optionally be taken.
Other elements[edit]
In addition to the panels listed above which are available by activating icons on the menu bar there are other temporary information and interaction windows.
Map[edit]
Pressing M opens the game map. It functions similarly to the compass, but can zoom out to reveal the entire world map.
Tooltips[edit]
Mousing over a skill icon in the user interface reveals a tooltip that describes what the skill does when it is activated. The information displayed in the tooltip is updated as the character's attributes and traits are changed. The blue text in the tooltip indicates the effects of the skill that are currently modified or enabled by traits.
Screenshots[edit]
To take a screenshot without GUI, either toggle the GUI with Control+Shift+H or press Control+Shift+Print screen for a single screenshot. This creates a normal quality JPEG. Stereoscopic (3D) screenshots can be created by assigning it to a keybind. The user may append "-bmp" to the command line to take all screenshots in the lossless bitmap format.
Notes[edit]
- Before the June 28, 2022 update, a little
 yellow shield used to be displayed below the health orb if the character had some damaged armor as a result of being defeated. If an armor piece was broken, the shield would become cracked and red.
  Hovering the icon showed what piece of armor was damaged/broken. Damaged or broken armor could be repaired at no cost at Equipment Repairs NPCs or anvils spread around the world.
See also[edit]
- Account Medals
- Chat panel
- Contacts panel
- Controls
- Guild panel
- Hero panel
- Inventory
- Options
- Login screen


