Twilight Oasis Fractal
Twilight Oasis Fractal
- Levels
- 80
- Type
- Fractal
- Dungeon
- Fractals of the Mists
- API
- 1267
| Image(s) |
|
Click to enlarge. |
“Spearhead the assault on the oasis.
— In-game description
The Twilight Oasis Fractal is a Fractal and occurs at levels 16, 41, 59 and 87. Players take the role of Mordant Crescent forces and join Palawa Joko as he solidifies his control over Elona.
Objectives[edit]
- Meet Dessa and assist with her experiments.
- Fractal Difficulty Scale: x
- Personal Fractal Level: x
- Purge the village.
- Cull the resistance forces.
- Destroy the Sandbinder.
- Elite Sunspear Sandbinder

- Continue cleansing the city.
- Continue fighting through the resistance forces to reach the inner gate.
- Destroy the dervish boss.
- High Priestess Amala

- Hunt the sandbinders shielding the gate.
- Sandbinders killed: x/2
- Return to the temple gate.
- Defeat High Priestess Amala.
- High Priestess Amala

- Kill the Priestess of Lyssa.

Time remaining: x:xx - Kill the Priestess of Melandru.

Time remaining: x:xx - Kill the Priestess of Dwayna.

Time remaining: x:xx - Kill the Priestess of Grenth.

Time remaining: x:xx - Kill the Priestess of Balthazar.

Time remaining: x:xx
- Kill the Priestess of Lyssa.
- Next island: x
Rewards[edit]
- Primary article: Fractals of the Mists#Rewards
Walkthrough[edit]
Overview[edit]
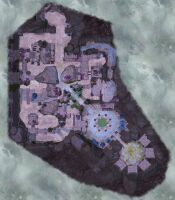
When players first enter the fractal they will be greeted by Palawa Joko, who thanks them for tracking down the Sunspears. Players will need to make their way through the small town and down the stairs to the southwest and into the small arena encircled by buildings where they will fight an Elite Sunspear Sandbinder.
- Elite Sunspear Sandbinder
The most annoying part of this fight are the two Tornadoes roaming the area. They do not target players directly, however if a player gets too close they will start gravitating towards it. The tornado will Blind players and deal more damage the closer one gets to the center.
Every once in a while he will gain a defiance bar and start channeling Wall of Earth which will creating an expanding circle that deals a large amount of damage to players it hits. There is no method to avoid this attack.
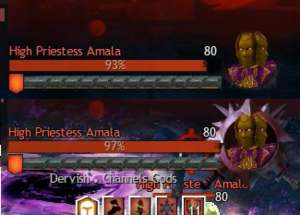
After defeating the Sandbinder, the wall in the back of the area will disappear allowing players to move forward. Shortly afterwards, players will reach a courtyard with High Priestess Amala in the center. When her health reaches 75%, she will do a massive attack that will "kill" all players and she will retreat to the temple in the back. Joko will appear shortly after and turn all players into Awakened, granting access to the Enhanced Reflexes special action skill.
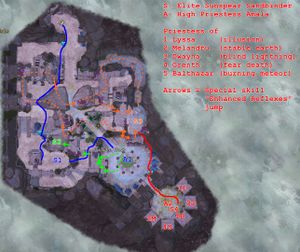
Players will need to use their special action skill to jump up the buildings to the right and navigate through the rooftops in order to find and kill the two Sandbinders maintaining the barrier. It is possible to reach the Sandbinder through a series of shortcuts, as shown in the images below.
After killing the final Sandbinder, players may drop down to the courtyard and head into the temple where they will find Amala being protected by nearby Sunspears. After killing all of the Sunspears, the fight against Amala will begin.
High Priestess Amala[edit]
- Lyssa phase
Amala will begin by disappearing and then summon multiple clones of herself. The clones will attack players with Winds of Chaos, dealing a small amount of damage and applying conditions. However, like mesmer clones they cannot withstand many attacks. There will also be Portal traps spread around the area that will teleport players into the air and give the (unnamed effect) effect while floating. After a certain period of time Amala will disappear and reappear in a different location, resummon clones and change the layout of the portals. Players will need to find the real Amala among them. Tab-targetting by default jumps to the highest ranked enemy. Pressing Tab will typically select the right clone. The correct clone will have the Legendary-rank purple circle on the NPC portrait. The other clones have no colored ring on their portraits.
A player will occasionally be targeted by her Polymorph Moa attack, indicated by a small circle expanding underneath their feet. Once fully filled, all players within that circle will be transformed into moas. This can be dodged, evaded and blocked. If this skill goes off while the character is in the air via Enhanced Reflexes, it is evaded, and it cannot harm allies.
Once she is brought down to 85%, she will teleport to the center and start channeling Mystic Detonation. If her defiance bar is not broken in time, everyone will take a large amount of damage and she will heal (slightly). Once broken the barrier protecting the Priestess of Lyssa will fall. If the priestess is not defeated during the time limit, Amala will heal slightly.
The Priestess will teleport to a different spot every 25%; going West, East, then North (relative to her platform). A direction may be skipped if she takes too much damage while stunned. Once she is defeated, the next phase will begin.
- Melandru phase
This phase starts with her summoning a Champion Earth Elemental This elemental will fixate on a random player, targeting only them with its attacks. It is not worth the time to kill this champion, however the fixated player is recommended to kite it away from the rest of the team so that they may focus on Amala.
Starting at this phase, Amala will occasionally use her Mystic Wave attack (similar to the Wall of Earth attack used earlier), indicated when she brings her scythe above her head and a small circle appears in front of her. This attack can only be avoided by using your special action skill. See Aerialist achievement below.
At 65% she will start channeling the same attack as before. Player will need to break her defiance bar again in order to reveal the Priestess of Melandru. The Priestess will have two Veteran Earth Elementals guarding her, and will also constantly apply 25 Stability to herself.
- Dwayna phase
At the start of this phase, she will start by channeling Smite Undead, marking where players are standing with a small circle and lightning will fall shortly. If hit, you will take a small amount of damage and be Dazed for a short while. She will continue to use this attack throughout this phase. Players should try to run away from each other during this phase and try not to cross anyone else's line of circles. Using your special action key to leap into the air can help you and your teammates avoid damage, as the AoE tracks footsteps, and can't appear while you're in the air.
At 60%, Amala will summon Tornadoes similar to those summoned previously by the sand binders. These will rotate around the area, and draw in and Blind your character much like those you have encountered before.
At 45% she will teleport to the center and start channeling the same attack and players will need to break her defiance bar again to reveal Priestess of Dwayna. Her platform is showered by lightning.
- Grenth phase
Her primary attacks here are her melee strikes, which will summon small Chillblains and Sand Swell AoEs that detonate and apply Poison and Chilled, and Torment and Chilled respectively, all on top of knockdowns and Bleeding from the strikes themselves; Amala will also use an Executioner's Scythe and Soul Spiral to stun a player and apply Chilled within close proximity.
She can also cast Rise which will summon ten Shambling Horrors as well as an additional five for every target hit by this attack, with each Shambling Horror lowering the damage she takes. She also has a smaller, subtler attack: Claim Soul. This small AoE does no damage, but will instantly down a player if they are hit by it (this will ignore Death Shroud, Rigorous Certainty, etc).
After reaching 40%, she will create walls around the arena, summon Veteran Flesh Wurms, and teleport to a random spot behind a wall. Touching the walls will apply Fear, so they must be jumped over using your special action skill. You may also simply range her until she comes back.
At 25% she will teleport to the center and start channeling the same attack and players will need to break her defiance bar again to reveal Priestess of Grenth. There are a couple of enemies on the platform with her, but they are easily dealt with.
- Balthazar phase
Amala will periodically gain 3 boons ( Protection, Swiftness and 10 Might) throughout this phase, with one application every 10 seconds.
In this phase the AoEs from Amala's melee combo will apply burning, as well as small knockbacks from the circular AoEs, and larger knockbacks from the cone shaped AoEs that knock you away from Amala.
Every once in a while, she will use Call Meteor on a random player, marked by the large circle on the ground. The meteor will do a large amount of damage when it lands and a small shockwave will spread through the area dealing a small amount of damage. This shockwave can be jumped over (special action skill is not needed). The meteor's radius increases with Fractal Tier (1,2,3,4)
Amala can also use a more powerful form of this attack, which has a far larger AoE, will still send out a shockwave, while she will simultaneously send a large pattern of circular, knockback applying AoEs from her current location.
At 18% hp Amala will spawn two large fiery tornadoes, with one being far larger than the other. The large tornado (roughly 600 units in radius) will slowly move in a large circle around the area, while the other will travel in an Epitrochoid pattern around the outside of the area. These tornadoes will draw you in and deal damage depending on how close you are to their center.
At 5% she will teleport to the center and start channeling the same attack and players will need to break her defiance bar again to reveal Priestess of Balthazar. She is immune to damage, but is tethered to four nearby Sunspears. Killing each Sunspear decreases her health by 25%.
After killing the final priestess, players can head down and defeat Amala.
Once she is defeated, players may watch Palawa Joko awaken Executioner Amala.
Achievements[edit]
| Hollow Victory | Fractals of the Mists | 1 5 |
|---|---|---|
| Complete the Twilight Oasis fractal on the Master tier.You committed the ultimate betrayal. Your weakness cannot be forgiven. | Completed the Twilight Oasis Fractal on the Master Tier | 5 |
| Aerialist | Fractals of the Mists | 5 |
|---|---|---|
| Jump over Amala's Mystic Wave attack three times without being hit. | Jumped Amala's Mystic Wave Three Times | 5 |
- Achievement qualification may be tracked via the Achievement Eligibility: Aerialist effect.
| Mercy of the Mordant | Fractals of the Mists | 5 |
|---|---|---|
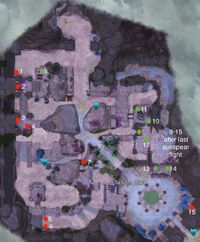
| End the suffering of all 15 downed foes in the Twilight Oasis fractal in one run.I have to admit I'm a little disturbed by your enthusiasm. | Ended the Suffering of 15 Downed Foes | 5 |
- See the map to the right.
- Progress can be tracked via the Achievement Eligibility: Mercy of the Mordant effect.
NPCs[edit]
Allies[edit]
- Awakened Occultist
- Awakened Mummy
- Awakened Soldier
- Executioner Amala
- Elite Awakened Abomination
- Palawa Joko
- Veteran Awakened Canid
- Veteran Awakened Ravager
Foes[edit]
- Elite Sunspear Sandbinder
- High Priestess Amala
- Priestess of Balthazar
- Priestess of Dwayna
- Priestess of Grenth
- Priestess of Lyssa
- Priestess of Melandru
- Sunspear Priestess
- Veteran Sunspear Beguiler
- Veteran Sunspear Crusader
- Veteran Sunspear Defender
- Veteran Sunspear Warrior
- Village Archer
- Villager
- Wounded Sunspear
- Wounded Villager
Objects[edit]
Dialogue[edit]
- Entering the fractal
- Palawa Joko: There you are. We've started without you. I trust you'll enjoy the reunion.
- Palawa Joko: You've demonstrated allegiance to your king by helping track these dogs. Solidify your loyalty—spearhead the assault.
- Palawa Joko: Let all the desert region see that defying me is certain death. Drown these streets in Sunspear blood.
- Dessa: Palawa Joko? That reanimated cadaver hurts my eyes.
- Dessa: Anyway...it appears you're somewhere in Elona, in the past.
- Dessa: Judging by your gear, I'd say you're Mordant Crescent—traitors broken by Joko, slaves to his will.
- Talking with Joko at the entrance
- Was I not clear about your role in this operation? It involves the slaughter of Sunspears for your king. It does not involve speaking.
- I would like to ask you a few questions.
- (Joko puts the player in a downed state)
- Palawa Joko: Any further inquiries? No? Perfect.
- Understood.
- Fighting the Elite Sunspear Sandbinder
- Elite Sunspear Sandbinder: There's no hiding behind those masks. I recognize you! You betrayed us!
- Elite Sunspear Sandbinder: Come to your senses. Help us stop the slaughter. Help us stop Joko.
- Elite Sunspear Sandbinder: What have you become? We are not your enemy!
- Dessa: You may not want to do this, but remember, this is just an echo.
- Dessa: You can't change history by your actions here. Just do what's needed to stabilize the fractal.
- Defeating the Elite Sunspear Sandbinder
- Palawa Joko: Skillful. Ruthless. Perhaps lacking a bit in spectacle... Still, your king approves.
- Palawa Joko: My powers of perception are confirmed. I had a feeling you'd take to your new tasks with conviction.
- Palawa Joko: Now, before these Sunspears can live forever serving their king, they have to die. Get to killing.
- Fighting High Priestess Amala
- High Priestess Amala: Sunspears, rally to me! We will wipe the Awakened from the face of Tyria!
- Dessa: This looks...challenging.
- When High Priestess Amala is at 75%
- High Priestess Amala: There can be no mercy for traitors.
- Palawa Joko: Oh, that one has real spirit! I wonder if she'll still have it once we've persuaded her to join our cause?
- High Priestess Amala: Fall back—defend the temple!
- Palawa Joko: Ah, my rebel Sunspears. Your deaths are disappointing. And untimely. I had such plans for you.
- Palawa Joko: Rise!
- Hunting the Sandbinders
- Palawa Joko: Use my gift. Storm the rooftops. Show your friends no mercy.
- Palawa Joko: Repay the kindness of your benevolent king by opening the throats of the Sunspears shielding that temple.
- Veteran Awakened Canid: On me. To the rooftops.
- Veteran Awakened Canid: There are more sandbinders. Find them all. Rip them apart.
- Veteran Awakened Canid: No mercy. Spill their guts.
- Encountering the Sandbinders
- Elite Sunspear Sandbinder: I don't know who you are, traitors, but you deserve your death.
- Elite Sunspear Sandbinder: You've turned your back on the Sunspears? Weak-willed traitors! You can't be allowed to live.
- Elite Sunspear Sandbinder: You trust the word of the deceiver Joko? Fools. Dead fools.
- Upon defeating all Sandbinders
- High Priestess Amala: Stand your ground, Sunspears! Just a little longer...
- Killing Injured Villagers
- Upon killing the first villager:
- Dessa: I have to admit I'm a little disturbed by your enthusiasm here.
- Upon killing five villagers:
- Dessa: I appreciate how hard you're throwing yourself into my research. I think.
- Upon killing eleven villagers:
- Dessa: Wow. Uh...you are really embracing your role in this fractal.
- Fighting High Priestess Amala
- Palawa Joko: Effective. Now finish this. There can be no mercy for the enemies of King Joko the Beloved.
- Palawa Joko: That Sunspear. Bring her down!
- High Priestess Amala: I'll kill you again, traitors!
- High Priestess Amala: Lyssa banish you!
- High Priestess Amala: Mother of illusion, grant me your strength.
- High Priestess Amala: No! Melandru take you!
- High Priestess Amala: Earth consume you!
- High Priestess Amala: Goddess of nature, lend me your power.
- High Priestess Amala: Stop! This is pure evil!
- High Priestess Amala: (scream) Dwayna, help me!
- High Priestess Amala: Goddess of life, obliterate the dead!
- High Priestess Amala: (growls) Grenth! Make them suffer!
- High Priestess Amala: Your lives were forfeit the instant you succumbed to the lich.
- High Priestess Amala: Die! Suffer for eternity!
- High Priestess Amala: God of death, tear out their souls!
- High Priestess Amala: Balthazar, god of war, grant me victory!
- High Priestess Amala: Balthazar, please! Don't let them survive!
- High Priestess Amala: Perish with me, traitors!
- Defeating High Priestess Amala
- High Priestess Amala: (coughs) Gods take you. All of you.
- Veteran Sunspear Beguiler: High Priestess!
- Palawa Joko: Your pathetic gods offer no protection, Amala. Now, simply pledge your allegiance, and I'll allow you to serve me alive.
- High Priestess Amala: I'm loyal...to the Sunspears. You'll...have to murder me, Scourge.
- Palawa Joko: I anticipated as much. Have it your way.
- High Priestess Amala: (gurgles)
- Palawa Joko: Now... Rise, Executioner Amala.
- Veteran Sunspear Beguiler: No! Fight, Amala! Don't succumb—
- Palawa Joko: Put this rabble down in the name of your king.
- Executioner Amala: Yes, my king.
- Veteran Sunspear Beguiler: All is lost...
- Executioner Amala: They live no longer.
- Palawa Joko: You've all earned another day of existence. But the hunt continues. The Sunspears must be annihilated...all of them. Everywhere.
Notes[edit]
- This fractal island was added with Daybreak release.
- The music track of the last boss fight is called "Amala" by "Maclaine Diemer and Brendon Williams". It is available on the "Guild Wars 2: Living World Season 4" album (and also on Spotify).
