Silent Surf Fractal
Silent Surf Fractal

Map of Silent Surf Fractal
- Levels
- 80
- Type
- Fractal
- Dungeon
- Fractals of the Mists
- API
- 1500

Loading screen
“A new threat emerges in the aftermath of the Jade Wind. Captain Thess and his Serpent Clan salvage crew arrive at the wreck of a trade convoy that recently departed for the Harvest Temple. Their search for fellow Luxon survivors leads them beneath the petrified sea, unaware of the growing evil that awaits them.
— Official description[1]
The Silent Surf Fractal is a fractal dungeon at scales 21, 43, 66 and 99. The story is set in Cantha's past and explores the fate of a group of Luxon sailors and the threat that emerged in the Jade Sea in the aftermath of the then recent Jade Wind cataclysm.
Objectives[edit]
 Meet Dessa and assist with her experiments.
- Fractal Difficulty Scale: x
- Personal Fractal Level: x
- Explore the chasm with Captain Thess.
- Help Thess open a portal
- Players at the marked location: x/2
- Clear out the naga raiders.
- Naga

- Get to the next group of jumping mushrooms.
- Survive the corrupted ambushers.
- Defeat the Corrupted Luxons and Naga.
-
- Corrupted First Mate Dolus
-
- Defeat the mysterious attacker.
- Unknown Demon / Kanaxai, Scythe of House Aurkus
-
Rewards[edit]
Normal Mode[edit]
- Primary article: Fractals of the Mists#Rewards
- Rare chance at the following:

Challenge Mode[edit]
- Rare chance at the following:


- Additionally, completing the Unknown Demon objective awards:


Walkthrough[edit]
Spelunking[edit]
When you enter the fractal interact with Captain Thess to start. Your party will get ![]() Thess's Ward which ports your character to checkpoints upon failure, and gain access to the Special action skill Equip Survey Gear which will give you the following abilities necessary to traverse the fractal:
Thess's Ward which ports your character to checkpoints upon failure, and gain access to the Special action skill Equip Survey Gear which will give you the following abilities necessary to traverse the fractal:
| # | Skill | Description | ||
|---|---|---|---|---|
| 1 | Grappling Hook | ¼ | Launch a grappling hook to pull yourself in the targeted direction. Consumes ammunition. | |
| 2 | Parachute | ¼ | 1 | Deploy a makeshift parachute to slow your fall. Consumes ammunition. |
| 3 | Black Powder Charge | 1 | Fire a concussive charge to provide an extra boost. Guaranteed to be 100% safe. Consumes ammunition. | |
| 5 | Flare | ½ | 1 | Fire a magical light source at target location. Bounces off walls and ceilings. Sticks to level surfaces. Does not require ammunition. |
You can weapon swap to use again your normal weapon abilities, and you can then reactivate the Leftover Supplies by clicking again the special action skill (default N key). The movement abilities you gain use up charges that you can only regain by rummaging through the Leftover Supplies at each checkpoint. The ability Black Powder Charge is a big leap forwards that can be used while airborne and negates fall damage, but the following guide largely ignores it as it is not technically required and it will strip eligibility for the Peace and Quiet achievement.
- Checkpoint 1
Jump to the crevise and use Parachute to break the fall. If you mistime it you will get teleported to this initial checkpoint regardless. Talk to Thess and refill the charges of your Leftover Supplies skills before proceeding.
- Checkpoint 2
Use Grappling Hook on top of the next jade platform. Keep in mind that this skill does not give you any additional height to where you aim, so grappling onto the edge will cause you to fall down and go back to the previous checkpoint. Interact with the Zip Line to make it to the next platform, and then take the following zip line towards the next checkpoint. It will drop you at the end of the line high above the platform or you can decide to drop early by using the same key as dismounting. Break the fall with a parachute or you will be teleported back to the start. Once enough players safely reach the platform and trigger the checkpoint, any player will get ported there if they die or fall. A group of spiders and cave bats will spawn that you need to defeat in order to proceed.
- Checkpoint 3
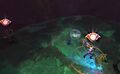
Refill the charges and then jump to the mushrooms beneath. You can land on any of them and you do not need to mitigate the fall as getting immediately launched does not cause any fall damage. When you are at the upper height of the jump use Grappling Hook on the middle of the big jade stalactite to pull yourself forward to next platform. You would not get any fall damage but depending on where and when you used your grapple hook you might fall a bit short, so you can use Parachute to cover the last distance if needed. Then walk over to the Wind Cannon and interact with it to reach the next checkpoint. Once enough players have reached it you will have to fight a group of naga before proceeding.
- Checkpoint 4
Refill the charges and interact with the wind cannon to launch your character onto a zip line (you will ride on it automatically). You can dismount the zip line shortly before it naturally ends (default X) to land onto any mushroom without the need of a parachute. Saving a charge here can make reaching the next checkpoint a bit easier but it is not necessary.
When you get launched you will automatically go through a wind cannon. From here to reach the next set of mushrooms further down use Grappling Hook on both upcoming pillars right as you are shot out of the Cannon, then Parachute to position yourself above a Mushroom, which will then bounce you onto the last zipline. Alternatively, if you miss the pillars and landed on the platform, you can use a combination of Black Powder Charge Parachute to reach the bouncing mushrooms.
Once you have reached the Wind Cannon, you will once again be shot onto a Zipline, which takes you to the final platform. If you have charges left on your parachute you can use it to break the fall, or if you ran out you can use your grappling hook onto the surface of the platform or the wall. The latter option is a bit trickier since you need to be within range and the hook has some travel time, so you should use it as soon as it is available to avoid having to redo this segment. Once enough players trigger the checkpoint, you have to first defeat a group of Corrupted Luxon Sailors and then the Corrupted First Mate Dolus. This mini-boss introduces some mechanics from the boss fight, the first being "Dread Visage" marked with an eye above his head where you need to turn your character away from him, and the other one being everyone having a big AoE beneath them and the enemy dashing in order from ![]() 1 to
1 to ![]() 5 and dealing damage at each location.
5 and dealing damage at each location.
With Captain Thess having fallen to the boss platform, you get instead ![]() Thess's Ward that ports you to this last checkpoint before the fight if you were to restart it. When your party is ready, refill a parachute charge and jump to the platform.
Thess's Ward that ports you to this last checkpoint before the fight if you were to restart it. When your party is ready, refill a parachute charge and jump to the platform.
Kanaxai[edit]
Interact with Captain Thess to start the encounter. You will fight Kanaxai (at the beginning starts out as "Unknown Demon") and on the edges of the main platform there will also be untargetable Aspects casting various attacks. At the very start of the encounter, Kanaxai and the Aspects cast Dread Visage indicated with a bright eye icon above their heads, make sure to have your character face away from all of them, not just your camera.
- 100-66%
Throughout the fight Kanaxai will cleave the closest player, dealing moderate damage and applying between 3 and 6 stacks of ![]() Bleeding or
Bleeding or ![]() Torment per hit. If there are no players near him (that are not downed) he will select a far-away target to jump to and will resume his normal attacks. The Aspects will continuously shoot projectiles (Aspected Volley) throughout the fight. In addition to this players will have to deal with these telegraphed attacks:
Torment per hit. If there are no players near him (that are not downed) he will select a far-away target to jump to and will resume his normal attacks. The Aspects will continuously shoot projectiles (Aspected Volley) throughout the fight. In addition to this players will have to deal with these telegraphed attacks:
- Rending Storm: One or more players will be marked with a circle AoE beneath them. After 3 seconds the AoE will lock in place and after 1 more second Kanaxai will throw an axe on it and leave a damaging AoE that will pulse
 5 Bleeding every second. Make sure to place them outside of the stack and towards an edge of the arena because they last a long time before they disappear, which is the next time he targets another set of players. The number of axes thrown increases by 1 up to the total number of players alive as the phase progresses and resets at 66 or 33%.
- Harrowshot: Occasionally an Aspect will mark a big circle AoE on the location where a player was standing and after around 3 seconds a blue projectile will land on it, causing
 Agony and a condition to anyone who gets hit. The condition applied varies depending on the Aspect that shot the projectile, such as
  Torment (Torment),
  Slow (Lethargy), etc. This attack cannot be dodged, blocked or avoided with invulnerability.
- Dread Visage: Occasionally Kanaxai and the Aspects will cast Dread Visage, the same attack as at the very beginning of the encounter. Looking at them will deal considerable amount of damage and apply
 Fear,
Fear,  Blinded and 3 Torment.
Starting at 90% and every 10% from here on out, he will briefly stop attacking and gain ![]() Gathering Shadows and a break bar. Breaking the defiance bar within 5 seconds will give him a stack of
Gathering Shadows and a break bar. Breaking the defiance bar within 5 seconds will give him a stack of ![]() Dread Defiance, briefly stun him and gain
Dread Defiance, briefly stun him and gain ![]() Exposed. If not broken in time the break bar damage done to it will carry over to the next time he gains a break bar, an Aspect will spawn on one of the outer islands and an Aspect from the main platform will tether to a player. This tether can be intercepted and whoever is linked for 3 consecutive seconds will gain
Exposed. If not broken in time the break bar damage done to it will carry over to the next time he gains a break bar, an Aspect will spawn on one of the outer islands and an Aspect from the main platform will tether to a player. This tether can be intercepted and whoever is linked for 3 consecutive seconds will gain ![]() Phantasmagoria.
Phantasmagoria.
Gaining ![]() Phantasmagoria will allow you to see an Aspect on one of the platforms surrounding the main arena, which is also marked on the mini-map with
Phantasmagoria will allow you to see an Aspect on one of the platforms surrounding the main arena, which is also marked on the mini-map with ![]() swords. A blue tether over the arena will point at a specific island that the player must reach. These players will be the only ones able to see this tether and their respective Aspect, thus only they can damage it. They must use Grappling Hook to reach them and kill them. They can choose to break their defiance bar to make them
swords. A blue tether over the arena will point at a specific island that the player must reach. These players will be the only ones able to see this tether and their respective Aspect, thus only they can damage it. They must use Grappling Hook to reach them and kill them. They can choose to break their defiance bar to make them ![]() Exposed[verification requested]; support players can make use of the increased incoming damage to squeeze in DPS if they are selected for the mechanic. Return using the bouncing mushroom on each island once your Aspect has been handled. Additionally, gaining
Exposed[verification requested]; support players can make use of the increased incoming damage to squeeze in DPS if they are selected for the mechanic. Return using the bouncing mushroom on each island once your Aspect has been handled. Additionally, gaining ![]() Phantasmagoria will sometimes trigger a voice line only audible to each individual player targeted, this is accompanied by a whisper in chat of the same text.
Phantasmagoria will sometimes trigger a voice line only audible to each individual player targeted, this is accompanied by a whisper in chat of the same text.
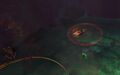
Appearance of Rending Storm. Dodge away.
Appearance of Dread Visage. Turn your back from them.
Appearance of the blue tether indicating which island you need to go to.


- 66/33%
When Kanaxai reaches 66/33% health he will gain ![]() Determined to Destroy and become invulnerable to damage while he charges World Cleaver indicated with an expanding orange AoE. Up to 5 players will gain the effect
Determined to Destroy and become invulnerable to damage while he charges World Cleaver indicated with an expanding orange AoE. Up to 5 players will gain the effect ![]() Phantasmagoria after being tethered for 3 seconds to an Aspect. This is easily interrupted by other players intercepting the tether, ensure you walk towards an Aspect (even if not your original one) if you were initially tethered. Handle the Aspects as before. Note that if you have broken every defiance bar up until this point this will be your group's first encounter with the
Phantasmagoria after being tethered for 3 seconds to an Aspect. This is easily interrupted by other players intercepting the tether, ensure you walk towards an Aspect (even if not your original one) if you were initially tethered. Handle the Aspects as before. Note that if you have broken every defiance bar up until this point this will be your group's first encounter with the ![]() Phantasmagoria mechanic.
Phantasmagoria mechanic.
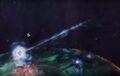
When Kanaxai finishes charging his attack after about 20 seconds he will cast World Cleaver and apply ![]() Agony. This attack cannot be Blocked. Handling the Aspects correctly lowers the damage the attack does per Aspect, if you were to get hit.
[verification requested]
Agony. This attack cannot be Blocked. Handling the Aspects correctly lowers the damage the attack does per Aspect, if you were to get hit.
[verification requested]

Appearance of World Cleaver.

Appearance of the Aspect tether.


- 66-1%

The fight resumes as in the first phase, but a new attack is introduced:
- Frightening Speed: Players will be targeted from
 1 to
1 to  5 with a respective overhead icon
  to
to  and a big AoE beneath them. Kanaxai will rush in a straight line to players in order and then back to his starting position, unleashing a brief flurry of slashes at each location corresponding to the initial circle in area of effect. Make sure to spread out to avoid overlapping slashes. This attack cannot be dodged, blocked or avoided with invulnerability. This attack deals damage based on a percentage of your total health[verification requested].
Achievements[edit]
| Cavalon's Champions | Silent Surf Fractal | 5 |
|---|---|---|
| Complete the Silent Surf fractal on the Master tier. | Completed Silent Surf on the Master Tier | 5 |
- Complete the fractal on tier 4.
| Good Listener | Silent Surf Fractal | 1 |
|---|---|---|
| Listen to all of Captain Thess's optional dialogue in a single playthrough of Silent Surf. | Listened to Captain Thess's Optional Dialogue in a Single Playthrough of Silent Surf | 1 |
- Talk to Captain Thess for his optional dialogue on each platform in a single playthrough (three in total). When it is available, he will have the overhead icon
 .
. - The achievement will be granted after completing the fractal.

| Grim Investigation | Silent Surf Fractal | 6 |
|---|---|---|
| Piece together the story of the Luxon sailors' final days. | Found 1 Texts | 1 |
| Found 2 Texts | 1 | |
| Found 3 Texts | 1 | |
| Found 4 Texts | 1 | |
| Found 5 Texts | 1 | |
| Found 6 Texts | 1 |
- See picture on the right for the locations of the journals. For a detailed guide and locations refer to the achievement page.
| Jade Sea Legs | Silent Surf Fractal | 3 |
|---|---|---|
| Complete the Silent Surf fractal without any assistance from Captain Thess. | Completed the Silent Surf Fractal without Help from Captain Thess | 3 |
- Complete the fractal without falling to your death during the jumping puzzle sections.
- The achievement will be granted after completing the fractal.
- Achievement qualification may be tracked via the
 Achievement Eligibility: Jade Sea Legs effect.
| Peace and Quiet | Silent Surf Fractal | 5 |
|---|---|---|
| Complete Silent Surf on the Master tier with no deaths, no Black Powder Charges used before the final encounter, and no interactions with Captain Thess's portals. | Completed Silent Surf on the Master tier with No Deaths, No Black Powder Charges Used before the Final Encounter, and No Interactions with Captain Thess's Portals | 5 |
- Complete the fractal on tier 4:
- Without dying.
- Without falling during the jumping puzzle sections and getting teleported by Captain Thess.
- Without using the Black Powder Charge ability.
- Achievement qualification may be tracked via the Achievement Eligibility: Peace and Quiet effect.
- Getting portaled to the boss (in case your party reached the final boss) will disqualify you from getting the achievement.
| The Fearless Few | Silent Surf Fractal | 5 |
|---|---|---|
| Complete the Silent Surf fractal without getting struck by the final boss's Dread Visage attack. | Completed the Silent Surf Fractal while Avoiding the Dread Visage Attack | 5 |
- Defeat the final boss without getting hit by the Dread Visage attack, indicated by a large eye above him and his Aspects.
- Achievement qualification may be tracked via the Achievement Eligibility: The Fearless Few effect.
| Unsundered | Silent Surf Fractal | 5 |
|---|---|---|
| Each time the final boss uses World Cleaver, defeat all Aspects before he can complete the attack. Then, complete the encounter. | Defeated All Aspects Each Time the Final Boss Used World Cleaver | 5 |
- Appears at 66% and 33%
- Achievement qualification may be tracked via the Achievement Eligibility: Unsundered effect.
Challenge Mote walkthrough[edit]
At tier 4, the challenge mote appears at the start of the fractal and allows you to skip to the last checkpoint. You still need to defeat the Corrupted Luxon Sailors and the Corrupted First Mate Dolus before facing the final boss. The sequence of attacks may differ to that of normal mode, and while the fight doesn't have any new mechanics, falling off the platform is an instant death and the attacks are more punishing.
- Rending Storm: In addition to applying Bleeding, it also pulses
 Exposed. Only the Rending Storms that were placed by other players pulse Exposed.
 - Harrowshot: This attack steals boons from players hit onto Kanaxai. Kanaxai can strip regeneration, quickness and alacrity but he will not copy them onto himself. It still cannot be dodged, blocked or avoided with invulnerability.
- Dread Visage: In addition to Agony and conditions, it now also applies
 Extreme Vulnerability, meaning that it's possible to instantly die from this attack if looking at multiple enemies at once. Below 66% Kanaxai will occasionally port out to one of the outer platforms and cast this attack by himself or with the other Aspects.
- Gathering Shadows: Besides casting this attack every 10% starting at 90%, he will also cast this attack at 45, 35, 25 and 15%. Failing to CC will trigger the Aspects tether mechanic after a few seconds.
- World Cleaver: Failing to complete this mechanic on time will wipe the party.
- Frightening Speed: When he goes back to his original location for a last set of slashes, stepping into the red AoE will instantly kill you. Additionally, below 33% he will cast Dread Visage every time he does a slash, so make sure to look away not only when he dashes to you, but also to your teammates or back to the starting position.
Some mechanics should be done with more care than in normal mode because of the consequences in CM:
- Because of the time constraint to deal with the Aspects during World Cleaver, try to not move when players are being tethered to gain
 Phantasmagoria as delaying it too much might make killing the Aspect on time impossible.
- When using Grappling Hook to go to the outer platforms, aim as far as possible to avoid falling short. You might want to select the setting Lock Ground Target at Maximum Skill Range and have the slider for the Field of View all the way to the right for maximum visibility. Additionally - stand still while aiming and casting the grappling hook. This brings you to your target island more consistently.
- When you are on the outer platforms you can still get hit by attacks such as Frightening Speed or Harrowshot.
- When coming back to the main platform make sure you don't land onto Frightening Speed or Harrowshot. If you use a bouncing mushroom you will land at the exact center of the platform. If you don't use the bouncing mushroom you will be teleported to a spot close to your island on the main platform. Simply stay on the island if the center is blocked by Frightening Speed etc.
- When spreading out for Frightening Speed, keep in mind that you might get targeted for Harrowshot. The radius of the AoE is similar between the two attacks and there is less available space to sidestep the projectile.
Challenge Mode achievements[edit]
| Explorers of Antiquity | Silent Surf Fractal | 5 |
|---|---|---|
| Accept the harbinger's challenge and defeat the final boss in Silent Surf.Bling-9009 has received reports of your exploits and now carries new items! | Defeated the Final Boss in Silent Surf on Challenge Mode | 5 |
- Complete challenge mode.
| Silent Surf Fractal | 5 | |
|---|---|---|
Accept the harbinger's challenge and complete the Silent Surf fractal with no one in your group being defeated.A full party of five must participate in the fractal from start to finish without dying.
|
Completed Silent Surf with no Deaths | 5 |
- Eligibility for the achievement is lost if the party wipes once and will not be awarded on a subsequent attempt. If the party is trying to get this achievement the instance needs to be reopened.
| Defiance Demolisher | Silent Surf Fractal | 5 |
|---|---|---|
| Accept the harbinger's challenge and defeat the final boss while he has ten or more stacks of Dread Defiance. | Defeated the Harbinger's Challenge Final Boss with Ten or More Stacks of Dread Defiance | 5 |
- Below 50% the party should slow down DPS to have all of their CC abilities ready for each breakbar. All breakbars need to be broken at 90%, 80%, 70%, 60%, 50%, 45%, 40%, 35% then you can do half the breakbar damage at 30% and finish it at 25% then repeat this for 20% and 15%. Since breakbars become harder the more you clear breakbars, after 35% it is best to use two breakbar thresholds(every 5% after 50% HP) since breakbar damage done carries over to next threshold. There is no breakbar at 5% HP, the last breakbar is at 10%.
NPCs[edit]
Allies[edit]
Foes[edit]
- Aspect of Death
- Aspect of Exposure
- Aspect of Fear
- Aspect of Lethargy
- Aspect of Torment
- Kanaxai, Scythe of House Aurkus (Starts out as "Unknown Demon")
- Humans
Objects[edit]
- Books
- Bloodied Journal
- Cargo Manifest
- Creased Journal Page
- Faded Journal Page
- Torn Journal Page
- Waterlogged Journal Page
Dialogue[edit]
- Upon logging on a character for the first time
|
|
Mysteries Are Afoot! I've done some off-the-clock investigating of the entity we encountered in the Gyala mines. Let's just say there's a frustratingly sparse collection of studies on the subject, most of which haven't been academically vetted. Figures. That said, if you're interested, I recommend less conventional methods for finding answers. The fractals have no shortage of anomalous activity, and while the historical accuracy of these "slices of time" are inconsistent at best, we might make some surprising discoveries! In the meantime, I'll continue digging through these outmoded "publications." Best of luck,—Gorrik PS: You know I prefer comms, but Rama wisely suggested that I reacquaint myself with all forms of communication. It's important that Brim and Scarab be able to service the broadest possible client base, even the technologically challenged.
A mysterious asura gate near Fort Marriner in Lion's Arch allows travelers to enter into a realm where history and technology violently collide. Interactive map |
- Entering the fractal
- Dessa: Huh, the Jade Sea. Don't recognize the exact location; go look around.
- Dessa: The hull damage on that looks recent. Intriguing...
- Captain Thess: Let's follow the trail below. Grab anything you find, but survivors take priority.
- Captain Thess: Parachutes from the cargo hold. Use them as needed—leftovers get sold.
- Dessa: Survivors? A shipwreck on the Jade Sea? This could be days after the Jade Wind!
- Captain Thess: Looks like they came this way.
- Talking to Captain Thess after the initial drop-down
- Captain Thess: Found the manifest. Cargo's missing from the hold; looks like the crew got into a bad scrap. Naga, probably.
- Captain Thess: They're Serpent Clan, like us. I'm not about to abandon my own.
- Captain Thess: See if you can zip down to the next ledge.
- Captain Thess: It's black as squid-ink soup down there. Toss a flare to mark a landing spot!
- Captain Thess: We're making good progress.
- Before the first fight
- Captain Thess: Hold on... Did you hear that?
- Captain Thess: Weapons ready!
- Captain Thess: Spiteful little critters.
- Captain Thess: Take these charges. They'll give you an extra push if you need it.
- Before the second fight
- Captain Thess: ???
- Dessa: I'd say, "Praise Dwayna," if I didn't know better.
- Captain Thess: This is making my head spin...
- Captain Thess: Ambush! Defend yourselves!
- Mysterious Voice: How do you not tire of these pitiful morsels?
- Captain Thess: Wha-what is that voice?
- Ominous Voice: I am not ready to return. Not yet.
- Captain Thess: More supplies. Take what you need.
- Dessa: Those voices from before. Something the second one said...
- Dessa: The fractal seems unstable here. Mind the gap.
- Mysterious Voice: Sounds like you've snared more in your web.
- Ominous Voice: The hunt continues...
- Mysterious Voice: Enjoy your prize, but do not linger forever. This place...it dulls the edge.
- Before the third fight
- Dessa: Are we sure these things are naga?
- Captain Thess: Take them out!
- Captain Thess: What happened to them?
- Captain Thess: I need—I'll be over here, collecting my nerves.
- Dessa: Something's off. I'm detecting...
- Captain Thess: I see...something in the dark. Aria? How?
- Captain Thess: Hold on—we're coming.
- Captain Thess: Wha-what's going on? (screams)
- Captain Thess: (grunts)
- Talking to Captain Thess after the third fight
- Captain Thess: Aria...I sailed with her some years back... Naga got to her first.
- Falling down and being teleported back by Captain Thess
- Captain Thess: Close one.
- Captain Thess: Nearly lost you.
- Starting the final fight
- Captain Thess: Gods... I-I can't move!
- Captain Thess: Hurry! I hear the naga! Ione, please!
- Captain Thess: (grunts)
- Dessa: Captain Thess... He's dead? He was just—
- Unknown Demon: We can begin, finally!
- At 66% health
- Unknown Demon: I don't often mingle with prey, but you've earned an introduction.
- Unknown Demon: I am Kanaxai, Scythe of House Aurkus, bringer of nightmares—and yours is just beginning!
- At 33% health
- Kanaxai, Scythe of House Aurkus: The timing of my return was fortuitous.
- Kanaxai, Scythe of House Aurkus: To behold such bounty—the anguish of thousands—served to me on the winds of a madman's wail!
- At 33% health, to a random player, one of the following
- Kanaxai, Scythe of House Aurkus: Does confronting your fears bring you comfort? Or terror?
- Kanaxai, Scythe of House Aurkus: You've crawled through jade and shadow into my nightmare.
- Kanaxai, Scythe of House Aurkus: Fear not the dark; it thrives within us all.
- At 10% health
- Kanaxai, Scythe of House Aurkus: This is not the end!
- Upon defeating Kanaxai
- Kanaxai, Scythe of House Aurkus: Enough. Your lives are yours.
- Kanaxai, Scythe of House Aurkus: Relish what comforts your fleeting time allows. I'll return for you.
- Dessa: A whole lot of bluster for an almost-corpse.
- Dessa: At least you sent him back to...wherever he's from. Make sure he doesn't follow you back, okay?
Related achievements[edit]
Upon completion[edit]
 Fury Manifest:
  Mist-Touched Staff Fragment — For the staff The Fury That Remains, if the collection Fury Manifest is active
- Hunger Manifest:
 Mist-Touched Dagger Fragment — For the dagger The Hunger That Renews, if the collection Hunger Manifest is active
 - Terror Manifest:
 Mist-Touched Longbow Fragment — For the longbow The Terror That Grows, if the collection Terror Manifest is active
 - Anguish Manifest:
 Mist-Touched Sword Fragment — For the sword The Anguish That Festers, if the collection Anguish Manifest is active
 - Bloodthirst Manifest:
 Mist-Touched Axe Fragment — For the axe The Bloodthirst That Lingers, if the collection Bloodthirst Manifest is active
Notes[edit]
- The June 28, 2023 game update fixed an issue that prevented Mist Attunement effects from being applied within the fractal.
- The July 18, 2023 game update implemented several bug fixes and general changes.
- The July 19, 2023 game update fixed an issue that caused pets to be affected by Kanaxai's boon stealing mechanic.
- The August 22, 2023 game update implemented several bug fixes and general changes.
- The September 26, 2023 game update fixed an issue that caused all party members to be defeated when engaging the first boss in challenge mode.
Trivia[edit]
- This fractal was announced in the February 2023 Studio Update blogpost on February 13, 2023, and released on June 27, 2023; Challenge mote for the Silent Surf Fractal was released on July 18, 2023.
External links[edit]
- Silent Surf Fractal teaser, Twitter.com
- Studio Update: Guild Wars 2 in 2023, Guild Wars 2.com
References[edit]
- ^ "WvW and fractals and dragon bashing–oh my!" newsletter