Aetherblade Fractal
Aetherblade Fractal
- Levels
- 80
- Type
- Fractal
- Dungeon
- Fractals of the Mists
- API
- 956
| Image(s) |
|
Click to enlarge. |
“Infiltrate the hidden Aetherblade base with the help of Inspector Ellen Kiel.
— In-game description
The Aetherblade Fractal is a Fractal that reprises the first part of the attack on the hidden Aetherblade base in Lion's Arch as encountered during the Sky Pirates of Tyria release. It occurs at levels 14, 45, 65, 70 and 93.
Objectives[edit]
- Explore the Aetherblade hideout and track down Mai Trin.
- Fractal Difficulty Scale: x
- Personal Fractal Level: x
- Inspector Ellen Kiel

- Breach the gate.
- Gate Guards Defeated

- Shut down Frizz's Lab.

- Avoid the golem-buffing electric walls.
Rewards[edit]
- Primary article: Fractals of the Mists#Rewards
Walkthrough[edit]
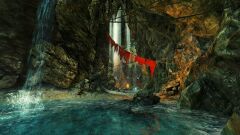
The party starts in front of a mined underwater passage. The players need to swim and avoid the mines. Triggering a mine is instantly lethal. Players should beware of mines hidden behind the scenery and therefore invisible from the expected view angle (on the ceiling and among the algae).
After exiting the mined passage, the party will meet Inspector Kiel and face two groups of Aetherblade attackers. Once the Aetherblades are defeated, the party will need to pass two trapped areas.
Aetherblade traps[edit]
The first trap area is relatively simple: the ground is divided into sections that "light up" periodically, killing players who step on them. During each phase, there will be several squares that will not light up, allowing the party to move from one safe section to the next and stay there safely during the "lit up" phase.
- Evasive movement skills like Whirlwind Attack can cross tiles safely.
After the party crosses the first section, they will face a single Inquest enemy. While very easily dealt with even for a single player, the Inquest enemy does have a knockback attack - which can knock a player back into the lethal puzzle area, killing them. Stability, dodging, and blocking will help.
Once past the puzzle, inside the hut, the squares can be disabled using terminals, allowing the players who have not yet passed the puzzle to move freely. Multiple terminals can be used by a single player if they use a skill to remove the Immobile effect.
On top of the slope, the party will face another trapped puzzle section. The entire floor is covered by a series of rotating force fields, forcing the players to run in the free spaces between the fields. Dodges and invulnerability skills can help. Once past, the puzzle can be deactivated by using terminals identical to those used to deactivate the first puzzle.
It is important to note that both trap sections must be disabled, even if every party member successfully crosses each one. Inspector Kiel must make it to the final phase and she is unable to move past either trapped area before it is disabled. Once past the puzzles, the party will face the cannon barrage section.
Cannon barrage[edit]
The party will need to defeat several waves of Aetherblade attackers while under fire by cannons. After the waves of Aetherblades are dealt with, the door opens and players reach Frizz, the final boss of the fractal.
Frizz[edit]
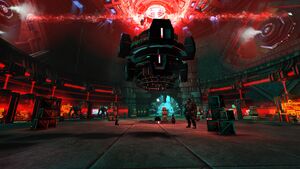
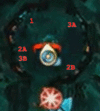
The fight starts with the party facing Frizz and a small number of Inquest and Aetherblade guards. Once Frizz takes some damage, he retreats into the shielded forcefield in the center of the room, summons defense golems and activates the room's forcefield defenses.
This section of the fight has the party face a small number of golems while a rotating forcefield forces the party to keep moving. Forcefields inflict heavy damage on the players they sweep over and boost the golems, granting them a short term blocking ability. The forcefield damage cannot be negated by dodging through the forcefield. The party needs to kill the golems to advance to the next phase.
- Phase one — The room is swept by a single, fast, half height forcefield. The forcefield can be outrun near the hub of the room, although this invites the risk of fighting generally closer to this mobile damage source. The fast forcefield can also be avoided by jumping on top of stacked crates present in the room. Players can simply stay on top of a crate stack for the duration of this phase, but can be pulled off by the golems.
- Phase two — The room is swept by a single, slow, full height forcefield. The forcefield can only be avoided by party members outrunning it. The party can maintain an optimal damage potential by remaining together in one half of the room.
- Phase three — The room is swept by both of the forcefields. The party will therefore have to keep outrunning the slow forcefield and periodically jump on top of crate stacks to avoid the fast forcefield.
Once the third set of golems is dealt with, the forcefield generator malfunctions and collapses on Frizz, killing him.
Achievements[edit]
| Aetherblade Retreat Stabilizer | Fractals of the Mists | 5 |
|---|---|---|
| You've completed the Aetherblade fractal inside the Fractals of the Mists.They're in full retreat now. | 1 Fractal | 5 |
| Fractal Recursion: Aetherblade Retreat | Sky Pirates | 3 |
|---|---|---|
Complete the Aetherblade fractal after completing the "Sky Pirates" episode.
|
Completed the Aetherblade Fractal | 3 |
Complete the fractal at least once.
| Holo-Hornpipe | Fractals of the Mists | 1 5 |
|---|---|---|
| Dance with the Aetherblade hologram dancers.It's Dance Like A Pirate Day! | Dance With Atherblade Holo Dancers | 5 |
Completed by dancing (/dance) with the two Aetherblades hologram dancers. The first hologram is found to the right of the shack with the switch that shuts off the charged floor panels. The second hologram is in the center of the next room at the top of the ramps with the moving phase walls.
| Still Faster Than Light | Fractals of the Mists | 5 |
|---|---|---|
| Complete Kleptotronic Advanced Designs without being hit by lasers. | Avoided Lasers in Kleptotronic Advanced Designs | 5 |
Avoid being hit by any of the laser walls during the fight with Frizz and his golems.
NPCs[edit]
Allies[edit]
Foes[edit]
- Frizz
- Elite Inquest Extinguisher
- Veteran Inquest Assassin
- Veteran Inquest Assistant
- Veteran Inquest Grenadier
- Veteran Inquest Technician
- Various (Aetherblades)
- Aetherblade Grenadier
- Aetherblade Swashbuckler
- Aetherblade Taskmaster
- Elite Aetherblade Golem
- Elite Aetherblade Striker
- Elite Aetherblade Thug
- Veteran Aetherblade Grenadier
- Veteran Aetherblade Swashbuckler
- Veteran Aetherblade Taskmaster
- Veteran Aetherblade Thug
- Veteran Aetherblade Thumper
Objects[edit]
Dialogue[edit]
- Primary article: Aetherblade Retreat#Dialogue
As this is a recreation of the Aetherblade Retreat, the dialogue is almost the same as the original for the same sections.
- Upon arrival
- Dessa Observation Mode: Hello? Can you hear me? I'm reading a large cavern beyond the water. That should be your starting point.
- Dessa Observation Mode: It seems you have an ally. Is that Lionguard armor? What's happening in there?
- Inspector Ellen Kiel: Let's get going.
- Talking to Inspector Kiel at entrance
- Mai Trin and her crew came through here. I've got a bad feeling about this, but at least you're here too. Let's go.
- I'll take the lead.
- Dessa Observation Mode: Wait, is this Inquest technology? And charr, humans, and norn? Is the Inquest multiracial now?
- As Inspector Kiel approaches the electric walls
- Inspector Ellen Kiel: Ow! It shocked me!
- Talking to Inspector Ellen Kiel while waiting at the electric walls
- We need to shut that down. You find a way to turn that off, I'll watch your back.
- I'm on it.
- At the second puzzle
- Dessa Observation Mode: Now that's just excessive.
- At the console before the Kleptotronic Design Lab
- Inspector Ellen Kiel: Hmm, let's see what this does.
- Talking to Inspector Ellen Kiel to start Frizz's Lab fight
- This security panel seems simple enough. Are you ready to breach the room?
- Let's go.
- Not yet.
- Frizz: This is a sterile research environment. Leave at once.
- Talking to Frizz
- This is a sterile research environment. Leave at once.
- Let's finish this.
- Initiating combat
- Frizz: Very well. I have ways of dealing with contaminants.
- When Frizz is at 75% health
- Frizz: You're vandalizing precious equipment. Why don't you play with live wires?
- During fight
- Frizz: Time to amplify the power. Fry, you pests. Fry like a skritt on a lightning rod.
- Frizz: This isn't supposed to happen. You should be dead by now!
- When someone is downed or defeated
- Frizz: Someone call sanitation. I have stains that need eradicating.
- When all golems are defeated
- Frizz: You think you've won? You've won nothing! Tremble and cry as I unleash my greatest—
- Inspector Ellen Kiel: Have I mentioned how much I hate those grubby little Inquest?
Related achievements[edit]
Upon completion[edit]
 Return to Season 1: Fractal Recursion: Aetherblade (Weekly) — Complete the Aetherblade fractal. (0
 ) (Historical)
 Sky Pirates: Fractal Recursion: Aetherblade Retreat — Complete the Aetherblade fractal after completing the "Sky Pirates" episode. (3)
 Incinerator I: The Experimental Dagger: Aetherblade Materials — Gather a sample of the materials being used by the Aetherblades from the Frizz's Laboratory chest in the Aetherblade Fractal.
 Astralaria IV: The Cosmos: Watchwork Pivots — Found in the chest at the end of the Aetherblade Fractal.
 Legendary Backpack: Ad Infinitum: Aetherblade Challenge Mote
Objective during[edit]
 Bolt III: Zap: Bottle of Frizz's Energy — Use a Capacitive Bottle to capture energy from a rotating wall while fighting Frizz in the Aetherblade Fractal.
 Bolt III: Zap: Bottle of Aetherblade Energy — Use a Capacitive Bottle to capture energy from an Aetherblade Striker's channeled lightning attack.
 Incinerator III: Spark: Searing Concoction — Use the equipment from Frizz's Lab in the Aetherblade Fractal to combine the Smouldering Concoction with the Combustive Substance to form a Searing Concoction.
 Sunrise III: Dawn: Phosphorescent Glow — Use the Illuminator to capture the phosphorescent glow from the light of the Inquest terminals in the Aetherblade Fractal.
Notes[edit]
- If Inspector Ellen Kiel did not advanced into the final chamber, talk to Frizz and select the "Let's finish this!" option to continue the fight.
- Since the golems in the final encounter block all incoming attacks for extended periods of time, it is most beneficial to have a source of unblockable damage, like Signet of Might.
- In scales where the force fields apply agony, it is a good idea to stand on the boxes and apply stability so the golems are unable to pull you down.
Trivia[edit]
- The Hornpipe is the dance that the Aetherblades hologram dancers are performing.
