Swampland Fractal
Swampland Fractal
- Levels
- 80
- Type
- Fractal
- Dungeon
- Fractals of the Mists
- API
- 949
| Image(s) |
|
Click to enlarge. |
“Banish evil spirits from a dangerous swamp.
— In-game description
The Swampland Fractal is one of the Fractals of the Mists. The Swampland Fractal occurs at scales 5, 32, 56, 77 and 89.
Objectives[edit]
- Traverse the marsh.
- Fractal Difficulty Scale: x
- Personal Fractal Level: x
- Investigate your surroundings.
- Return the wisps to the clefts.
- Wisps returned: x /3
- Explore the passage opened by Bloomhunger.
- Kill the Mossman.
- Mossman

- Investigate the clearing.
- Kill Bloomhunger.
- Bloomhunger

- Fractal stabilized. Depart when ready.
Rewards[edit]
- Primary article: Fractals of the Mists#Rewards
Walkthrough[edit]
Wisps[edit]
- Mechanics
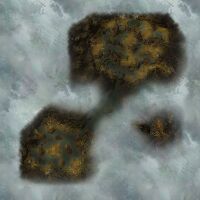
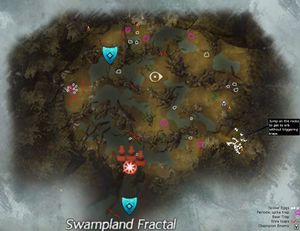
Get all three wisps back to their clefts within the allotted time. Wisps are indicated by pick-up icons on the mini-map. Picking up the first wisp will start a timer. Send at least 1 party member to each wisp. Ensure each party member is ready before grabbing any wisps.
- There are traps on the ground that cause knockdown and cripple. They may be avoided by jumping over them, or using Swiftness, Stability, and Condition-removing skills.
- Invigorator Rifle Prototypes may be found on the ground near the clefts. Members of the party not running wisps may use these rifles to buff their allies with swiftness, cripple enemies, and break stuns.
- Walls will appear between trees as soon as a wisp is picked up, requiring runners to jump over or go around them. At higher tiers, the only expedient option will be to go over these walls.
- If the timer runs out before the three wisps are returned, the map will reset and the location of the wisps will change. The map can also be purposely reset by picking up and then dropping one of the wisps.
The time limit to return the wisps at the beginning of the fractal becomes lower the higher the Fractal scale is:
| Fractal Scale | Time Limit (mm:ss) |
|---|---|
| 5 | 1:04 |
| 21 | 1:04 |
| 32 | 0:38 |
| 41 | 0:38 |
| 56 | 0:30 |
| 67 | 0:30 |
| 77 | 0:30 |
| 89 | 0:30 |
After the three wisps are brought back successfully, a passage will open. Proceed into the passage toward the boss.
- Tips
- Players may take player created portals while carrying wisps, for example, a mesmer with Portal Entre is useful for the farthest wisps.
- It is more efficient and courteous to let the person carrying the farthest wisp to go first. You can see that they have taken their wisp by watching the minimap (the timer will start once any wisp is picked up). Even by counting down in chat, due to human reaction and latency, it is very difficult to pick up all the wisps at the exact same time. Doing so can provide that player with an extra second which can make a difference in higher scale Swampland Fractals.
- Try to deposit the wisps into the wisp clefts closest to the side where your wisp was. For example, if someone else is carrying a wisp from the extreme far west (left) corner, you will want to make sure that you do not deposit your wisp into the west cleft, as you will only be making the person carrying the furthest wisp take even more time to reach the nearest unoccupied cleft.
- Traps spawn in the same place no matter the scale, so memorizing safe paths will save time.
Mossman[edit]
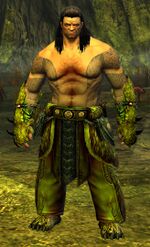
Partway through the passageway to Bloomhunger the party will be ambushed by Mossman. The way forward is closed and Mossman must be defeated before proceeding to Bloomhunger.
Mossman summons wolves and attacks in melee range. He does high damage with his regular attacks, but is relatively easy to kite. Occasionally, he will disappear in stealth, and reappear with a charged attack (which looks like the Warrior's Dual Strike skill) that will likely down his target if it connects. It has substantial range, so be prepared to evade when he reappears. It is possible to keep track of him on the mini-map, which makes it easier to predict and dodge his attack. Some of his attacks (like throwing his axe) can be reflected. Once his health is lowered, he will transform into one of the Norn's racial elite forms (eg. Snow Leopard, Wolf, Raven). He will gain leap skills and a massive damage spike.
In general, applying heavy crowd control effects on Mossman to break his Defiance bar and stun him as often as possible is the most effective strategy. Bring AoE skills and weapons that cleave multiple targets to clear out the wolves.
Once defeated, the passageway will open allowing the party to proceed forward and investigate the clearing.
Bloomhunger[edit]
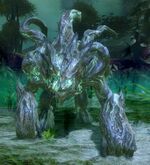
The Bloomhunger fight increases in difficulty with the fractal level. Upon entering the clearing, the party will see four Wisp Clefts in a circle, and a single Wisp near the entrance to the clearing. To begin the fight, pick up the Wisp and deposit it in one of the clefts. Once the Wisp is deposited, Bloomhunger will appear in the middle and the fight will commence.
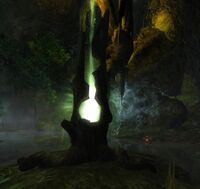
- Wisp Clefts
Once the fight begins, a green circle will appear around the wisp cleft the Wisp was deposited in. The green circle will eventually shrink, before disappearing, forcing the party to the next Wisp Cleft in a clockwise rotation. These green circles make Bloomhunger and the spirits it spawns vulnerable to damage. It also gives players standing in them the Wisp Vigor buff, which grants +100% Endurance Regeneration. It is very important that players try to remain inside the green circles as often as they can, as dodging is very important.
- Bloomhunger Attacks
Bloomhunger has multiple special attacks
- Charge - Bloomhunger will rise up on his hind legs before charging toward the player, unleashing a devastating swipe at the end of his charge, knocking down and damaging players. Dodge or walk to the side to avoid this attack. Bloomhunger will stop his charge where his target was standing.
- Leap - Bloomhunger leaps into the air toward the players, a large AoE appears on the ground where he will land, knocking down and damaging players. Move out of the AoE or dodge just as he lands to Evade this attack. He normally opens with this attack.
- Pound - Bloomhunger pounds the ground furiously with his fists in a channeled attack. Dodge out of the AoE or break his Defiance bar during this attack.
- Poison Rain - Bloomhunger will shake back and forth sending out raining poison fields. Do your best to avoid standing in the poison fields that land. Projectiles may be reflected. If possible, break his defiance bar.
- Shoot - Bloomhunger shoots a blob of poison to a player, creating a poison field at the area of impact.
He will almost always begin his Pound attack after his Leap attack, giving your party a moment to break his Defiance bar. On higher levels, Bloomhunger will summon Oakhearts to his aid between phases. Oakhearts are slow enemies with large amounts of health and are capable of stunning and knocking down players. They have slow attacks and a lot of health, so it's prudent to decide before-hand on whether your party will kill them individually, or if your party will cleave them with Bloomhunger. Breaking their Defiance bar allows you to deal a decent amount of extra damage to them. Killing them during Onslaught Phases is ideal if the group has decided to kill them, as dealing with the Oakhearts and Bloomhunger at the same time can be tricky.
- Onslaught Phase
At 75% and 50%, Bloomhunger will become invulnerable and move to the center of the arena for the Onslaught Phase. During this phase, spirit animals will spawn in the arena and attack the players, the spirit animals are invulnerable until they enter the green ring surrounding the Wisp Clefts. The party must survive the onslaught until they kill enough monsters and Bloomhunger returns to the fight. Bloomhunger will continuously pulse his Poison Rain attack. It is vital for players to bring AoE skills and cleaving weapons to handle the amount of Spirits that will spawn at higher levels. Blinds are also helpful.
After each Onslaught Phase, Poison Blooms will spawn around the arena; the poison put out by these blooms poisons players and applies protection to other enemies. Assigning someone to kill them ahead of the party's movement can greatly reduce the additional pressure.
- Wisp Phase
At 25%, Bloomhunger will return to the center as with the Onslaught phase, but this time he will begin building a charge. Four wisps will appear in each corner of the arena (NW, NE, SW, SE) indicated by pickup icons. The Wisp Clefts will become receptacles for the wisps. Players must return the Wisps to the Clefts before Bloomhunger becomes fully charged, or he will unleash a blast that will severely damage all players (killing them entirely on higher levels). It is best for teams to organize who will take which wisp before the fight starts to avoid confusion at this phase. This can be done easily by placing a personal waypoint on the mini map. (Alt+Left Click)
Once the Wisp Phase is complete, a large green circle will spawn in the center of the room, and Bloomhunger will become vulnerable once again. He will start out stunned, but his defiance bar will recharge quickly. Spirit animals will spawn and attack the players.
Achievements[edit]
| Swampland Fractal Stabilizer | Fractals of the Mists | 5 |
|---|---|---|
| You've completed the Swampland fractal inside the Fractals of the Mists.Shifting trees won't stop you. The Mossman will. | 1 Fractal | 5 |
| Fancy Footwork | Fractals of the Mists | 1 5 |
|---|---|---|
| You've made it through the Swampland fractal inside the Fractals of the Mists without triggering a single trap.You can't be caught that easily. | 1 Challenge | 5 |
- Do not trigger any of the tripwires, beartraps, or spiketraps while completing the Wisp event. Then successfully finish the entire fractal.
- Due to the timer, this achievement requires 3 players in order to retrieve all the orbs in time, teleportation skills can be used to be faster and skip traps.
- You will get the achievement upon completing the fractal as long as you don't trigger any traps. It is easy to do this if you let your party members complete the wisps section for you.
- Trap types
Zooming the camera in, all traps can be identified visually:
- Tripwire: as two wooden stakes with a bright blue wire between them.
- Bear trap: metal bear trap on floor (often underwater and thus difficult to see)
- Spike trap: pulsating red circles (safe to walk in when not red)
- Spider eggs: effectively bomb traps with weak small spider mobs
NPCs[edit]
Foes[edit]
Historical NPCs[edit]
Objects[edit]
Dialogue[edit]
- Upon arrival
- Dessa Observation Mode: Ugh, a swamp. I knew I should've sprayed you all with mosquito repellent before you left. All those biting things just waiting to...oh, uh, never mind.
- Upon defeating the final boss
- Dessa Observation Mode: There, fractal's stable. That was...creepy. Swamps. Ugh, so many squirming, hungry, crawling... Let me know when you want to move on.
Related achievements[edit]
Upon completion[edit]
 HOPE I: Research: Bloomhunger Sap — Harvested from the Bloomhunger in the Swamplands Fractal[sic].
 Nevermore I: Ravenswood Branch: Protector of the Swamplands — Found within the Swampland Fractal chest.
 Ad Infinitum I: Finite Result: Swampland Challenge Mote
Objective during[edit]
 Kudzu I: The Experimental Longbow: Lovely Dandelion — This particular variety is only grown by the Mossman in the Swampland Fractal.
 Twilight III: Dusk: Swampy Gloom — Use the Gloominator to capture the gloom in Bloomhunger's room in the Swampland Fractal.
 Ad Infinitum I: Finite Result: Charged Clump of Swamp Moss
 Ad Infinitum I: Finite Result: Unstable Magically Charged Infusion Sample
 Legendary Backpack: Ad Infinitum: Jungle Wurm Omelet (Mossman Style)
- Specifically from The Mossman
 Incinerator III: Spark: Swamp Gas — Acquire swamp gas from the Mossman in the Swampland Fractal.
 The Dreamer III: The Lover: Mossman's Dream — Found in Swampland Fractal chest.[sic]
 Astralaria IV: The Cosmos: Swamp-Cured Leather — Looted from the Mossman in the Swampland Fractal.
Trivia[edit]
- The music track is a hidden track from Guild Wars Prophecies. This could be also heard in The Catacombs.
