Scrap Rifle Field Test
Scrap Rifle Field Test
- Location
- SCAR Bivouac
(Tangled Depths) - Time limit
- 4:30
| Interactive map |
|
Interactive map (Upper level) |
“Kill as many chak as you can before the timer runs out, but be careful—your scrap rifle is prone to overheating! Destroying chak eggs will release a goo that will heal you and cool your rifle if you are close by, but it's likely to stir up the chak.
— Adventure objective
Scrap Rifle Field Test is an adventure in SCAR Bivouac in which the player must kill as many chak as possible using Scrap Rifle skills while not allowing their rifle to overheat. Interacting with the Scrap Rifles in SCAR Lane starts the adventure.
Getting there[edit]
| Search YouTube for videos related to Scrap Rifle Field Test. |
Take the north exit from SCAR Camp Waypoint — and follow the path to the east. Interacting with the box of weapons on the ground at the end of this path (just south of Cascade Descent) will bring up a dialog to take you into a single-player instance where you can interact with the flag to start.
Mechanics[edit]
- Upon entering, players have the option to use the Action Cam or not.
- Rifle skills accumulate stacks of heat which dissipate over time. At 100 heat stacks, you will have a final opportunity to throw the rifle for an explosion before the rifle is destroyed and the adventure is terminated.
- Destroying eggs and being splashed by the goo will heal you for 5000 health and decrease your heat stacks by 10.
- General skill usage:
- Shrapnel Blast is used to aggro foes. It has an extremely wide cone hit range, so be mindful of where it's aimed. You may accidentally pop an egg if you're not careful. Damage and condition damage done by this skill is decreased against enemies that are further away. This skill adds 3 heat stacks.
- Use the skill to aggro chak, and then wait until enough have gathered to use the dps skill.
- If you walk up to an egg with your back faced towards it and use Shrapnel Blast, you will always pop it within effect range.
- Spray and Pray is the main dps skill. The skill is extremely efficient in heat usage and dps, so prioritize its usage whenever possible. This adds 4 heat stacks.
- Explosive Leap and Explosive Disengagement are great for movement, popping eggs and returning. Both add 5 heat stacks each.
- Charring Barrier / Throw Overheated Scrap Cannon can be used as a nuke while running away from chak, while adding 10 heat stacks.
- Shrapnel Blast is used to aggro foes. It has an extremely wide cone hit range, so be mindful of where it's aimed. You may accidentally pop an egg if you're not careful. Damage and condition damage done by this skill is decreased against enemies that are further away. This skill adds 3 heat stacks.
- Some chak refuse to get aggro. Some of them stay near the wall unless you shoot them, and even then they often just turn back towards the wall again after a while. Make sure you kill them off along with some other normal chak as collateral. If you miss too many of these chak you may struggle to reach high score.
- The hardest part of the adventure is probably the last section, as chak spawn from all 3 corners of the lowest floor and spread far apart. Try to kite around the middle egg to kite them into a single spot. Your first skill is probably more efficient for this section over the second one just due to how far away all the chak are.
Masteries[edit]
- Optional
- Glider Basics (Gliding Level 1) — Recommended.
- Bouncing Mushrooms (Itzel Lore Level 1) — Recommended.
- Blazing Speed Mushrooms (Itzel Lore Level 3)
- Adrenal Mushrooms (Itzel Lore Level 6)
Skills[edit]
| # | Skill | Description | ||
|---|---|---|---|---|
| 1 | Shrapnel Blast | ½ | Fire a cloud of shrapnel that causes more damage the closer you are to foes. | |
| 2 | Spray and Pray | 5½ | 2 | Ignite chopper fuel for a makeshift flamethrower. Applies burning on the final attack and deals 10% bonus damage to burning targets. |
| 3 | Explosive Leap | 1 | 20 | Blast the ground, damaging nearby foes and leaping to your target. |
| 3 | ¼ | Fire an explosive shot at your feet, removing movement-impeding conditions, launching yourself backward and striking nearby foes. | ||
| 4 | Rusty Shrapnel | 20 | Launch a cluster of rusty shrapnel that that[sic] bleeds, cripples and poisons enemies. Usable while gliding. | |
| 5 | Charring Barrier | 20 | Burn and blind foes with a wall of ignited chopper fuel at the target location. Usable while gliding. | |
| 5[1] | Throw Overheated Scrap Cannon | 1 | Throw your overheated scrap cannon within 5 seconds for a devastating final attack. |
- ^ Replaces Charring Barrier and removes skills 1-4 if the Heat Level reaches 100%.
Rewards[edit]
First-time reward[edit]
| Reward tier | Chak killed | Experience | Reward |
|---|---|---|---|
| Gold | 150 | 80,010 | |
| Silver | 80 | 40,005 | |
| Bronze | 30 | 26,670 | Bag of Gear |
Daily reward[edit]
| Reward tier | Chak killed | Experience | Reward |
|---|---|---|---|
| Gold | 150 | 24,003 | Scrap Rifle Field Test: Gold |
| Silver | 80 | 16,002 | Scrap Rifle Field Test: Silver |
| Bronze | 30 | 13,335 | Scrap Rifle Field Test: Bronze |
Notes[edit]
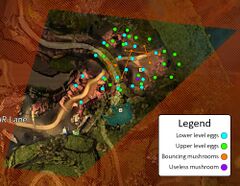
- Destroying all 40 chak eggs in one play through will reward the Chak Egg Scrambler achievement; this includes eggs destroyed by hatching chak. Having the Bouncing Mushrooms Mastery is necessary to achieve this.
- This adventure is instanced, so you might not return to the same map upon leaving, especially if you do not have a party or squad with someone in the original map.
- The timer has been increased by 30 seconds with the March 6th, 2018 update.
- Conditions dealt by the Scrap Rifle skills scale with the stats of the character. It may be easier to use a character with high condition damage.
- Only the stats obtained from armor (including your back item) count. Weapons and accessories do not.
- Example: Getting full Viper's armor over Celestial can give you around 15-20 more Chak kills in the given time.
- Consider getting Condition Food and Utilities, as well as potentially Enchanted Combat Boosts.
Related achievements[edit]
 Tangled Depths: Chak Egg Scrambler — Destroy all of the chak eggs in the scrap cannon adventure in one attempt. (5)
 Tangled Depths: Scrap Rifle Field Test: Gold — Kill as many chak as you can before the timer runs out, but be careful-your scrap rifle is prone to overheating! Destroying chak eggs will release a goo that will heal you and cool your rifle if you are close by, but it's likely to stir up the chak. (1
 )
) Tangled Depths: Scrap Rifle Field Test: Silver — Kill as many chak as you can before the timer runs out, but be careful-your scrap rifle is prone to overheating! Destroying chak eggs will release a goo that will heal you and cool your rifle if you are close by, but it's likely to stir up the chak. (1
 )
) Daily: Daily Adventure: Scrap Rifle Field Test — Open the bronze daily reward chest from this adventure! (0
 ) (Historical)
 Hivemaster: Scrap Rifle Field Test: Silver — Earn silver or better in this adventure.

