User:Lukfruit/Actual Commander's Compendium
Overview of the Project[edit]
Work in progress last update 15 Jul 2023 i'll update when i feel like it
- Many event pages have detailed breakdown of the event, i want to compile a bit more unga-boonga guides here with copy-pastable instructions.
- Overall the hope it for the people to look at some of these and go "I can lead that". Thus the community will get more commanders. Ideally it is best to avoid the feeling of wall of text, no idea how to achieve that though.
- Right now i am opting to keep this all on a single page for the ease of Ctrl+F of the desired event
- I am also considering stylising everything to look more like a book, but maybe keep it for later.
To-Do's[edit]
- Add description about how a tag can be hidden should the commander desire to do some prep work
- Add a copypastable squad warning message to late pinata asking people to join coin collection of no pinata for them
- Fill out all the events that makes sense to lead/tag up for.
- Found this blast from the past, maybe something useful here — Train
Introduction[edit]
The most important role of commander is having the tag on and being there.
For the most part most players usually know what to do, and you just need to be there. A PvE map might be full, but everyone will be trying to join other instance for the meta because they see no tags on their current one. Or you might be just roaming in WvW tag up and you will have a small group of people soon, which will make taking objectives easier (don't do this if there are other tags on the WvW map though). One exception is Raids and more difficult strikes, where you are also expected to form and manage groups, though you can ask for help and people (at least in my experience) will help out, you'll have to promote them to Lieutenant though. Most of the cases you don't need to be a guiding beacon but more of a light to attach the moth.
Other noteworthy Guides on Commanding: by Hardstuck.gg/Mighty teapot's guild
Have a Tag On[edit]
This section covers what it envolves being a commander and some tips/trick for commanding. It assumes the owner already has a commander tag from Commander's Compendium or Catmander's Compendium. Mentor's tag is not really a substitue for these as it seems to have a smaller social pull, although some people still join you occasionally.
Advertising your Instance/Taxi-ing people in[edit]
For most events it is expected that the commander will advertise their instance in the LFG (default Y). Find the map you are on in the LFG tool in the tab looking for group, by first finding the expansion your map came from or the type of content you are plannning to lead, if it's the instanced content and, secondly, finding the map you are on, then press Advertise your group in the bottom left of the LFG tool. The game will then ask you to enter the name for you advertisment.For open world events, a common practice is to state the event and the last number of the ip of your instance. You can check ip of you instance by typing /ip in chat. If the event has multiple commanders leading it is, usually instead of the event name or in addition to it, people state the side they are leading. For instanced content, it is common to state what content you are planning to do, and who you are looking for. Here are a few examples of LFG advertisements:
Bounty train
Pinata .68
West .31
IBS5 + DS, qheal
Be There[edit]
Various commanders have their own styles of commanding and pathing through various content, these are just recommendations/refreshers.
In Open World PvE[edit]
General[edit]
In general a source of ![]() Superspeed is useful in any escort content, people in your squad are not always responsive to the request to provide superspeed, so that role is usually on you.
Superspeed is useful in any escort content, people in your squad are not always responsive to the request to provide superspeed, so that role is usually on you. ![]() Scrappers have somewhat easier time doing that,
Scrappers have somewhat easier time doing that, ![]() Druids,
Druids, ![]() Elementalists,
Elementalists, ![]() Heralds and
Heralds and ![]() warriors can apply it with low uptime, and
warriors can apply it with low uptime, and ![]() mesmers have to jump through a few hoops and still have low uptime.
mesmers have to jump through a few hoops and still have low uptime.
Here is a list of skills and traits by class that grant superspeed to allies (so that you may ask other people a bit more directly to use these):
![]() Windborne Speed — Staff Air 4. 3 seconds on 20 second CD.
Windborne Speed — Staff Air 4. 3 seconds on 20 second CD.
 "Eye of the Storm!" — Utility skill. 5 seconds on 30 second CD.
![]() Toss Elixir U — Toolbelt skill for Elixir U. 3 seconds on 32 second CD.
Toss Elixir U — Toolbelt skill for Elixir U. 3 seconds on 32 second CD.
 Bypass Coating — Toolbelt skill for Blast Gyro. 3 seconds on 30 second CD.
- Gyroscopic Acceleration — Adept
 Scrapper trait. 5 seconds on use of a Well skill (6 different skills + Function Gyro, CDs are 20,25,20,20,20,45,25 seconds). Effectively the only profession that can provide 100% uptime on superspeed by itself.
 - Speed of Synergy — Minor master Scrapper trait. 5 seconds on use of healing skill (15-24 seconds CD).
 Crystal Configuration: Zephyr — Master
  Holosmith trait. 3 seconds on 2 second CD. Needs verification that NPCs can benefit from the pad.
![]() Chaotic Release - Elite skill. 5 seconds on ~20 second CD.
Chaotic Release - Elite skill. 5 seconds on ~20 second CD.
![]()
![]() Celestial Shadow —
Celestial Shadow — ![]() Druid master trait, 3 seconds on ~10 second CD
Druid master trait, 3 seconds on ~10 second CD
![]() Banner of Tactics — Utility Skill. 5 seconds Superspeed on 30 sec CD.
Banner of Tactics — Utility Skill. 5 seconds Superspeed on 30 sec CD.
![]() Slipstream — Underwater Spear 4. 8 seconds on 25 second CD.
Slipstream — Underwater Spear 4. 8 seconds on 25 second CD.
![]() Time Warp — Elite Skill, NPCs will likely run out of the field after 1 pulse. 1.5 second per pulse, 1 pulse per second, 6 pulses, 120 second CD.
Time Warp — Elite Skill, NPCs will likely run out of the field after 1 pulse. 1.5 second per pulse, 1 pulse per second, 6 pulses, 120 second CD.
![]()
![]() Temporal Enchanter —
Temporal Enchanter — ![]() Inspiration trait. 2 seconds on use of Glamour skill. 5 very niche skills with cooldowns of 32,25,72,72,120 seconds.
Inspiration trait. 2 seconds on use of Glamour skill. 5 very niche skills with cooldowns of 32,25,72,72,120 seconds.
 Well of Action —Utility skill. You need to place it where the units you try to buff will be in 3 seconds, not the easiest thing to do. 5 seconds on 20 second CD
It is worth repeating that superspeed is not a boon, and does not benefit from Concentration/Boon Duration, or anything else that specifically affects boons. Only way to increase its duration is  Superior Rune of the Zephyrite
Meta Trains[edit]
Meta trains are events that due to their timing align one after another and people find desirable to do. They might vary in duration (hardstuck.gg one last for 6 hours, for example, most are usually around 2 hours) Here are a few examples or Solo and Squad meta trains:
- Pinata -> chak -> auric basin -> dragonstorm.
- Doppleganger -> vabbi dogs -> VB matriarch -> piñata -> tangled depths -> (no waiting for the door) junundu rising -> doom lore in grothmar -> auric basin -> dragon storm -> aetherblade -> blackout -> gang war.
- [fast] Meta Train
- hardstuck.gg Meta Train
- LS4 Meta Train: Istan (Palawadan/GreatHall) -> Thunderhead (Oil) -> Jahai(Shatterer) -> Thunderhead (Keep) -> (Optional Metas) Sandswept/DragonFall/Kourna
- POF Meta Train: Vabbi(Forged) -> Elon Riverlands(Augury) -> Crystal Oasis(Choya/Pinata) - The Desolation(Junundu).
Central Tyria[edit]
World boss train[edit]
Claw of Jormag[edit]
Claw of Jormag 2023 Style[edit]
Leading requirements: Minimal
- Tips
- Bring/Swap to Healing gear/build.
- Overview
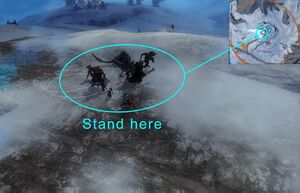
- In 2023 both phases are done by basically ignoring the mechanics of the boss, stacking on a hill next to the bosses front left leg (right one if you are facing the boss), and outhealing the damage of
 Icy Grave and reviving the downed. Most people will not be joinig the squad, so messages will be sent through /s.
 - Prep
- 1. Tag up and advertise your squad in LFG to taxi people in, writing IP is not necessary for this one
Claw of Jormag
- 2. Before the pre starts (which starts at xx:30) you might suggest people to swap to healing gear
/s If you have healing gear or build it might be nice to swap to it.
- Boss
- Once the pre starts, break the corrupted shards that spawn around the plateau.
 Crash Landing waiting spot
 - Stack on a hill (where everyone is already stacking).
- Break the Barrier, while healing everyone and reviving the downed.
- DPS the boss.
- If you or people want the Crash Landing achievement, wait for the boss slightly to the south east of it's spot (at the end of a short "desire path" in the snow) after it takes off (at 50% hp), if you do this achievement you'll be defeated (dead), not downed. Most likely no one will be around to res you. Tell people to teleport to one of the nearest waypoints and do so yourself.

/s Dead tp to [&BEMFAAA=] or [&BHoCAAA=]
- 6. Get to the hill to the north west where everyone is stacking.
- 7. Kill the boss, while healing everyone and reviving the downed.
Legendary Ley-Line Anomaly[edit]
Dry Top[edit]
Silverwastes/RIBA[edit]
Verdant Brink[edit]
HP Train[edit]
Mounted Path[edit]
Windglider Path[edit]
The Meta[edit]
Auric Basin[edit]
Octovine[edit]
HP Train[edit]
Tangled Depths[edit]
Chak Garent (80)[edit]
Leading requirements: Minimal
- Overview
- This is usually the event everyone comes to Tangled Depths in the year 2023. There are 5 paths from
 Ley-Line Confluence Waypoint — , ignore the right most one, it's not relevant to the event, for a total of 4 lanes involved in the event. Due to powercreep this event is relatively easy.
 - As a commander you'll have to taxi people in, count people on your lane and ask for help, if you think there is not enough people (i'd recommend at least 10 people per lane). If you don't have enough, ask for reinforcements. Most people know what to do, so you don't have to guide them much, it might be worthwile to say in map chat when you killed a chak garent in your lane, so that other people don't rush in to help you, after they've killed theirs. If you see other mention that they've killed Chak Garent in their lane, you might mention current HP percentage of yours, if it isn't close to dying.
- Prep
- Tag up and go to a Lane without a tag up
- Check the ip of your map, note the numbers after the last dot in the ip and advertise your squad in LFG, stating your lane and those numbers to taxi people in. The message will look something like:
Ogre .31
- 3. Make sure you have enough people in your lane (at least 10), call for reinforcements if there are not enough people
- Tips on Fighting Chak Garent
- Stay as far away from the expanding donuts as you can, you don't want to be knocked into them, or knocked down next to them. If you don't trust your dodging/moving out of danger skills bring
 Stability/
 Stun break.
- Event
-
- Left lane — Ogre Lane (Ogre)
- Kill eggs for 2 minutes until Chak Garent Spawns;
- Attack Chak Garent
- If you don't kill him on first try you have a second chance, after running from poison cloud, and killing the eggs again.
- Top Left lane — Nunoch Lane (Nunu)
- Interact with the nodules (they are usually off the ground and require you to jump on their level with a
 Springer or Bouncing Mushroom,
 - Repeat until Chak Garent Spawns, then Attack Chak Garent
- If you don't kill him on first try you have a second chance, after running from poison cloud, and stomping nodules again.
- Top Lane — Rata Novus Lane (Rata)
- Attack collectors to spawn Ley Energy
- Pick up Ley Energy and throw it into the circle around Rata Novus Golem
- Repeat until Chak Garent Spawns, then Attack Chak Garent
- If you don't kill him on first try you have a second chance, after running from poison cloud, and recharging the golem again.
- Top Right Lane — SCAR Lane (Scar)
- Kill chak around the megathumper for 2 minutes until Chak Garent spawns.
- Attack Chak Garent
- If you don't kill him on first try you have a second chance, after running from poison cloud, and protecting the megathumper again.
normally after the meta people go to Auric Basin and do Octovine
Treasure Mushroom[edit]
Leading requirements: Minimal
Normally before the meta or after the meta, before the wall is broken, people go and kill Treasure Mushroom. People usually do it for a small chance to get Invisible Boot Box. If you are going to do it after the meta, make sure to loot the chest from the meta under the ![]() Ley-Line Confluence Waypoint — , as it despawns either after you leave the meta related zone/ using a burrow/wp at teku nunoch or maybe after some time. Effectively you'll miss out on
Ley-Line Confluence Waypoint — , as it despawns either after you leave the meta related zone/ using a burrow/wp at teku nunoch or maybe after some time. Effectively you'll miss out on  Tangled Depths: Hero's Choice Chest.
Go to ![]() Teku Nuhoch Waypoint — , take the Nuhoch Wallows to the grub pit, move from the small enclave you appear in to a larger room with "trees" if you see the event the treasure mushroom is up. If the event is not up, the mushroom has a respawn time of about 10 minutes, and you can wait for it to spawn, just don't miss out on the meta if you are doing TM before it.
Teku Nuhoch Waypoint — , take the Nuhoch Wallows to the grub pit, move from the small enclave you appear in to a larger room with "trees" if you see the event the treasure mushroom is up. If the event is not up, the mushroom has a respawn time of about 10 minutes, and you can wait for it to spawn, just don't miss out on the meta if you are doing TM before it.
Call people:
Treasure Mushroom is up! TP to [&BAwIAAA=] and take the Nuhoch Wallows to the Grub Pit
After waiting a bit, start killing it slowly, just auto attacks (skill 1) is enough.
HP Train[edit]
Oh boi, explaining this one through text is going to be fun
Dragon's Stand[edit]
Bloodstone Fen[edit]
Ember Bay[edit]
Bitterfrost Frontier[edit]
Lake Doric[edit]
Draconis Mons[edit]
For the most part there isn't much to organize around in Draconis Mons, and commanders mostly serve as a notification that the event is happening there.
[edit]
The Meta[edit]
There are 3 events in the meta, most of which boil down to kill things
Champion Stonehead[edit]
Champion Nature's Spirit[edit]
Champion Bloodstone-charged Lava Wurm[edit]
Mushroom Emperor[edit]
Webby Mother[edit]
Inquest Power Suit[edit]
Leading requirements: Minimal
Getting to Rata Arcanum[edit]

TP to ![]() Heathen's Hold Waypoint — take the northern thermal tube that launches you closer to the center of the map, take the next thermal tube across the lava river.
You could either mount a
Heathen's Hold Waypoint — take the northern thermal tube that launches you closer to the center of the map, take the next thermal tube across the lava river.
You could either mount a ![]() skyscale or
skyscale or ![]() griffon mid flight and fly towards the
griffon mid flight and fly towards the ![]() Asura Gate — or land and walk on foot through the Rata Arcanum. If you choose the latter and don't have access to a
Asura Gate — or land and walk on foot through the Rata Arcanum. If you choose the latter and don't have access to a ![]() springer or a
springer or a ![]() skyscale, you'll need to pick up an Inquest Keypad from the inquest there to open barrier to the gate.
skyscale, you'll need to pick up an Inquest Keypad from the inquest there to open barrier to the gate.
The event[edit]
This champion is required to progress the  Druid Stone which in turn is needed for the
  Aurora and occasionally is a target for a daily so a lot of people want to do this one.
But before the Inquest suit can spawn players will have to do a pre-event
Aurora and occasionally is a target for a daily so a lot of people want to do this one.
But before the Inquest suit can spawn players will have to do a pre-event ![]() Use Inquest keypads to shut down the Inquest's gate (80). Considering how quickly the Power Suit dies it is a good idea to call people and tag up during the pre-event rather than after the champion has spawned.
Use Inquest keypads to shut down the Inquest's gate (80). Considering how quickly the Power Suit dies it is a good idea to call people and tag up during the pre-event rather than after the champion has spawned.
Inquest suit pre-event is up. TP to [&BM0JAAA=] take northern thermal vent to the middle of the map and then the one next to it, then fly towards [&BLwJAAA=].
The pre-event is relatively simple, only difficulties you might encounter are people dying to a turret if they stand on red light on the ground (you can use one of the inquest keypads to disable to turrent, by interactive with the terminal to the east, under the said turret. And the second "difficulty" is people sometimes have trouble reaching/finding the two gate terminals: one on the gate itself and the other one on the hill next to the gate.
Champion tends to die fast, so not much point in advertising it again, since most people just won't be able to reach it in time.
The event has about 10 minute respawn time. confirmation needed
Champion Devourer[edit]

Leading requirements: Minimal
To get to the devourer you'll need to enter Golemancer's Tomb, to do so go into the crevice with devourers in the south of Rata Arcanum, behind the tents (how to get to Rata Arcanum).
It takes 15-20 minutes for this champion to respawn, and it is required for Draconis Mons Master, which is required to craft legendary Aurora. It respawn without a pre-event, dies rather fast and it usually takes a while to get to the tomb it spawns in. So it might be worth announcing that it is should spawn soon (if you are counting) beforehand. Ask People to DPS it slowly.
Champion Devourer is up. TP to [&BM0JAAA=] take northern thermal vent to the middle of the map and then the one next to it, then fly towards [&BLwJAAA=]and enter a hole with devourers behind the tents in the south of Rata Arcanum.
Don't forget to loot the chest that spawns on the pillar in the Devourer's room, since auto-loot won't pick it up.
Siren's Landing[edit]
Crystal Desert[edit]
Bounty Train[edit]
 Piñata (80)[edit]
Leading Requirements: Less than minimal
- Personal note
- Please tag up for this one and taxi people in, if you are in an instance with Casino Blitz and there is no Tag on your map or if there is no pinata taxi in LFG for your instance, sometimes you can see tags in you map but they are not advertising their instance. More pinata instances = better.
- Overview
- Probably one of the easiest events to lead. Just tag up, advertise your group in the LFG and you can afk at the waypoint until piñata spawns. People usually collect the coins for Casino Blitz (which is the pre-event) by themselves. The only exception to this if you are doing a late pinata event. You'll know it's late pinata if time is past xx:10 and it's still round 1. This means there is not enough people and if round one isn't complete by xx:15 there will be no pinata [verification requested] due to time limit running out at xx:25 and pinata requires completion of 3 rounds of Casion Blits. During late pinata sometimes you'll have to ask people to collect coins, if the speed at which coins are collected seems slow to you (at least 30 coins collected by the time round 1 has 4 minutes left/ 60 coins by 3 minutes left) ask people to join the coin collection or there will be no pinata.
/m please join coin collection or pinata will not be happening.
Then once 3 rounds are complete, TP to ![]() Amnoon Waypoint — wait for 1 minute and kill the pinata. Be warned it dies extremely fast, so put off grabbing your coffee until after it is dead.
Amnoon Waypoint — wait for 1 minute and kill the pinata. Be warned it dies extremely fast, so put off grabbing your coffee until after it is dead.
I also like to send a message in map chat 1-3 minutes before pinata spawns (you'll have to change time if you are doing slightly delayed events)
/m Join us at [&BLsKAAA=] at xx:21 as we fail to get [&AgGSSwEA] from Choya Piñata. Don't be late it dies really fast.
Desert Highlands[edit]
Bounty Train[edit]
Elon Riverlands[edit]
Bounty Train[edit]
Path of Ascension[edit]
Doppleganger[edit]
Deadhouse[edit]
The Desolation[edit]
Bounty Train[edit]
Maws of Torment[edit]
Jundu Rising[edit]
Domain of Vabbi[edit]
Bounty Train[edit]
Explorer Flynn[edit]
Forged with Fire[edit]
Serpent's Ire[edit]
Leading requirements: High
Living World 4 Zones[edit]
Domain of Istan[edit]
Sandswept Isles[edit]
Domain of Kourna[edit]
Jahai Bluffs[edit]
Thunderhead Peaks[edit]
Dragonfall[edit]
Meta[edit]
Champs[edit]
Bridges[edit]
Leading requirements: Low
- Overview
- There is an extremely annoying achievement that is required to complete Visions of Dragonfall which in turn is required for
 Vision — My Beautiful Infrastructure. Effectively the player needs to assist in building or defending 25 bridge events. Normally these are available on a fresh map, which on dragonfall happens more frequently due to map resetting after the meta. And after that it feels more like it is luck based, since someoone else might do the bridge event without you knowing. Overall, bad experience.
 - But if you have several people you can organise and effectively track and stagger the events and just do the rotation.
- Difficulties
- Despite the achivement description, it counts only success of the events.
- Events repeat approximately 15 minutes after the last successful completion, meaning due to RNG you might have 2 events pop-up at the same time even though your squad had a decent rotation.
- Should the defense event fail, shortly after a repair event will appear, however should the defense succeed it's back to 15 minutes waiting time.
- It feels like events sometimes significantly shorter and complete after killing barely a few mobs while other times the defense might last a few minutes.
- The faster you complete the event, the more likely it is that someone will miss out on participation.
- Random people doing their own thing messing up the rotation.
- North-west of the map is a bit of a pain to navigate.
- Once the Break the Crystal Dragon (all camps have reached tier 4) meta event has started, the bridge events will cease to appear.
- Strategy
- Before the rotation is clear it is a good idea to spread out across all 4 of the bridges and ask squad mates to call out when the event pops up.
- It is a good idea to record on paper, or in /s, /d or even /m, when the next one will appear: for example west xx:37, just add 15 minutes to the time you got the event succeeded pop-up.
- In addition to this, due to difficulty #2 i recommend checking two spots at the same time and calling out if the event is up, like "west up"
- Due to difficulties #3 and #4 should two events pop-up at the same time, I recommend focussing on only one and letting the other one fail. In my experience, splitting and stalling results in both events completing at the same time and some people missing out. At least everyone can participate in repair and the timer for it is clear.
- Tag a mob/kill a mob and either wait on the bridge or go to the next expected bridge event (depending on the squad size). This ensures the event takes longer to complete allowing more people to get credit for it.
- It might be worthwhile to marker the correct path through the burning forest north east of the map. (optional though)
- Advertise your squad, invite people not in squad who do the events, ask people in /m if anybody else is doing the event and overall try to minimise amount of randoms, just don't be harass them.
- Once the Break the Crystal Dragon has started you can either switch to doing the meta (which is rather lucrative) or try to search for a new map.
Overall i don't think this is a thing that commanders will lead more than once. But i hope should someone want to do this achievement, they'll find this info helpful. Certainly faster than doing this achievement alone.
Icebrood Saga Zones[edit]
Grothmar Valley[edit]
Bjora Marches[edit]
Defending the keep[edit]
Drakkar[edit]
Leading Requirements: Minimal to Low
- Tag up, advertise your instance with the ip.
- Do the escort
- Attack the boss while dodging the attacks.
- Protect Jhavi Jorasdottir
- Ask mesmerers to equip Portal Entre and announce which gate they are entering.
/d mesmers make sure to equip [&BtUnAAA=] and please announce which gate you are planning to enter so that we could coordinate. - Attack the boss while dodging the attacks.
- Run to Jhavi in the center of the arena and break the breakbar. (The waystation is provided by the event i think)
- Go into the gate #1 (unless you are a mesmer). Kill the champion.
- Attack the boss while dodging the attacks.
- Run to Jhavi in the center of the arena and break the breakbar.
- If you are a mesmer that said they are going into the second gate, drop a portal and go into the second gate. You might have to run a bit back, after teleporting to drop the portal exit. If you are not a mesmer wait for the portal, and then take the portal. Kill the champion.
- Attack the boss while dodging the attacks.
- Run to Jhavi in the center of the arena and break the breakbar.
- If you are a mesmer that said they are going into the third gate, drop a portal and go into the third gate. You might have to run a bit back, after teleporting to drop the portal exit. If you are not a mesmer wait for the portal, and then take the portal. Kill the champion.
- Kill the dragon.
Drizzlewood Coast[edit]
Dragonstorm[edit]
End of Dragons Zones[edit]
Secrets of the Obscure Zones[edit]
Skywatch Archipelago[edit]
Rifts[edit]
Meta[edit]
- Pre-meta
- Stage 1
- Follow the dwarf
- Protect the dwarf
- Stage 2
- Kill things in within circled zones on the map and collect essence by running over it
- Stage 3
- Kill things around the dwarf and collect essence by running over it (it's kinda like RIBA because mobs drop essence for everyone, but it despawns)
- Meta
Spread out over zones, marked as I, II, III /m Spread out over zones, marked as I, II, III.
- Stage 1
- Pick up orbs. They are in the air. Touching Skyscale launcher launches you up and automatically mounts you on a skyscale. EVEN IN COMBAT.
/m Stage 1. Pick up orbs. They are in the air. Touching Skyscale launcher launches you up and automatically mounts you on a skyscale. EVEN IN COMBAT.
- Stage 2
- Kill things on your platform, after an elite is dead, approach the siphon on your skyscale and USE SPECIAL KEY ON A CRYSTAL ABOVE IT. Don't get distacted by mobs in the cetral area. But don't let them cap, the siphons as well. Elites on the platforms are the priority!
/m Stage 2. Kill things on your platform. Don't get distacted by mobs in the cetral area. But don't let them cap, the siphons as well. Priorities the Elites on the platforms. Once the elite on the platform is dead, approach the siphon for that platform and USE SPECIAL KEY ON A CRYSTAL ABOVE IT.
- Stage 3
- Pick up orbs again
/m Stage 3. Pick up orbs. They are in the air. Touching Skyscale launcher launches you up and automatically mounts you on a skyscale. EVEN IN COMBAT.
- Stage 4
- Go back to platforms and kill things until champion spawns. All 3 champions need to die within 20 seconds of the first one dying, otherwise they'll resapwn with 50% health.
- After champions are dead, approach the siphons on your skyscale and USE SPECIAL KEY ON A CRYSTAL ABOVE IT.
/m Stage 4. Go back to platforms and kill things until champion spawns. All 3 champions need to die within 20 seconds of the first one dying, otherwise they'll resapwn with 50% health. If your champ is dying too fast go help the others.
/m After champions are dead, approach the siphons on your skyscale and USE SPECIAL KEY ON A CRYSTAL ABOVE IT.
Amnytas[edit]
Rifts[edit]
Meta[edit]
- Pre-meta
- Kill Champs over the map in red circled zones. Make sure to use special key, Don't stack on green.
- Meta
- Stage 1
- Spread out over south, west and east circles around Central Tower
- Pick up orbs. They are in the air. Touching Skyscale launcher launches you up and automatically mounts you on a skyscale. EVEN IN COMBAT. then turn them in by approaching a big sphere above the guardian.
- At some point a champ will spawn. Kill it. Use Special key, don't stack on green.
- Stage 2
- Take the portal to central tower.
- Kill tentacles, find appropiate golems and use the special key it gives. If you are doing a tentacle with death gaze, make sure to pick up the anti-deathgaze hammer and use it when you are the target of the death gaze.
- After Tentacles are dead dps the mouth, don't approach to close or you'll be swolen.
- If you are Swolen at any point from now on look for a sandfall/lightfall around the arena you are in and walk towards it.
- at 50% stage 3 starts.
- Stage 3
- Psyche! it's Stage 1 again.
- Spread out over south, west and east circles around Central Tower.
- Pick up orbs. They are in the air. Touching Skyscale launcher launches you up and automatically mounts you on a skyscale. EVEN IN COMBAT. Then turn them in by approaching a big sphere above the guardian. Res the guardian as needed.
- At some point a champ will spawn. Kill it. Use Special key, don't stack on green.
- Stage 4
- Go back to the Central tower and kill tentacles.
- DPS the mouth again.
- Fly down the central tower and kill tentacles around the bottom half of the tower, on your skyscale.
- WP to balance WP or just fall down. Take the portal to the meta, take the portal to the centeral tower.
- Stage 5
- Spread around the NPC in the middle and stay in circles. Your spell on the right of your health bar have been replaces. Repeat the symbol NPC is showing. (the symbol can also be seen on the minimap).
- After Simon says part, get on Skyscale. Touching Skyscale launcher launches you up and automatically mounts you on a skyscale. EVEN IN COMBAT. Shoot your Skyscale fireballs into the eyes to kill them, They are immune to all other damage.
In WvW[edit]
Leading requirements: Low to Extremely High, depending on the map, time and opposing teams.
While this guide will provide you with various tactics and counter tactics for WvW, it is not a real substitute for experience, if you wanna lead in WvW find a commander and stick to them, see what they do and why they do it. Then start tagging up in off-peak hours. Also keep in mind that a lot of leading is done via voice coms like discord. And if you do tag up be prepared that people might have trouble executing your calls, so keep those as simple and clear as possible.
Common Catapult Spots[edit]
Common Trebuchet Spots[edit]
In Strikes/Raids[edit]
Leading requirements: Low to High, depending on the encounter
I don't have much experience leading for this content, as it is not content i normally enjoy. But the commander is normally expected to create a 10 man raid, and split it into several groups (normally 2). This is done so that boons are equally distrubuted between groups, as the boons and healing are applied primaraly to the group of the boon provider. As such a group normally involves a healer, an alacrity provider, and quickness provider. Roles are normally combined and shortened to:
- qDPS — a DPS that also provides Quickness
- alacDPS — a DPS that also provides Alacrity
- qHeal — a healer that also provides Quickness
- alacHeal — a healer that also provides Alacrity
- DPS — pure DPS, they don't provide any support and normally do only DPS
- Condi — can be used to signify that the player is a version of one of the above, but deals their damage primaraly through conditions rather than strike damage.
As such a squad might be composed of 2 groups: qDPS, alacHeal, and 3 DPS, and qHeal, alacDPS and 3 DPS, some of them might be condi, but for now (and most of the content) it is not important. Pure healers and rarely used. There used to be a very potent shielder build for Scourge, who used to carry pugs, but recent patch shook things up and i don't know if it is still around.
Normally it is a good idea to move yourself to group 2 or 3 and sort people between these 2 groups, so that people who join your squad (they automatically join to group 1) don't mess up your formation. Some people usually state their role themselves, but it's benefitial to change your squad message to:
Please state your role, when you join
or something similar, sometimes people miss it and you might have to ask them directly, no harm done.