Guild Bounty

“Your guild is tasked with tracking down and capturing various targets for the Orders. These people are wanted for a variety of reasons and have all sorts of tricks up their sleeves to resist arrest!
— Official website
![]() Guild Bounties are open world guild missions where members work together to kill targets across Tyria within 10-20 minutes. These NPCs are randomly chosen from a short list; to succeed, you must kill one requisite NPC for the Easy weekly bounty tier, three for the Medium weekly bounty tier, and five for the Hard weekly bounty tier.
Guild Bounties are open world guild missions where members work together to kill targets across Tyria within 10-20 minutes. These NPCs are randomly chosen from a short list; to succeed, you must kill one requisite NPC for the Easy weekly bounty tier, three for the Medium weekly bounty tier, and five for the Hard weekly bounty tier.
Tiers[edit]
| Tier | Time | Targets |
|---|---|---|
| Easy | 10 Minutes | 1 |
| Medium | 15 Minutes | 3 |
| Hard | 20 Minutes | 5 |

Mechanics[edit]
Any player with the 'Mission Control' permission for their Guild Rank can trigger the bounty from the Missions tab of the guild panel. Guild members can view the target NPCs using the mission tab of the guild panel or share the information via chat or other means. Once found, an authorized guild member must speak to the NPC to trigger the event to subdue the NPC. The target(s) spawn in an open PvE zone; since there are no special instances, non-guild members can help kill the target and get credit for a regular event.
The targets do not have to be killed in order, so guild members can split up into groups to tackle each separately. All requested targets must be completed for any member to receive mission credit. Each member who succeeds in dispatching at least one target will earn a Guild Mission chest; members who participate in multiple events will only receive one chest. The guild also earns a favor reward that scales with the difficulty tier.
Should a guild that is hunting a bounty come upon their target already being slaughtered, the guild may still participate in the fight and receive the Completion awards for completing the bounty. If you are a small guild with small member participation, this will help you greatly.
Additionally, if a target is already being engaged prior to a Bounty for that target being activated, the guild can activate the bounty during the fight and will still receive the Completion awards for completing the bounty. For small guilds with issues concerning active member participation, this situation will also help you greatly.
Walkthrough[edit]
- Preparations
Given the short time limit, many guilds send members to the eighteen possible zones to locate the targets before triggering the bounty. This strategy is especially helpful for Tier 3 bounties. However, it can be complicated during peak hours if another guild on the same world is given the same target: if a possible target is killed before your guild triggers the bounty, the NPC will respawn in another location and must be found again.
Alternatively, the guild can wait to identify the targets before searching for them. This works better for smaller guilds, since some targets can take a long time to find, unless several people are combing the map together. The guild can ask other players in map chat to assist, speeding up the process considerably.
Regardless of the method you choose, you will want to divide participants into groups, at least one for each target. It also helps to use characters that have unlocked as many waypoints across Tyria as possible.
- Starting the Mission
A player with the Mission Control permission for their Guild Rank, usually a Guild Leader or Officer, will trigger the bounty and the targets will be identified in Guild Chat and visible within the mission section of the guild upgrade panel. If your guild didn't pre-identify the target locations, send each team to the relevant zone to begin the search now.
- Coordinating Groups
The most efficient method for defeating all the targets is to send one team to tackle each NPC and any that finish early can map travel to help out one of the slower groups. Since the events scale up quickly with the number of nearby allies, a small group can sometimes be faster in defeating these champion-level opponents. The bonus rewards are the same for all guild participants, so many guilds find it is not worth the risk to wait for other members to converge at each foe's location. So long as each guild member has gotten credit for hitting at least one target, they will receive the bonus reward upon the mission's completion.
However, if the bounty's event timer runs out, the target will immediately respawn elsewhere, requiring a new search and typically causing the mission to fail due to lack of time.
- Killing the Targets
Once a team is in place, an authorized guild member can trigger the event by speaking with the target NPC. After a brief monologue, the NPC will become hostile and the nearby team can begin attacking. If another guild triggers the event for the same target, any of your guild members participating will receive credit towards the mission chest; any that are too far away will not.
Cancelling Guild Bounties[edit]
Any player with the Mission Control permission for their Guild Rank is able to cancel a Guild Bounty after it has begun. If this is done, there is a three-minute wait before the guild bounty can be started again.
Cancelling a guild bounty does not sacrifice anything other than time; a guild and its members are still eligible to receive rewards on the first completed Bounty mission for that Tier slot.
Rewards[edit]
Member rewards[edit]
Members of a guild that successfully kill at least one target receive the following rewards if the mission is completed.
Note for players who are part of a guild but cannot attend their guild missions: These rewards will be received even if, for example, you were to start a guild bounty alone, kill a target, and abandon the mission, and your guild completes the mission later in the week.
- 1 or 2 pieces of rare or better equipment (depending on Difficulty Tier)
- 70
 to 80 (depending on Difficulty Tier)
 - 1 or 2
 Guild Commendations (depending on Difficulty Tier)
 - There is also a chance to receive an ascended accessory.
Guild rewards[edit]
Guilds that successfully complete a Bounty will receive the appropriate level of favor, being 300, 400, or 500. (And a 10% bonus if the guild has not chosen to specialize.)
Non-guild member rewards[edit]
Participants who complete the dynamic events but aren't members of the guild will receive standard event rewards. The exception to this rule is if the other participants also have an active bounty on the target (see Mechanics, above).
Reward caps[edit]
- Each member can only receive the individual rewards once per week. If a guild member has received their rewards for a guild mission, the small chest icon beside that mission slot will display as open and glowing gold from within.
- The guild can only earn favor from this mission once per week, per Difficulty Tier. If a guild has successfully completed and earned rewards for a guild mission, the small shield icon beside that mission slot will appear filled in and glowing gold.
Possible targets[edit]
| Image | Bounty | Zone | Zone Level | Path/Spawn locations | Tier |
|---|---|---|---|---|---|
 |
2-MULT | Timberline Falls | 50-60 | 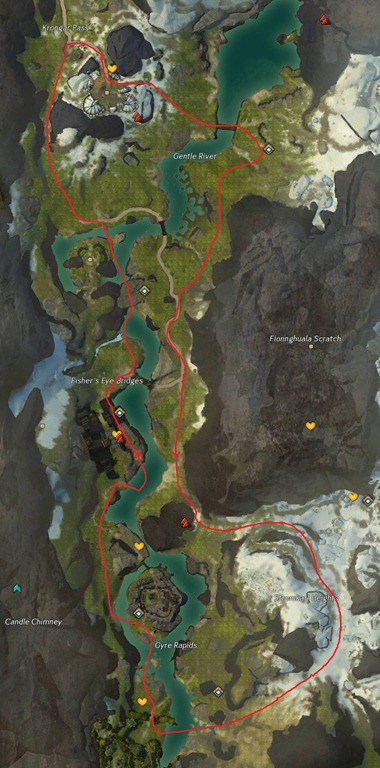 2-MULT's path 2-MULT's path |
Medium |
 |
Ander "Wildman" Westward1 | Southsun Cove | 80 | See page for details | Hard |
 |
Bookworm Bwikki | Lornar's Pass | 25-40 | 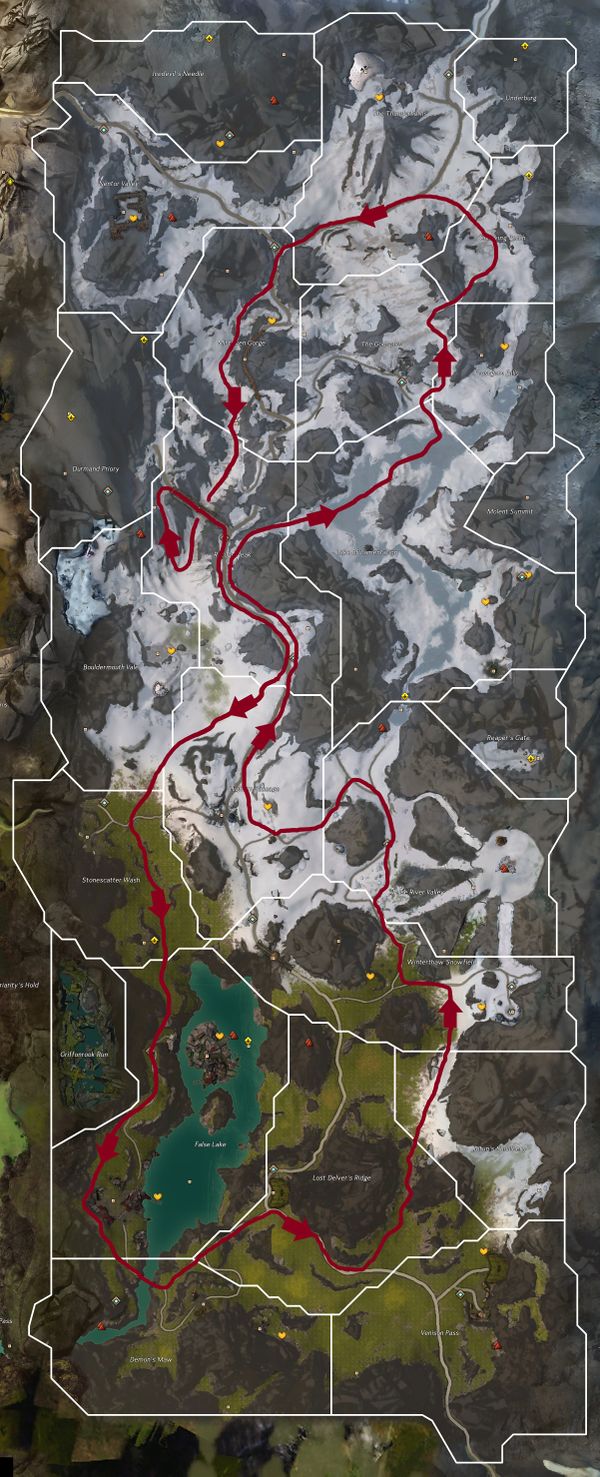 Bookworm Bwikki's path Bookworm Bwikki's path |
Medium |
 |
Big Mayana2 | Sparkfly Fen | 55-65 |  Big Mayana's spawn locations Big Mayana's spawn locations |
Hard |
 |
Brekkabek | Harathi Hinterlands | 35-45 | 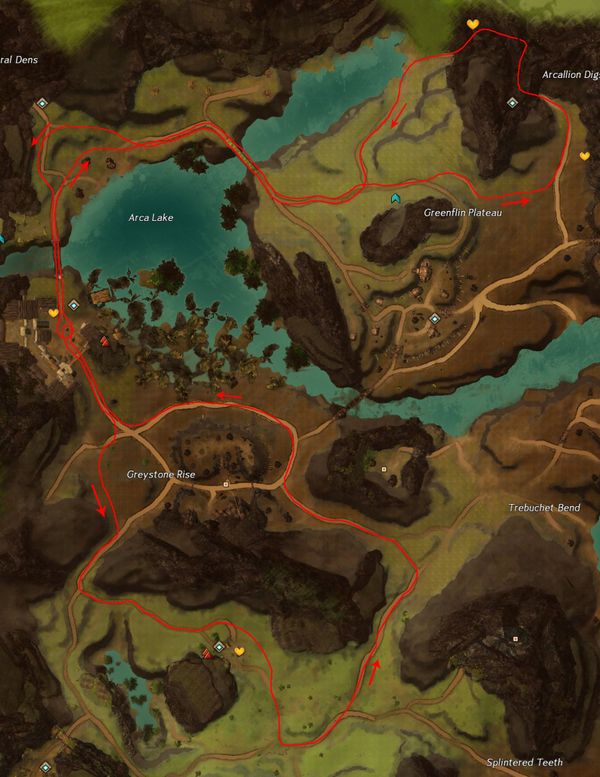 Brekkabek's path Brekkabek's path |
Easy |
 |
Crusader Michiele | Sparkfly Fen | 55-65 | 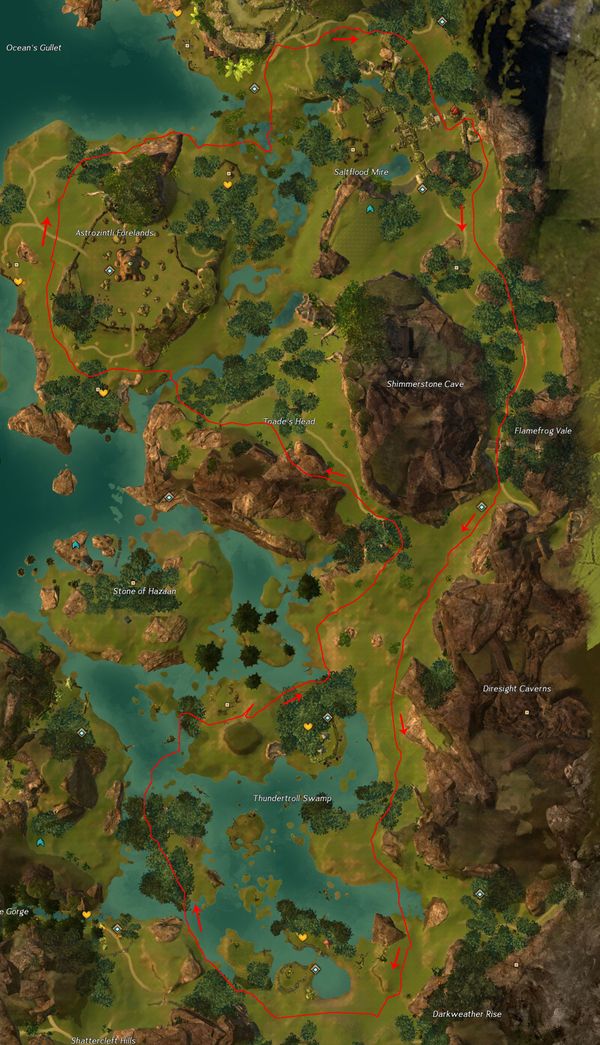 Crusader Michiele's path Crusader Michiele's path |
Hard |
 |
"Deputy" Brooke | Snowden Drifts | 15-25 | 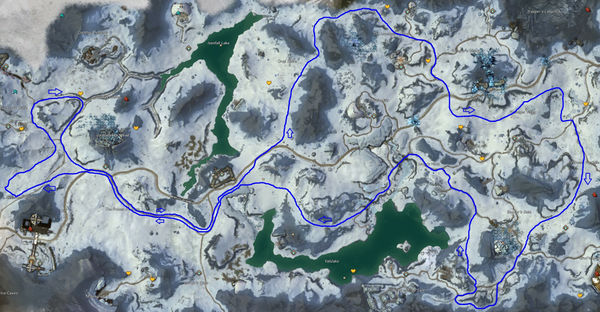 "Deputy" Brooke's path "Deputy" Brooke's path |
Hard |
 |
Devious Teesa | Frostgorge Sound | 70-80 | 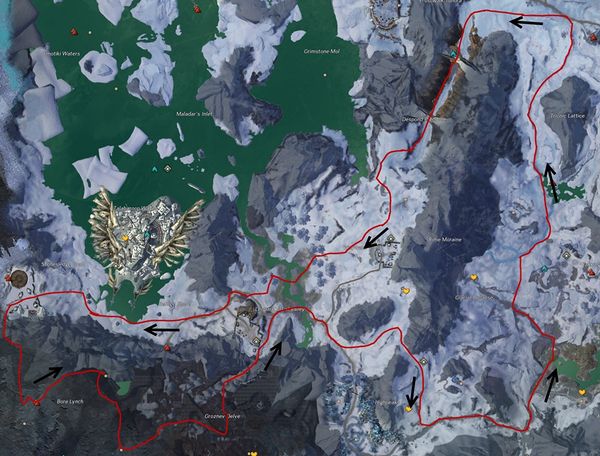 Devious Teesa's path Devious Teesa's path |
Hard |
 |
Diplomat Tarban | Brisban Wildlands | 15-25 |  Diplomat Tarban's path Diplomat Tarban's path |
Hard |
 |
Half-Baked Komali | Mount Maelstrom | 60-70 | 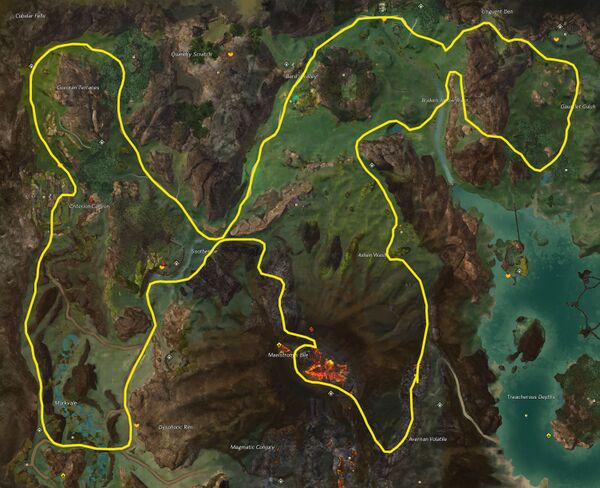 Half-Baked Komali's path Half-Baked Komali's path |
Medium |
 |
Poobadoo | Kessex Hills | 15-25 | 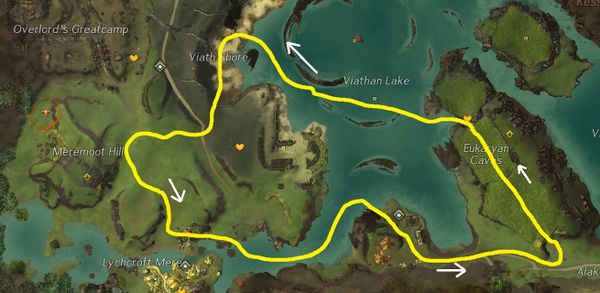 Poobadoo's path Poobadoo's path |
Easy |
 |
Prisoner 11413 | Iron Marches | 50-60 | 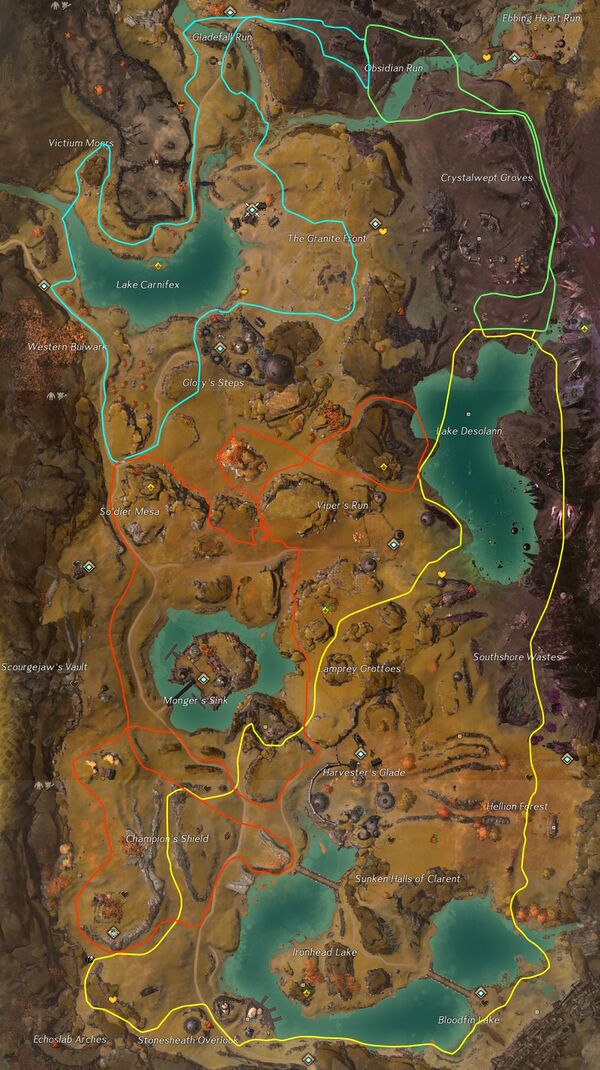 Prisoner 1141's path Prisoner 1141's path |
Hard |
 |
Shaman Arderus | Fireheart Rise | 60-70 | 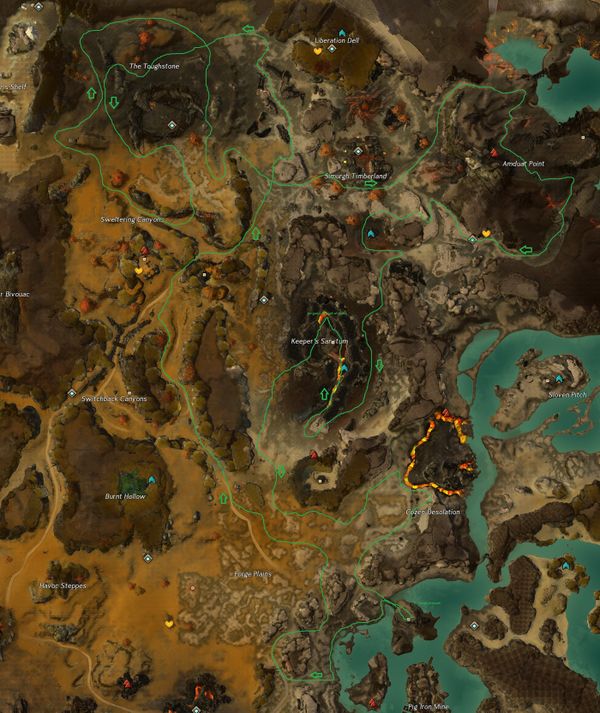 Shaman Arderus's path Shaman Arderus's path |
Hard |
 |
Short-Fuse Felix | Diessa Plateau | 15-25 | 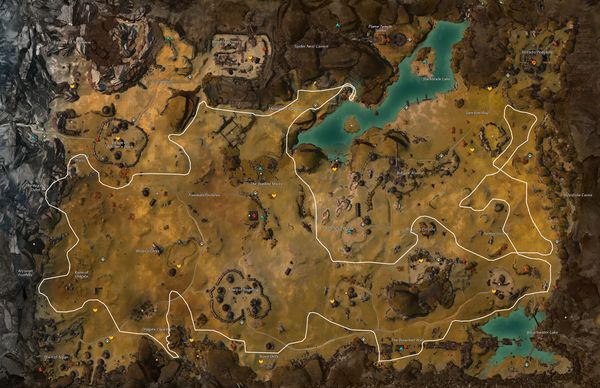 Short-Fuse Felix's path Short-Fuse Felix's path |
Medium |
 |
Sotzz the Scallywag4 | Gendarran Fields | 25-35 | 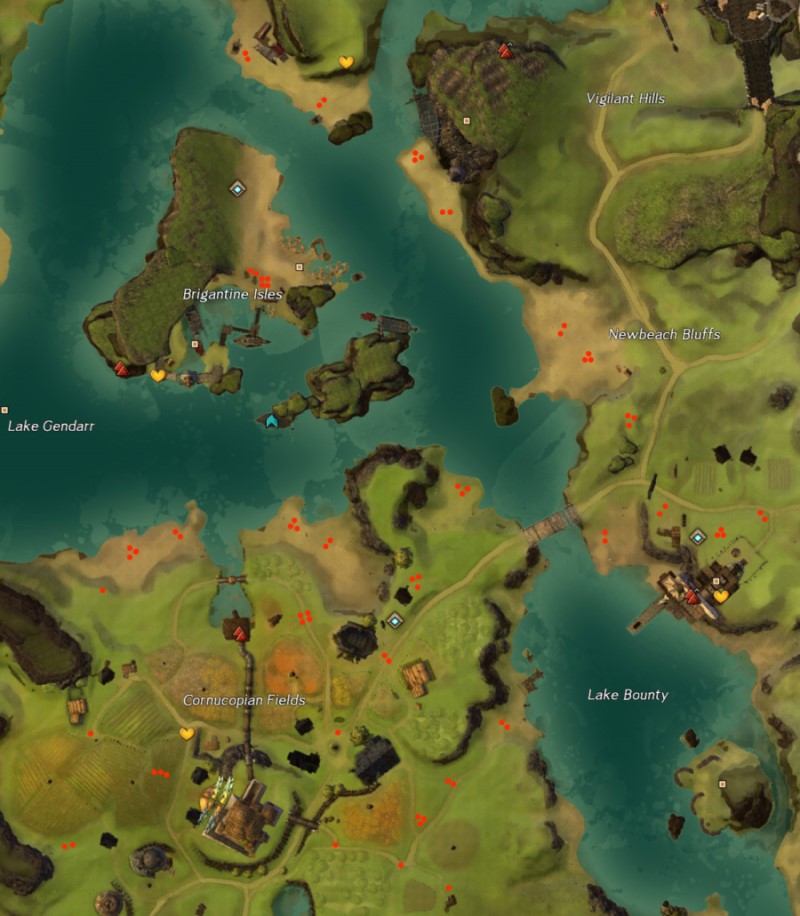 Sotzz the Scallywag's spawn locations Sotzz the Scallywag's spawn locations |
Medium |
 |
Tricksy Trekksa5 | Blazeridge Steppes | 40-50 | 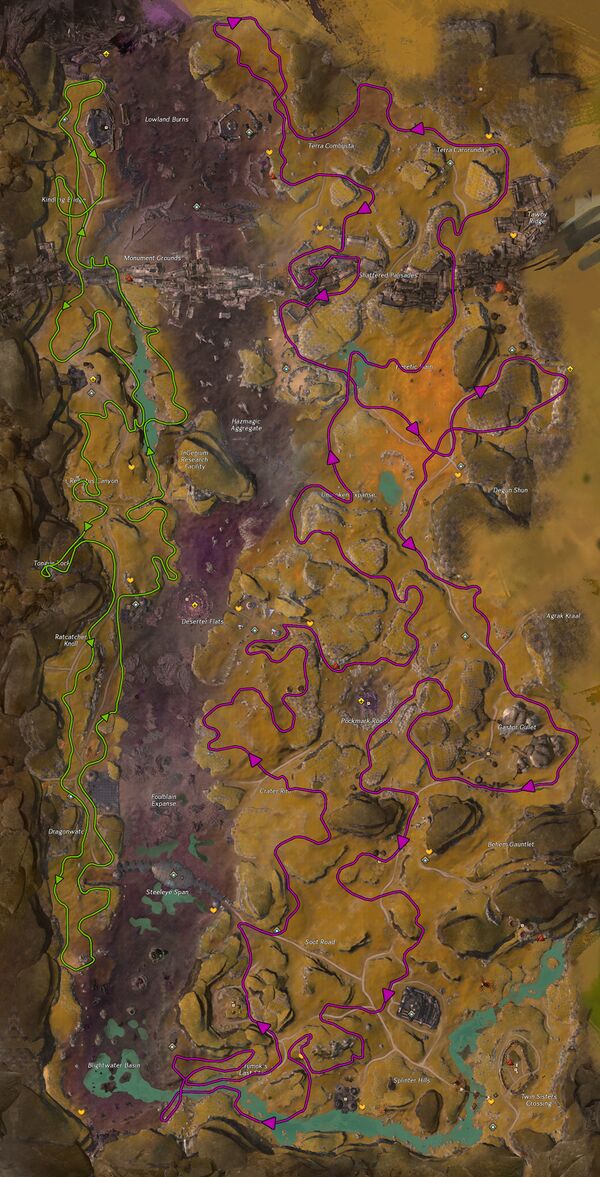 Tricksy Trekksa's path Tricksy Trekksa's path |
Hard |
 |
Trillia Midwell | Fields of Ruin | 30-40 | 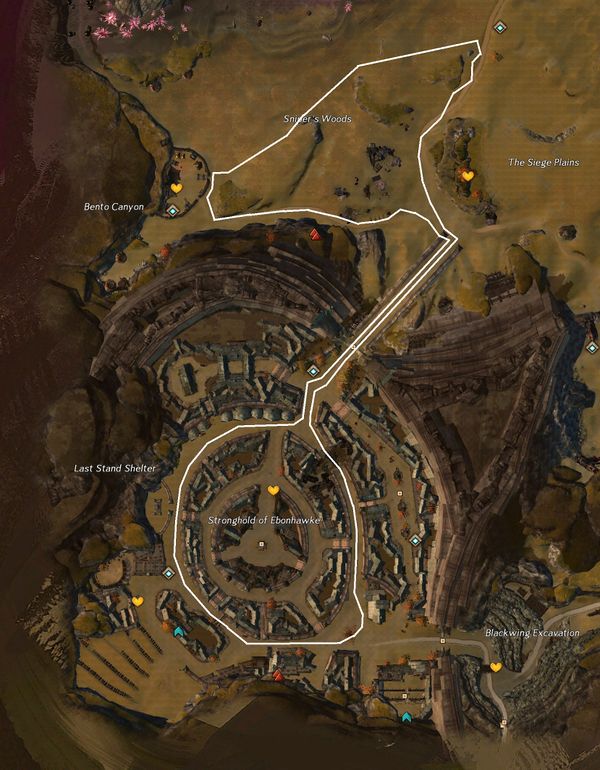 Trillia Midwell's path Trillia Midwell's path |
Easy |
 |
Yanonka the Rat-Wrangler6 | Fields of Ruin | 30-40 | 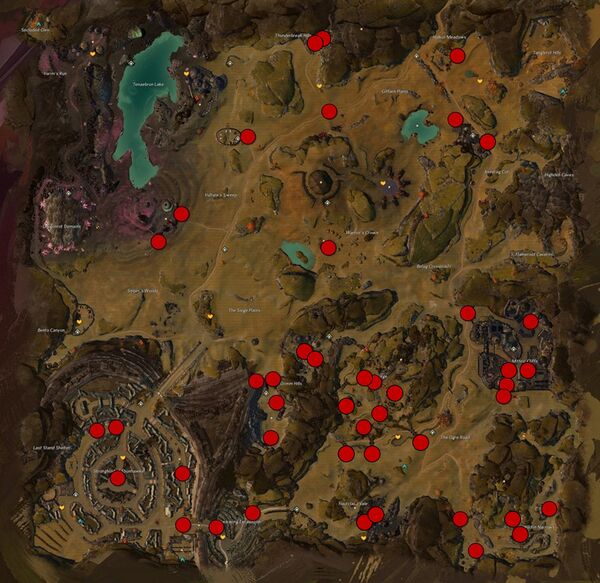 Yanonka's spawn locations Yanonka's spawn locations |
Medium |
- 1 Swallowed by a Veteran Karka
- 2 Hides in a Suspicious Tree
- 3 She is Running, searching her by going opposite of her path would be easier to find her.
- 4 Hides in one of 60+ Suspicious Barrels.
- 5 Disguised as Curious Cow, Mysterious Moa, Peculiar Pig, or Weird Wind Rider.
- 6 Can be pulled by interacting with Suspicious Rat.
Interactive map[edit]
Trivia[edit]
- Guild Bounties were introduced in the Flame and Frost: The Gathering Storm update on February 26th, 2013.
- Before Guild Merits became defunct, these were the only guild missions that did not require Guild Merits to unlock.