Crab Scuttle
Crab Scuttle
- Location
- Southsun Shoals
(Southsun Cove) - Event type
- Guild mission
- Level
- 80
| Event maps | |
 | |
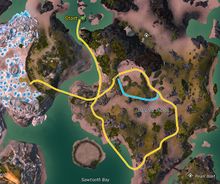
 Crab Scuttle Path | |
Crab Scuttle is a Guild Race where members transform into a crab and must pass through the Dappled Shores and across the bridge into Driftglass Springs while dealing with various karka and Southsun wildlife such as Reef Riders, Reef Drakes, and crabs. Special karka hatchlings will attempt to reach you and blow themselves up, dealing critical damage to you. Escorts are both of limited use, and at the same are extremely helpful, almost vital, to the success of this race.
Part of the course takes racers through an area where the Help Advisor Zakk repair his golem and reclaim his training area event can occur. This event causes wurms to spawn that constantly move around and known down players, including those on the race, drastically increasing the difficulty of this section. It is recommended that guild members work to complete this event as fast as possible to make the race easier. This section can be avoided by going through the flags leading into the wurm area, then turning around and heading up the south side of the hill. You can then drop down directly on top of the tunnel, avoiding the wurms altogether.
Getting there[edit]
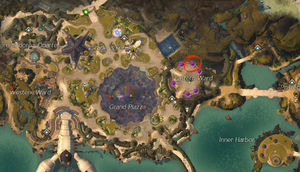
From Kiel's Outpost Waypoint go West (see map). The Guild Race ![]() Icon does not appear on the map unless it has been activated. If you have never been to Southsun Cove then use the Southsun Cove
Icon does not appear on the map unless it has been activated. If you have never been to Southsun Cove then use the Southsun Cove ![]() Asura gate by the Gate Hub Plaza Waypoint in Lion's Arch (see map). You may need an escort because the start of the Guild Race is far from the Asura Gate through a level 80 area.
Asura gate by the Gate Hub Plaza Waypoint in Lion's Arch (see map). You may need an escort because the start of the Guild Race is far from the Asura Gate through a level 80 area.
Objectives[edit]
- Complete the Guild Race course.
- Time remaining: 30:00
- Guild Races Completed X/15
- Interact with the guild banner to begin.
- Guild race finished! The course and end chest will remain active until time expires.
NPCs[edit]
Foes[edit]
Dialogue[edit]
- When not assigned to you and not started
- A guild officer needs to activate this race for you before you can participate.
- Leave
- When activating race
- Would you like to start this guild race? Warning: the timer will run out in 30 minutes.
- Yes, I'm ready to race the course!
- Leave.
- After the race has started
- Your guild has opened this race course to you. Would you like to participate?
- What's the race?
- You'll be transformed into a crab, and will have to dodge traps and enemies while racing the course.
- How will I know where to go?
- On your map you'll see blue flags identifying course checkpoints. Race through the checkpoints in order to reach the finish line.
- Yes! Sign me up.
- I'd rather not participate.
- Yes! Sign me up.
- I'd rather not participate.
- Yes! Sign me up.
- I'd rather not participate.
- When you're defeated during the race
- You've been defeated. Would you like to return to the starting line?
- Yes.
- No.
Skills[edit]
Racers are transformed into a crab with approximately 20,000 health for this race.
| # | Skill | Description | ||
|---|---|---|---|---|
| 1 | Search | 6 | Search for area traps. | |
| 2 | Threaten | ¾ | 5 | Raise your claws in contempt. Grants speed boost. Confuses and provokes target. |
| 3 | Crab Shell | ½ | 15 | Block incoming attacks for a short time. |
Strategies[edit]
- Primary article: Guild Race#Strategies
- Take your time when you're not in danger. Despite the name, racing quickly along the course is a sure way to stumble upon multiple traps and die quickly, forcing you to start over.
- Use the Search skill (#1) continuously, press Ctrl + Right Click to turn it into an autoattack. Traps are your main enemy along the course, and hitting two traps in a row will quickly cause you to go back to the beginning. Waiting a couple seconds for it to come off cooldown, in a safe location, is usually preferable to blindly wandering into a spike trap.
- The only real way to survive the suicide attack from the karka hatchlings is using Crab Shell, as you usually have more than one set of hatchlings incoming. The hatchlings will still explode, but you will take no damage and can quickly race through the section afterwards. The hatchlings will eventually leash once you pass far enough.
- If in a group, try to cycle who is in the lead, or even in the rear if possible, based on who has the Crab Shell skill up. The re-use on the skill is longer than how often you'll usually run into more hatchlings.
- Escorts can be rather limited in their use here. Many of the karka enemies (particularly the hatchlings) as well as the crabs are only hostile to racers, making it impossible to clear them out ahead of time. The only real thing escorts can do is provide stealth, swiftness, protection, and aegis, as well as healing afterwards.
- At the same time, escorts can be extremely vital to the success of the race. If the wurm event is active, escorts should complete it as fast as possible to remove this danger to racers. There are also several Veteran enemies at different points that racers will need to get past, but escorts can at least distract.
- There is a dead-end 2/3 of the way through the course where you have to find a hole in the wall and use it to pass through. Any escorts guiding you cannot pass through and will have to go around to meet you on the other side. This section can be much easier to pass through by going through the flags leading into the wurm area, then turning around and heading up the south side of the hill. You can then drop down directly on top of the hole, avoiding the wurms.
- Keep an eye on the mini-map for the next flag. It is exceptionally easy to feel lost in this race, due to the hills blocking your view of the next flag.
- The final section involves crossing the bridge and a run across a space filled with several hatchlings, crabs, and traps that are non-hostile to escorts. Stealth and swiftness are exceptionally useful at this point to help them reach the end.
Walkthrough[edit]
Prior to starting this race, it is recommended to complete Help Advisor Zakk repair his golem and reclaim his training area and Reclaim the settlement by burning out the karka nests (or Protect the settlement's vital storage facility depending on whichever is active). This step is not necessary, but it will make completing the race much easier.
Along the path, players will encounter Karka Hatchlings which will run up and explode, inflicting either Karka Face Grab, Karka Leg Grab or Karka Back Grab. Multiple explosions will inflict an effect that is currently not applied. These hatchlings are friendly to all players that have not transformed into crabs. Players can dodge the attack once the hatching has jumped up, or players may use Crab Shell to block the explosions. If one of the three effects has been applied, players can either wait it out, or perform a dodge to remove them one at a time.
- Checkpoint 1
When you begin the race, start by heading south towards the drake cave, avoiding hatchlings along the way. Once you reach the entrance, you should use your Search ability because there is a line of burrowed karka hatchlings there, indicated by a mound of sand. Players should dodge through them to avoid being damaged and getting damaged and afflicted with one of the aforementioned effects. It is also possible to use your Threaten skill to make the nearby enemy crab run through them for you, but it is unreliable.
- Checkpoint 2
Once inside the cave, there is another burrowed hatchling to your left. The drakes inside of the cave can pull you towards them and apply Confusion, making using any of your skills pretty hazardous. Allied players may kill them before you reach the cave.
You will now reach a fork in the road. To the left is a shorter path, but more dangerous. At the exit will be more burrowed hatchlings. To the right is another exit, but you will have to take a slightly longer path. There may or may not be a Reef Drake Broodmother waiting at the end.
After exiting the cave, start heading to the left. Once you pass the flags you can either continue following the path or swim around the rock.
- Checkpoint 3
You will soon come across another fork with the set of flags slightly beyond it. One path is covered by burrowed hatchlings that players can dodge through, and the other is a slightly longer that that circumvents them. Once past, you will travel through the next set of flags and into a beach house, that may or may not be occupied by a Veteran Reef Rider. Friendly players may kill it to make the tourists come back, allowing for safe passage. It is also possible to just run past it.
- Checkpoint 4
After leaving the beach house, head to your left towards the next set of flags. There will be Karka hatchlings and burrowed hatchlings after crossing it.
- Checkpoint 5
Afterwards, head to the left towards the Onyx Field point of interest, where the next flags are.
- Checkpoint 6
This is arguably the hardest part of the rush. There are burrowed hatchlings throughout the area, and a lot of Karka Hatchlings will spawn. If Help Advisor Zakk repair his golem and reclaim his training area event is active, then players will need to navigate through the area avoiding the burrowed wurms as well, which will instantly down you when they touch you. The next set of flags is at a small burrow within the area. Players may also take a longer, but safer, path around the area and drop down to the flags instead. Friendly players may also provide Stealth to make crossing it easier.
- Checkpoint 7
Once you travel through the burrow, you will appear at the opposite end. Start heading to the bridge straight ahead. There is a hole along the path, so try to walk around it. If you fall, you will land in the drake cave again. You will not need to travel through all the checkpoints again, just head back to the bridge from the beach house..
- Goal
After crossing the bridge, there will be many Karka Hatchlings that must be avoided. There are also a few burrowed hatchlings in the area. If Reclaim the settlement by burning out the karka nests is active, you will also encounter the more dangerous Crazed Young Karka and Veteran Crazed Young Karka which can run players over and fire devastating projectiles at the runners.
The end is at the first exit to the left after entering the settlement. There are some burrowed hatchlings there too.
