Blightwater Shatterstrike
Blightwater Shatterstrike
- Location
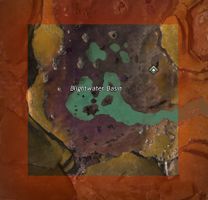
- Blightwater Basin
(Blazeridge Steppes) - Event type
- Guild mission
- Level
- 43
| Event maps | |

| |
“Brand energies coursing through crystal nodes along Blightwater Basin in Blazeridge Steppes are reaching critical levels. Work together to destroy these crystal nodes and stop the energy buildup.
— In-game description
Blightwater Shatterstrike is a guild challenge where guild members have to use Charrzookas to destroy 5 crystal nodes before any of them regenerate, while being attacked by branded creatures.
Getting there[edit]
From Tumok's Waypoint — head southwest and interact with the guild challenge marker.
Objectives[edit]
- [Group Event] Use charrzookas to destroy the crystal nodes simultaneously. (43)
- Northern Crystal Node

- Northern Crystal Node will regenerate in: 0:30
- Western Crystal Node

- Western Crystal Node will regenerate in: 0:30
- Southwestern Crystal Node

- Southwestern Crystal Node will regenerate in: 0:30
- Southeastern Crystal Node

- Southeastern Crystal Node will regenerate in: 0:30
- Eastern Crystal Node

- Eastern Crystal Node will regenerate in: 0:30
- Event will fail in: 20:00
Dialogue[edit]
- You'll need a party of your guild members to take on this challenge. Are you ready?
- Yes. Bring on the challenge!
- Leave.
Strategies[edit]
- Players must use the guild-backed bazookas to damage the crystal nodes because of the Corrupted Defenses effect.
| # | Skill | Description | ||
|---|---|---|---|---|
| 1 | Fire Missile | ½ | ½ | Unaimed rocket shot. Powerful but innacurate[sic]. Stuns if targeting icebrood. |
| 2 | Jump Left | ¼ | 5 | Shoot at the ground to leap to your left. |
| 4 | Jump Forward | ¼ | 5 | Shoot at the ground to leap forward. |
| 4 | Jump Right | ¼ | 5 | Shoot at the ground to leap to your right. |
| 5 | Heat Shield | 3 | 30 | Vent excess heat from your gun, creating a fiery shield. |
All five crystals need to be destroyed within 30 seconds of each other in the overall time span to complete this Challenge. These crystals can only be damaged by the bazookas that are dropped off the Charrcopter at the beginning of the challenge, and will regenerate some health very slowly over time.
- The number of branded enemies that spawn and the damage done to the crystals scales to the number of players in the instance, so this Challenge is very achievable with smaller guilds.
- It is important to note that players who use the dropped weapons will retain their Utility Skills, and this can be very helpful for survivability.
- Beware especially of the Veteran Branded Sparks and kill them ASAP as they can cause a lot of damage.
One strategy that can be very effective is to split the group into three parties before beginning the mission: two even, majority parties to carry bazookas and damage the crystals, and one smaller party to defend the others.
- When the mission begins, all parties remain together and begin with the nearest crystal, the Eastern Crystal Node. All players with bazookas carefully damage the crystal, ceasing fire when the crystal is very low (around 5-10% health). All parties then continue clockwise to the Southeastern Crystal Node and repeat, moving carefully from crystal to crystal. All parties then completely destroy the Northern Crystal Node, leaving 30 seconds in which to kill the remainder.
- Once the Northern Crystal Node has been destroyed, the two majority parties then split up. One majority party continues clockwise, destroying the eastern-most crystals, and the other majority party reverses course to move counter-clockwise, destroying the western-most crystals. The small defense party can also split in half and follow both of the majority parties. This method requires good communication and trusting your team to know when to stop firing, but is very effective for a successful completion.
NPCs[edit]
Allies[edit]
Foes[edit]
Objects[edit]
- Eastern Crystal Node
- Guild Backing
- Northern Crystal Node
- Southeastern Crystal Node
- Southwestern Crystal Node
- Western Crystal Node