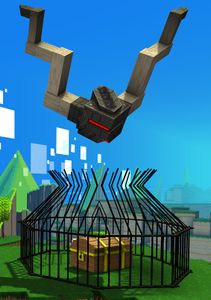
Cage
Cage
Cages are enemy objects found inside Super Adventure Box that serve as the end boss for the first two zones of a world. The head of Lord Vanquish floats above the cage and shoots giant laser beams at any players who approach.
Locations[edit]
Combat abilities[edit]
- Behavior
- Shakes head every 25% life, pausing attacks or interrupting a queued attack.
- Skills
- World 1
- Smash - Targets the the player position and shoots a laser blast. Deals 1 damage. Dodgeable by regular movement.
- World 2
- Smash - Shoots the four cardinal points with a laser blast successively. Deals 1 damage. Cannot hit the eight corners of the cage.
- Smash - Laughs then shoots a continuous laser beam around the cage, covers area with fire. Deals 1 damage. Evade while the head is laughing to dodge; the fire does no damage.
- Test Zone
- Smash - Targets the the player position and shoots a laser blast. Deals 1 damage. Dodgeable by regular movement.
- Smash - Shoots the four cardinal points with a laser blast successively. Deals 1 damage. Cannot hit the eight corners of the cage.
- Smash - Laughs then shoots a continuous laser beam around the cage, covers area with fire. Deals 1 damage. Evade while the head is laughing to dodge; the fire does no damage.
- Summon Ooze - Spawns a number of Oozes around the cage
Strategy[edit]
In World 1, the head will choose a target adjacent to the Cage and fire a laser at his position. This will cause an explosion which damages and launches the player away from the Cage. The explosion has a slight delay, so players can avoid damage simply by strafing. The common tactic is to run around the cage in a circle while attacking it.
The launching caused by the blasts can prove fatal. In World 1-2, a solid hit will result in you falling off the platform into a lake of poison. In 2-1, a hit can knock you over a cliff to your death. In World 2-2, a hit will send you all the way back to the bottom of an icy hill and possibly over a cliff. The head usually only attacks with the laser when players are close to the cage. Attacking with ranged weapons, while expensive, is perfectly safe.
In World 2, the head gains 2 new attack patterns. The first is a quick blast to each of the compass points around it (easily avoided by being slightly off to the side). For the second, the head will laugh before firing its laser in a full circle around the cage. This can be evaded, but make sure you have a safe space to dodge in to, or dodge directly forward into the cage. The original directly aimed blast will be used extremely rarely.
The cage itself has 1500 hitpoints, but scales up with additional players in the area. Every 25% of its total health, the head will flinch and shake its head before resuming the attack. This serves as an interrupt, but there isn't much need for one other than to get a small breather.
Trivia[edit]
- The prison guarded by a boss containing a servant at the end of the level is a nod to Super Mario World. As the last part of a world, Mario would have to travel through a castle, defeat the koopa, and be informed by the servant, Toad, that he has yet another world to go through.
