Roller Beetle
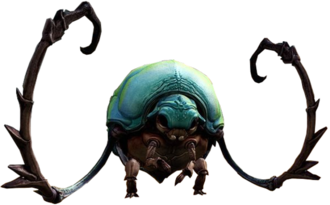
“A once-humble scarab beetle, bulked up to phenomenal size and strength by asuran science.
— In-game description
The Roller Beetle is a mount introduced with the Long Live the Lich release, an Episode 3 of Living World Season 4. It is the first new mount released since the launch of Guild Wars 2: Path of Fire.
Roller beetle can accelerate to tremendous speeds with its Roll Out ability, making it the fastest land mount. At high speeds, it becomes harder to steer, so some practice is required to master Roller beetle's ability to drift and turn sharply. See below for some tips.
A series of special Roller beetle races is available for players to test their skills against time and other racers.
Unlocking[edit]
Requirements[edit]
- Complete Forearmed Is Forewarned, the second chapter of Long Live the Lich (episode 3).
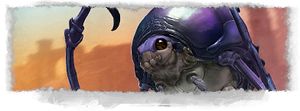
- Talk to Spearmarshal Zaeim in the Domain of Kourna during the third chapter, Tactical Triage.
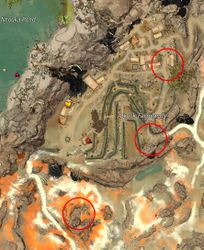
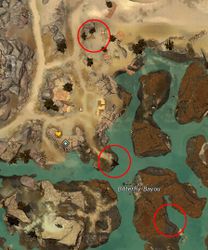
- Found in a building on the southern side of the Allied Encampment (northwest of the Allied Encampment Waypoint — , after the square with the merchants).
- Talk to Gorrik on the northern edge of the Allied Encampment to complete
 High Roller and unlock
  Beetle Juice.
- For the quickest access to the beetle collection, speak to Gorrik first before talking to anyone else. The chapter contains four sub-steps, each of which can be completed in any order. However, starting a new step requires the current one to be completed first.
- The items required for these and subsequent collections do not consume inventory slots.
- Complete
 Beetle Juice, and subsequently
  Beetle Saddle and
  Beetle Feed to unlock the mount.
Walkthrough[edit]
This collection contains ten items. Nine of these items are found in various locations across the Domain of Kourna. The tenth item is acquired by speaking to Gorrik after collecting the other nine.
This collection contains nine items, however only seven must actually be found. (The eighth and ninth are awarded after collecting the other seven.) These items are found in a mix of both the Domain of Kourna and several regions of Central Tyria.
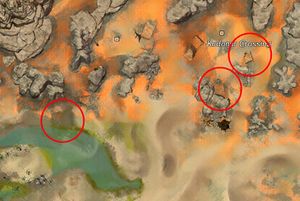
- Inquest Beetle Notes: Dropped by Awakened Inquest in the Domain of Kourna. Awakened Inquest can be found in the Dabiji Hollows.
- Inquest Power Schematics: Hack a Lab Terminal on the second floor of the Pogahn Bluffs Proving Ground (Dabiji Hollows) in the Domain of Kourna. (There are two Terminals, either will work.)
- Shadow Creator's Seal: Dropped by any Bounty target from the Domain of Kourna.
- Steam Power Coupling: Dropped by Steam creatures found on the Lake of Lamentation near Lamentation Waypoint — in Lornar's Pass. Another location to try is the Thaumanova Reactor near Muridian Waypoint — in Metrica Province.
- Plagued Struts: Dropped by Inquest Golems in the Domain of Kourna, e.g. the Veteran Mark I Golem. Inquest Golems can be found almost anywhere that Awakened can–try the western/eastern bridges to Gandara.
- Anomaly Spark: Participate in Defeat the Ley-Line Anomaly to disperse its destructive energy before it overloads. Can be acquired even if the event fails.
- Mk II Power Inverter: Dropped by the Inquest Golem Mark II world boss near Old Sledge Site Waypoint — , a world boss in Mount Maelstrom.
- Completed Saddle: Talk to Blish, who is near Gorrik in the Domain of Kourna, after collecting the other seven parts.
- Saddle Up: After receiving the Completed Saddle, interact with Petey, who is near Gorrik in the Domain of Kourna.
This collection contains eight items, the eighth of which can only be unlocked after collecting the other seven. These items are found across Kourna, Tyria, and the Crystal Desert.
- Live Plague Scarab: Obtained by completing the Trample scarabs with your mount to contain the outbreak event in the Domain of Kourna. This event can be found on the Western Front and the Front Line.
- Plague Scarab Egg: Dropped by the Plague Experiments during the raid on Gandara, the Moon Fortress as part of the event End the plague experiments, the final part of the Containing the Scarab Plague meta event.
- Junundu Ichor: Dropped by Junundu Wurms in the Crystal Desert. Tip: it is easier to find one in the sulfurous rivers of The Desolation.
- Hearty Beetle Slime: Dropped by the Alpha Beetle in the Far Silverwastes.
- Desert Luciferin: Purchased for 50 Inscribed Shards from Milin, the Renown Heart vendor near Apizmic Grounds Waypoint — .
- Frigid Wurm Goo: Dropped by Cave Wurms underwater near Deeprift Brood — in Ntouka Pond in the Domain of Kourna.
- Toxic Spider Yolk: Dropped by the Toxic Spider Queen near Viathan Waypoint — or Gap Waypoint — in Kessex Hills.
- Dinner's Ready: Interact with Petey (near Gorrik in the Domain of Kourna) after obtaining the other seven items.
- Unlock achievements
 Long Live the Lich: High Roller — Find the items Gorrik needs to buff up his beetle. (0)
 Long Live the Lich: Beetle Juice — Collect "medicines" for Petey. (3)
 Long Live the Lich: Beetle Saddle — Collect saddle parts and bring them to Blish for assembly. (3)
 Long Live the Lich: Beetle Feed — Collect 8 roller beetle foods and feed Petey the perfect meal. (5
 )
)
Mechanics[edit]
- A roller beetle has 5932 base health.
Movement/Controls[edit]
After learning the three masteries, general movement is controlled by the following default controls:
- Speed up/Boost - Space or V
- Drift - C (AKA "Mount Ability 2" in your control options menu)
- Perform a Trick - Hold Space while airborne. (With Big Air mastery unlocked)
Unlike most mounts, the Roller Beetle does not have a fixed running movement speed. It has a base movement speed (600 units per second), which is equivalent to that of the Raptor. If the Beetle rolls down a hill or if its primary movement skill is used, it accelerates up to triple its normal speed (1800 units per second). The Roller Beetle can then sustain this higher speed until it rolls up too steep a hill or crashes into terrain, both of which will slow the Beetle down.
- Speed up/Boost
Boosting consumes Endurance, requires a full Endurance bar to activate, and consumes the full bar in a single activation. This ability gives a massive boost to the Beetle's speed and acceleration for 2.5 seconds. After boosting, it takes 15 seconds before endurance is full and boost can be used again (2.5 second cool down while the boost is active where endurance remains at 0, then 12.5 seconds to recharge).
Drifting[edit]
The drift key is the Roller Beetle’s second ability and can only be used when the Beetle is rolling faster than 1000 units per second. This ability causes the Beetle to enter special drifting states which allow the Beetle to make sharp turns at high speed.
There are two drift states: a “tractionless” drift state which allows the Beetle to rotate freely without changing direction, and a sliding state in which the Beetle can turn corners at the cost of some speed. The tractionless drift state is entered by simply pressing the drift key. When the drift key is released, provided the Beetle is not facing in the direction it is moving, the Beetle will enter the sliding drift state. Upon entering this state the Beetle’s direction of motion will change in the direction the Beetle is facing while also losing some speed. The Beetle can only remain in the tractionless drift state for 1.8 seconds, after which it will automatically leave the drift state.
How to drift well[edit]
The following method for drifting is one which is designed to be consistent at both making turns and losing as little speed as possible. It is not the only way to drift but it is recommended.
There are two parts to the drift: the setup and the follow through. To set up the drift, press and hold the drift key, then press the turn/strafe key in the direction you wish to turn. It is important to keep the drift key held during the setup up as this drift state allows the Beetle to rotate freely while also maintaining the Beetle’s current velocity. You should begin the drift setup up a little before you plan on making the turn, to allow time for the Beetle to rotate.
Once the setup is complete and you have reached the turn, release the drift key while still holding the turn/strafe key. This will cause your Beetle to begin turning in the direction it is facing. Begin to slowly turn your camera (with right click held or while using the action camera) to the point where you wish to finish your drift. Throughout the entire turn it will help to very quickly tap the drift key. This will give you more control over the Beetle while also minimizing speed loss, by rapidly alternating between the drift and slide states. Once you have completed the turn, you can leave the drift by simply releasing the turn/strafe and drift keys. The Beetle will reorient itself to align with the direction the camera is facing on its own.
Advanced drifting techniques[edit]
The following tricks and techniques were found by the beetle racing community, and aren't individual mount abilities but combinations of the already existing Roller Beetle abilities and movement control. There are several advanced drifting techniques for the Roller Beetle which allow the Beetle to break through the normal speed limit. They are the powerslide, air drift, air canceled sliding (ACS for short), and hyperboost. Note: since jumping is required to begin an ACS on flat ground, it is extremely useful to check the “Disable conditional mount movement ability input” option in the general options. This will separate the boost key from the jump key. This option applies to all mounts.
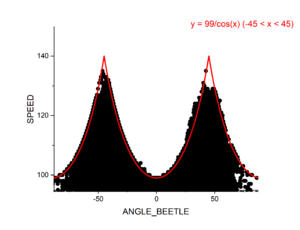
All of these techniques utilize the fact that the Roller Beetle’s maximum speed depends on the angle between the Beetle’s direction of motion and the direction it is facing (known as the “beetle angle”). This is because the game incorrectly reads the Beetle’s speed while it is drifting. Instead of reading the Beetle’s actual velocity, it reads the component of its velocity in the direction it is facing. As such, the Beetle’s maximum speed can be calculated using the formula 1800/cos(beetle angle). This formula holds until a beetle angle of 43.9° as the Beetle cannot exceed 2500 units per second regardless of the Beetle angle. The Beetle can only reach this maximum speed of 2500 units per second when the beetle angle is between 43.9° and 46.1°.
(Note that the speedometer used to record this data uses different speed units. 1800 units per second is equivalent to 99 on the speedometer.)
- "Powerslide"
The powerslide is the most basic of the advanced drifting techniques. All that is required is to drift along a sloped surface. For best results, use the turn/strafe keys to keep the beetle angle above 0° while holding the drift key. Drifting perpendicular to the slope with the Beetle facing down the slope will result in the highest acceleration. The greater the angle of the slope the more acceleration. This technique is most useful on guild hall tracks, but can still be used in the open world.
- "Air drift"
The air drift is quite simply drifting in the air. It is a powerful technique that grants high acceleration when done properly, but will result in significant deceleration when done incorrectly. The core of air drifting is that, below 60° beetle angles, an increasing beetle angle will result in acceleration, while a decreasing beetle angle will result in deceleration. air drifts are performed by turning the beetle while airborne. While it is not required to press the turn/strafe and drift keys, both are highly recommended as they will make turning the Beetle midair much quicker, resulting in more acceleration. The beetle angle will increase more rapidly when the beetle angle is higher up to an angle of 60°. A beetle angle greater than 60° will result in a deceleration.
The most optimal way to begin an air drift is to drift prior to becoming airborne, ensuring the beetle angle is above 0° prior to becoming airborne, then following the Beetle’s turn in the air with the camera to accelerate. It is important that the beetle angle is not too high before becoming airborne as this will cause a rapid deceleration. It is possible to begin an air drift without raising the beetle angle prior to becoming airborne, but it will take some time for the beetle angle to raise enough to have rapid acceleration. An air drift can be initiated by drifting off a ledge, or by drifting and then jumping.
- "Air canceled sliding"
Air canceled sliding (or ACS for short) is a powerful technique which allows the Beetle to accelerate on flat ground without the use of the boost. It can help to think of the ACS as its own drift state, separate from the other two.
To perform an ACS, you must successfully land an air drift. In most cases, an ACS is entered by performing a jump drift (an air drift induced by a jump), usually on flat ground. There are several steps required to perform a jump drift. First, press the drift key to begin a drift, then press the turn/strafe key in the direction you wish to turn. Next, you need to turn your camera and then jump. It is important to begin turning your camera just before jumping, and to continue turning the camera through the entire duration of the jump.
You *must* hold the drift key after landing the air drift and for the entire duration of the ACS. The Beetle will leave an ACS the moment the drift key is released. Your beetle angle must be between 35° and 60° upon landing in order to enter the ACS drift state. The ACS will last for a maximum of 1.8 seconds after which the Beetle will enter a regular slide and begin slowing down.
After entering an ACS, the Beetle can be turned by turning the camera. For maximum acceleration, the Beetle angle should be kept around 45°. More or less than this will still result in acceleration, so long as the beetle angle stays between 20° and 70°. It is extremely useful to be holding the turn or strafe key in the direction you wish to turn the Beetle during an ACS as these will both increase your beetle angle.
Chaining ACS allows you to stack the overspeed to generate higher speeds over time. However, in order to chain an ACS successfully you must jump again, which is impossible in the ACS or slide state. It is therefore necessary to release and re-press the drift key to allow the Beetle to jump.
It is important to note that the Beetle cannot jump properly while in an ACS. To chain ACS, the drift key must be released and repressed to allow the Beetle to jump once again allowing the beetle to re-enter the ACS. Note that the Beetle cannot jump while in an ACS, nor while in a normal slide (where the drift key is not held).
- "Hyperboost"
The hyperboost is a special boost that is performed by boosting while drifting. It is by far the easiest way of reaching the true max speed of the Beetle.
To perform a hyperboost, press the drift key and the turn/strafe key in the direction you wish to do the hyperboost, turn the camera, then press boost. The steps are similar to that of a jump drift, except that instead of jumping, the boost key is pressed. It is important to hold the drift key for the entire duration of the boost in order to achieve the maximum possible speed. You will also need to keep the beetle angle between 43.9° and 46.1° to achieve the maximum speed.
Keep in mind that when performing a hyperboost, the Beetle will not travel in a straight line but in a slight curve in the direction the Beetle is facing. If the beetle angle is greater than 0° during a boost, but the drift key is not held,the Beetle will be much slower, but also have a higher turning rate than when holding the drift key. If you release the drift key at any point during the hyperboost, repressing the drift key will do nothing until the boost has finished.
- "Drift hold"
The drift hold is the only technique on this list which does not accelerate the Beetle. Instead, it is used to maintain speeds above the Beetle's normal maximum while traveling in a (mostly) straight line. After performing any of the above techniques to go over the Beetle’s normal speed limit, release, repress, and hold down the drift key. This will cause the Beetle to travel in a straight line while maintaining its speed. Because the Beetle will eventually leave the traction-less drift state after 1.8 seconds, it is important to release and repress the drift key within this time in order to maintain the Beetle’s momentum. This will cause the Beetle to turn slightly and lose some speed, so it is advisable to keep the drift key held as long as possible before repressing.
Tips and techniques[edit]
- The trail behind the beetle is a visual speedometer. At maximum speed, the trail will be orange. As you lose speed, the trail will change to purple, and finally become blue at base speed.
- The Roller Beetle does not have a faster turning rate than other mounts, and like other mounts its ability to change direction while airborne is limited. This combined with its very high speed makes turning difficult, especially on uneven terrain. Effective use of the secondary "drift" movement is therefore necessary for maneuvering at speed.
- At high speed, the Beetle is able to roll or even skip across water. If the Beetle is traveling at full speed when it impacts the water (either by rolling off the shore or falling a short distance), it will typically be able to skip 3 or 4 times before losing too much speed and dismounting. Additional skips and distance can be achieved if the Boost is activated as the Beetle starts losing speed.
- At high speed or while Boosting, the Roller Beetle can roll up the sides of cliffs or ravines. This works best when the Beetle reaches the cliff from the ground and rolls up, and does not work well when the Beetle is already airborne and impacts the cliff.
- With the Big Air mastery, the player can perform tricks while airborne. To do a trick, hold the jump button while in the air. While doing a trick, endurance will refill at 35 endurance per second, up from 8 per second, causing it to fill in approximately 3 seconds from 0%.
- Performing a trick requires a minimum speed of 800 units per second.
- Tricks require a minimum of 0.8 seconds to complete. If the Beetle lands while a Trick is active, the trick will fail. Failing a trick consumes 1/3 of the Beetle's total endurance.
- The minimum possible endurance recovery from a trick is 28%
- The boost ability will not accelerate the Beetle while it is airborne. Jumping during a boost can be used to shorten the length of the boost by reducing the Beetle’s average speed during the boost.
- The Beetle will lose less speed going uphill while the drift key is held and the beetle angle is greater than 0° and less than 90°.
- Drifting while rolling downhill will allow the Beetle to accelerate above its usual maximum speed of 1800 units per second. It will not accelerate the Beetle more than if the Beetle were not drifting.
- If the drift key is held while rolling down a slope, and the Beetle angle goes above a certain angle (the exact angle is unknown at this time), the Beetle will “unstick” from the slope. This can be used to begin an air drift off the slope without the need to jump. It is most useful on guild hall tracks.
- Performing mid air tricks while a boost is active will cause the boost to end.
- The sliding and air canceled sliding drift states will recharge the Beetle's endurance slightly faster than the usual rate.
For increased control over your mount, you can check the box in the general options menu for "Disable conditional mount movement ability input." This will separate mount ability 1 from Space, and mount ability 2 from S. Do keep in mind that this will also unbind it for all other mounts as well, with differing results.
Known bugs[edit]
- If a boost is performed and a boost orb in a time trial is collected during the boost, then if mid air tricks are performed before the boost has ended, the Beetle’s endurance bar will be reset.
- If the Beetle is mounted at the exact time the player jumps, the Beetle’s boost will not accelerate the Beetle as expected. This effect will remain active until the player dismounts and remounts the Beetle.
Related masteries[edit]
Roller Beetle Mount[edit]
| Mastery | XP required | Points | Description |
|---|---|---|---|
| 571,500 | 3 | Learn to launch foes a short distance by rolling over them with the roller beetle's engage skill, Roll Out. | |
| 609,600 | 4 | Smash your way into secret areas and destroy volatile crystals with your roller beetle. | |
| 698,500 | 5 | Learn to perform stylish airborne tricks after boosting to regain endurance. | |
| Total | 1,879,600 | 12 |
Other masteries[edit]
- Ravenous Discipline: Increase damage when using an engage skill.
- Masterful Descent: Decrease fall damage while mounted by 75%.
- Nimble Benevolence: Gain Swiftness (10s) and Protection (4s) when using an engage skill or being knocked off from your mount.
- Adroit Evasion: Evade when using endurance during a mount movement skill.
- Bond of Life: Unlocks the Bond of Life mount healing skill.
- Bond of Vigor: Unlocks the Bond of Vigor mount utility skill.
- Bond of Faith: Unlocks the Bond of Faith mount utility skill.
- Sharing Is Caring: Increase maximum mount health by 50%.
- Well Rested: Increase endurance regeneration by 20%.
Skills[edit]
| # | Skill | Description | ||
|---|---|---|---|---|
| Roller Beetle | Summon and mount your roller beetle. | |||
| 1 | 2 | Engage. Roll forward, damaging foes that you pass through. | ||
| While moving at high speed, hold to reduce friction with the ground and increase turning speed. Release once facing in the desired direction to reengage friction. | ||||
| Rapidly accelerate forward for several seconds with reduced turning control. | ||||
| Dismount your mount |
Lore[edit]
“Roller beetles can cross vast stretches of sand dunes in the blink of an eye by curling into a ball to gather momentum. Controlling beetles gracefully at top speed requires skill and finesse, encouraging their fans to form competitive racing networks across Tyria.
List of Roller Beetle skins[edit]
- See also: Gallery of Roller Beetle skins
(*) The mounts in the marked rows either don't appear in API:2/account/mounts/skins and API:2/mounts/skins and/or don't have an ID set. Therefore it cannot be checked if they have been unlocked.
Gallery[edit]
- Screenshots
- Renders by Kate Picchi
Trivia[edit]
| The Guild Wars Wiki has an article on Rollerbeetle. |
- The Roller Beetle has 3 idle animations, and one of them is always played when it is given a snack.
- The snack animation is a little dance, based on the dance of the rollerbeetles in the original Guild Wars, a little electronic tune will play while it dances. During the dance, the Commander riding the beetle will do a 'raise the roof' dance move with their hands.
- The rollerbeetle looks around and chirps, while the Commander looks into the distance.
- The Commander taps on the rollerbeetle, and when it looks back the Commander gives it a thumbs up, and the rollerbeetle nods and gives a thumbs up in return.
- The Atholma Docks in Sandswept Isles were made for this mount.[1]
- The Roller Beetle can be dyed before the collections are complete.
- The Roller Beetle's theme is known as "High Roller", and it can be found in the Living World Season 4 soundtrack.
- Unlike other mounts, the name of the tamed roller beetle is already given as Petey by Gorrik.
- Prior to the November 19, 2019 game update, when the beetle was mounted, its endurance was set to 0 and took 12.5 seconds to fully recharge.
Related achievements[edit]
 Roller Beetle Racing
 Long Live the Lich: I Can See My House... — Show your roller beetle the view from the highest point in Kourna. (1)
 Long Live the Lich: Roller Beetle Training: Silver — Earn this achievement by opening the silver chest. (1)
 Long Live the Lich: Roller Beetle Training: Gold — Earn this achievement by opening the gold chest. (1)
 All or Nothing: Underworld's Angels — Take a roller beetle from Dragon's Claw and ride into a hole in the ice at the Dredgeways. (1)
 Prologue: Bound by Blood: Grothmar Grand Tour: Silver Challenge — Finish the Grothmar Grand Tour within the silver challenge time limit. (2)
 Prologue: Bound by Blood: Grothmar Grand Tour: Gold Challenge — Finish the Grothmar Grand Tour within the gold challenge time limit. (3)
 Prologue: Bound by Blood: Grothmar Grand Tour: Pole Position — Finish the Grothmar Grand Tour in the top three. (3)
 Jormag Rising: In This Together — Jump from the highest slope of Canopy Crag while mounted on a roller beetle. (3)
 Shadow of the Mad King: Demon of a Drifter — Complete a lap of the Roll into Madness race event or time trial in Mad King's Raceway within the extreme challenge time. (10
 )
)
See also[edit]
- Associated items
External links[edit]
- Roll on, Commander!, Facebook
- The Roller Beetle: A Familiar Friend
- Roller Beetle Design Behind the Scenes
References[edit]
- ^ Let's Play Guild Wars 2, Sandswept Isles Open World!, Youtube.com
