Bounty
“Kick off challenging boss events whenever you're ready to take them on. Everyone can join the hunt!
— Official site
Bounty system is a feature introduced in the Guild Wars 2: Path of Fire expansion, set to challenge a group of level 80 players with hunting and overcoming powerful NPC enemies. Bounties are creatures and people being driven wild by the chaotic ley energies in different places of the region. All bounties have two or three random Unstable Magic Abilities depending on the rank, which results in various combinations of abilities each time they are fought. Legendary rank bounties appear in the same places every time and Champion rank bounties change their location between three options for each bounty.
Bounty Board and contracts[edit]
Bounty Boards contain the currently active contracts needed to reveal the location of the target bounties. A player can have only one contract with them as selecting more will always replace the old selection. Having the contract is not necessary for receiving rewards for completing the bounty. Once a player selects the contract, the location of the bounty is revealed on the map.
Once the player carrying the contract has reached the location of the bounty, the event will start automatically and the players must defeat the bounty within the 10 minute time limit. Any players that participate in the event will receive rewards for the successful defeat of the bounty. Domain of Istan and Sandswept Isles bounty contracts may sometimes result in ambushes by Palawa Joko and as such do not count towards any achievement containing the target bounty.
After the bounty is defeated or the timer runs out, the contract is taken down. Legendary bounties reappear on the bounty board 30 minutes after the bounty has retreated or has been defeated. Champion bounties reappear after 15 minutes.
List of bounties[edit]
Crystal Oasis[edit]
Champion[edit]
Legendary[edit]
| Objective | Event | Bounty Board | |
|---|---|---|---|
| 1 | Distraught Choya | ||
| 2 | Queen Yidaxu | ||
| 3 | Corrupted Facet |
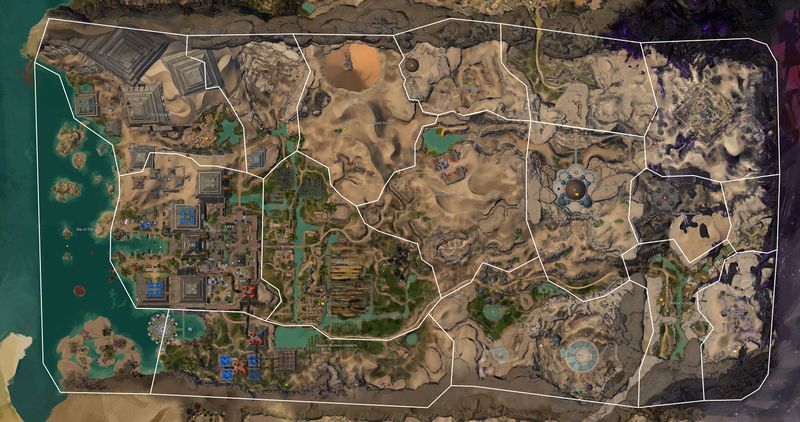
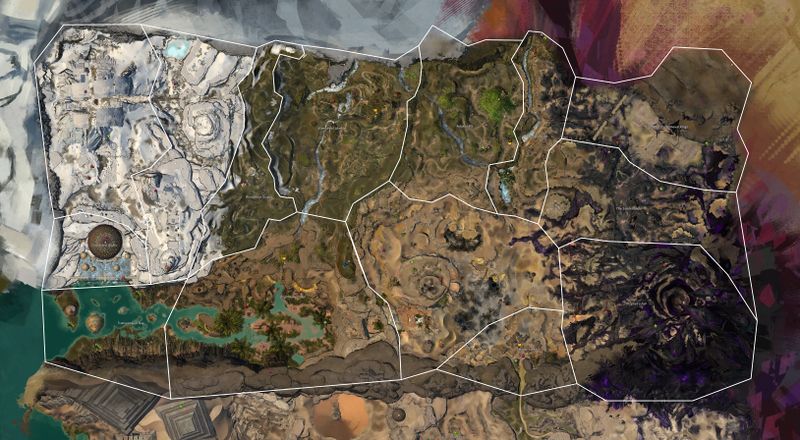
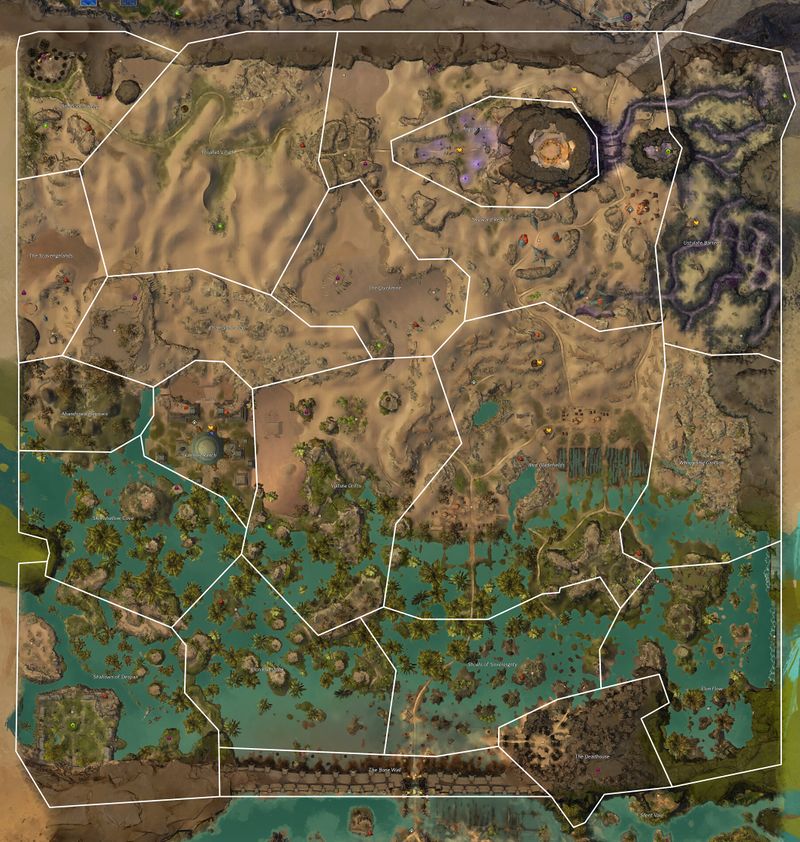
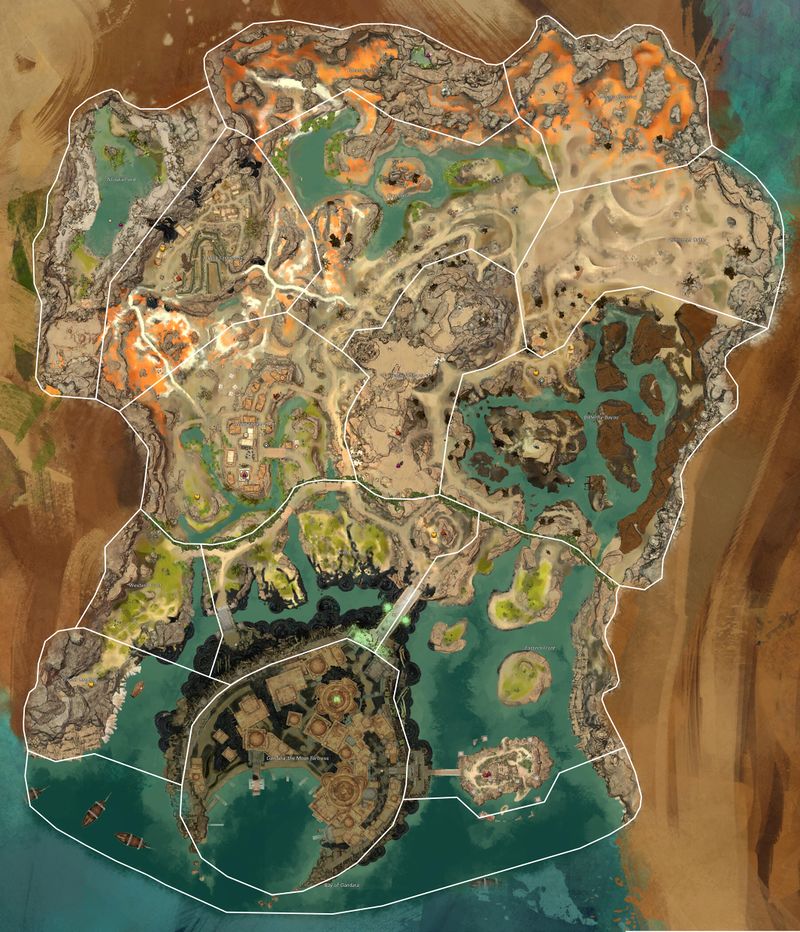
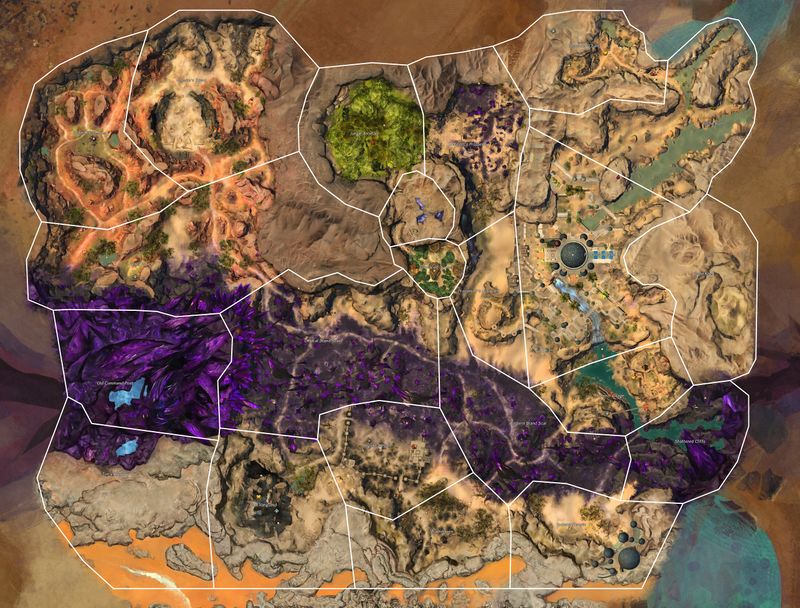
Possible spawn locations[edit]
Use the controls on the right to switch between the bounty targets.
Desert Highlands[edit]
Champion[edit]
Legendary[edit]
| Objective | Event | Bounty Board | |
|---|---|---|---|
| 1 | Wissper Inssani | ||
| 2 | Forged Tormentor | ||
| 3 | Ellutherius Wintergust |
Possible spawn locations[edit]
Use the controls on the right to switch between the bounty targets.
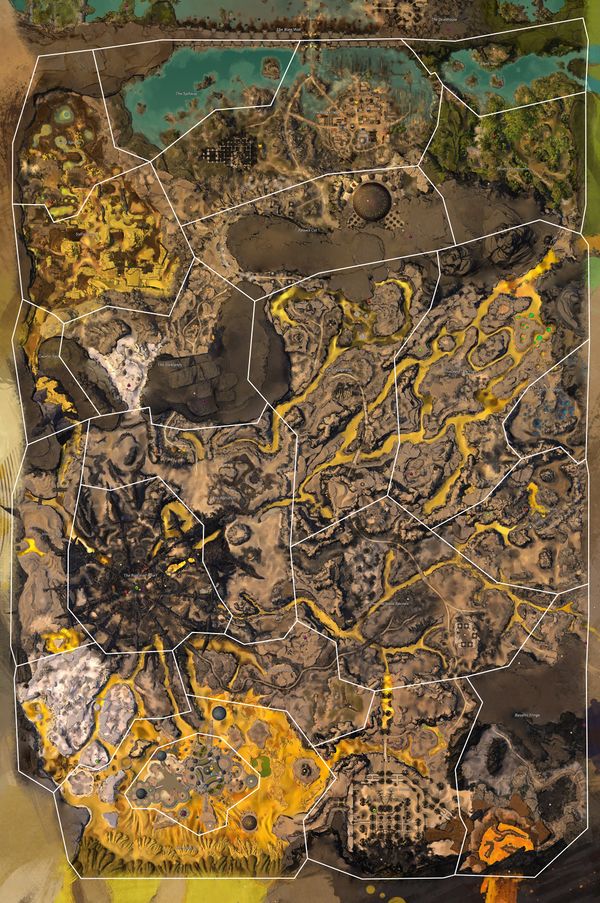
Elon Riverlands[edit]
Champion[edit]
| Objective | Event | Bounty Board | |
|---|---|---|---|
| 1 | Adal, Unyielding Firmament | ||
| 2 | Tohg Atta Awoth | ||
| 3 | Brandclaw | ||
| 4 | Dorrik the Wanderer | ||
| 5 | Morg | ||
| 6 | Matriarch Talonslayer | ||
| 7 | Awakened Stray | ||
| 8 | The Terror of the Sands | ||
| 9 | First Mate Pekknik | ||
| 10 | Shoot of Stormbringer |
Legendary[edit]
| Objective | Event | Bounty Board | |
|---|---|---|---|
| 1 | Zehlon Ossa | ||
| 2 | Xoul Igra Zhoss |
Possible spawn locations[edit]
Use the controls on the right to switch between the bounty targets.
The Desolation[edit]
Champion[edit]
Legendary[edit]
| Objective | Event | Bounty Board | |
|---|---|---|---|
| 1 | Queen Ishraa | ||
| 2 | Forged Rampager | ||
| 3 | Awakened Hoarder |
Possible spawn locations[edit]
Use the controls on the right to switch between the bounty targets.
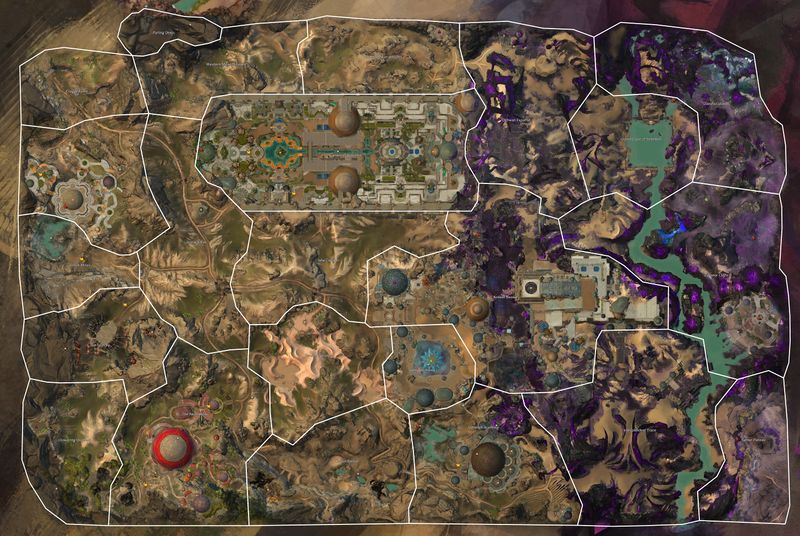
Domain of Vabbi[edit]
Champion[edit]
Legendary[edit]
| Objective | Event | Bounty Board | |
|---|---|---|---|
| 1 | Daol Brol Shiol | ||
| 2 | Rubedon, Trembling Earth | ||
| 3 | Triq Griz Grolak | ||
| 4 | Forged Corpsrazer |
Possible spawn locations[edit]
Use the controls on the right to switch between the bounty targets.
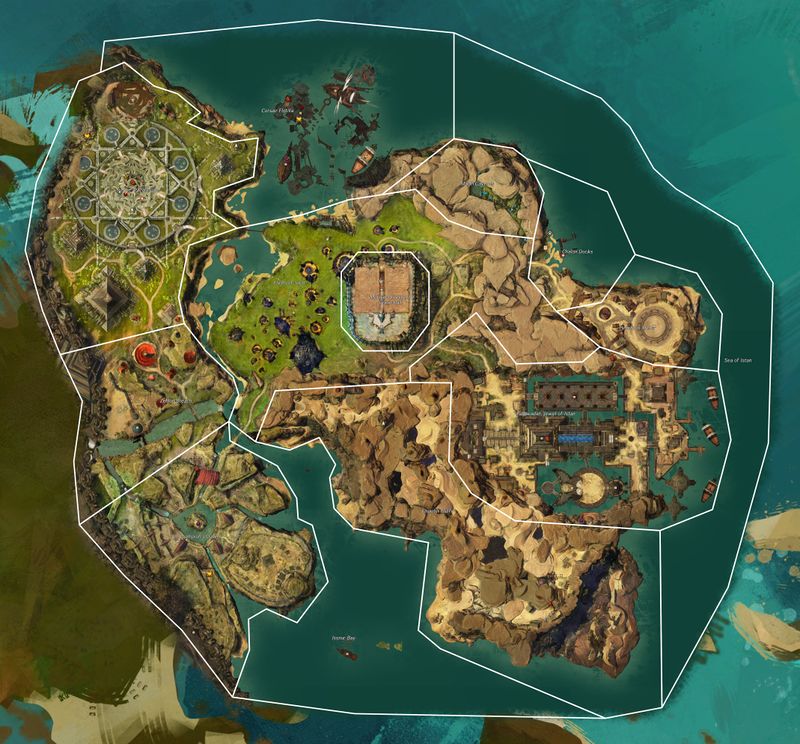
Domain of Istan[edit]
Please note that while doing bounties in Domain of Istan, there is a chance you will get ambushed by Mordant Crescent forces instead.
| Objective | Rank | Event | Bounty Board | |
|---|---|---|---|---|
| 1 | Lady Shamshir | Champion | ||
| 2 | Matriarch Shrilliss | Champion | ||
| 3 | Simoom the Accursed | Champion | ||
| 4 | Suneh Stormbringer | Champion | ||
| 5 | Smoldge | Legendary |
Possible spawn locations[edit]
Use the controls on the right to switch between the bounty targets.
| Bounty map locations |
|---|
| Lady Shamshir |
| Matriarch Shrilliss |
| Simoom the Accursed |
| Suneh Stormbringer |
| Legendary Smoldge |
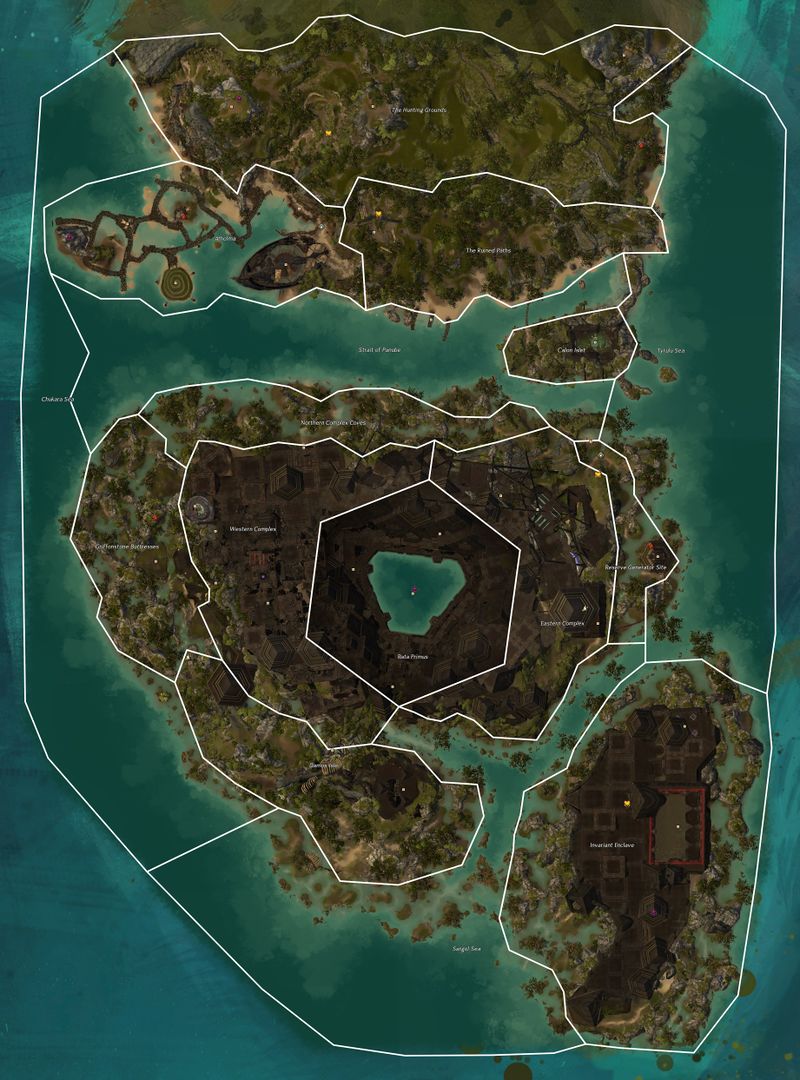
Sandswept Isles[edit]
Please note that while doing bounties in Sandswept Isles, there is a chance you will get ambushed.
Champion[edit]
| Objective | Event | Bounty Board | |
|---|---|---|---|
| 1 | Vebis the Inquisitor | ||
| 2 | Magneton Manipulator | ||
| 3 | The Prickly Pair (Brash Blue & Racuous Red) | ||
| 4 | Crystalwing | ||
| 5 | Nepheretes | ||
| 6 | Old Stonehoof | ||
| 7 | Exterminator IG-04 | ||
| 8 | Ironshell | ||
| 9 | Oakenscorn | ||
| 10 | Emogg the Soulbeast |
Legendary[edit]
| Objective | Event | Bounty Board | |
|---|---|---|---|
| 1 | Seneb the Desecrated | ||
| 2 | Starcaller |
Possible spawn locations[edit]
Use the controls on the right to switch between the bounty targets.
Domain of Kourna[edit]
Champion[edit]
| Objective | Event | Bounty Board | |
|---|---|---|---|
| 1 | Cabochon | ||
| 2 | Asphodel | ||
| 3 | Agasaya | ||
| 4 | Enbilulu |
Legendary[edit]
| Objective | Event | Bounty Board | |
|---|---|---|---|
| 1 | Troopmarshal Olori Ogun |
Possible spawn locations[edit]
Use the controls on the right to switch between the bounty targets.
| Bounty map locations |
|---|
| Cabochon |
| Asphodel |
| Agasaya |
| Enbilulu |
| Legendary Troopmarshal Olori Ogun |
Jahai Bluffs[edit]
This map's bounty board is at Kodonur Temple.
| Objective | Rank | Event | Bounty Board | |
|---|---|---|---|---|
| 1 | Angry Pet Rock | Champion | ||
| 2 | Wyvern Matriarch & Wyvern Patriarch | Legendary | ||
| 3 | Badly Confused Ettin | Champion | ||
| 4 | Zommoros's Shield & Zommoros's Sword | Champion |
Possible spawn locations[edit]
Use the controls on the right to switch between the bounty targets.
| Bounty map locations |
|---|
| Angry Pet Rock |
| Legendary Wyverns |
| Badly Confused Ettin |
| Champion Weapons |
Rewards[edit]
In addition to these standard drops, all bounties also drop a champion bag, and most have the chance of also rewarding rare items such as minis or boxes with the Bounty Hunter's armor.
| Name | Type | Rarity | Quantity |
|---|---|---|---|
| Crafting material | Rare | 2-6 | |
| Container | Masterwork | 2 | |
| Service | Fine | 1 | |
| Service | Masterwork | 1 | |
| Container | Rare | 1 | |
| 3-10 | |||
| Gizmo | Basic | 1 |
Related achievements[edit]
 Crystal Desert: Expert Bounty Hunter — Complete champion bounties in the Crystal Desert region. (5
 )
)
 Crystal Oasis: Crystal Oasis Champion Bounties — Defeat each champion bounty in Crystal Oasis at least once. (10)
 Desert Highlands: Desert Highlands Champion Bounties — Defeat each champion bounty in the Highlands at least once. (10)
 Elon Riverlands: Elon Riverlands Champion Bounties — Defeat each Champion bounty in the Elon Riverlands at least once. (5)
 The Desolation: The Desolation Champion Bounties — Defeat each Champion bounty in the Desolation at least once. (10)
 Domain of Vabbi: Domain of Vabbi Champion Bounties — Complete each champion bounty in the Domain of Vabbi at least once. (15)
- Crystal Desert: Master Bounty Hunter — Complete Legendary bounties in the Crystal Desert region. (5)
- Crystal Oasis: Crystal Oasis Legendary Bounties — Defeat each legendary bounty in Crystal Oasis at least once. (6)
- Desert Highlands: Desert Highlands Legendary Bounties — Defeat each Legendary bounty in the Highlands at least once. (6)
- Elon Riverlands: Elon Riverlands Legendary Bounties — Defeat each Legendary bounty in the Elon Riverlands at least once. (6)
- The Desolation: The Desolation Legendary Bounties — Defeat each legendary bounty in the Desolation at least once. (6)
- Domain of Vabbi: Domain of Vabbi Legendary Bounties — Complete each legendary bounty in the Domain of Vabbi at least once. (6)
 Daybreak: Istani Bounty Hunter — Complete all five bounties in the Domain of Istan. (3)
 A Bug in the System: Sandswept Isles Champion Hunter — Defeat each champion bounty in the Sandswept Isles at least once. (3)
- A Bug in the System: Sandswept Isles Legendary Hunter — Defeat each legendary bounty in the Sandswept Isles at least once. (2)
 A Star to Guide Us: Jahai Bounty Hunter — Complete all four bounties in Jahai Bluffs. (8
 )
)
See also[edit]