Lion's Arch Exterminator
Lion's Arch Exterminator is an Explorer achievement that requires the player to find fifty Karka Hatchlings throughout Lion's Arch.
Achievement[edit]
| Explorer | 1 10 | |
|---|---|---|
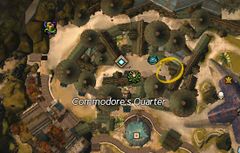
Find Turl Sharptooth in the Commodore's Quarter, and use one of his special rifles to deal with the karka hatchling infestation.
|
50 Hatchlings Exterminated | 10 |
Walkthrough[edit]
Find Turl Sharptooth in the Commodore's Quarter, and talk to him to obtain one of his special rifle to deal with the Karka Hatchling infestation. After you accept the rifle, stop and look on the wall to his left - before you shoot it, review the comments below on appearance and sound of the hatchlings. The rifle is a bundle, and stays equipped as you move both while underwater and swimming on the surface (i.e. it can be used when the skillbar is hidden, but remember what button is shoot (default is "1")). If you have mounts, you can mount and dismount without losing the rifle. It is also possible to waypoint teleport within Lion's Arch and not lose the rifle bundle. Should you lose the rifle, like by dropping the bundle, by dying, by disconnecting, or by leaving Lion's Arch, you can get another by speaking to Turl Sharptooth again.
This achievement is a mix between a jumping puzzle and scavenger hunt which gets your character into more remote and odd corners of Lion's Arch. There's times when your character may get jammed in between landscape features and not be able to get out, unless with a teleport or by using a waypoint (keep this in mind as it may save a lot of stress).
This is an achievement where your settings can ease or increase difficulty. If you've set your camera show the widest field of view, your character's body may sometimes get in the way. If you've set the game's level of detail to low for performance reasons, then you may need to change your settings to make terrain details more defined, in order to make it easier to see the hatchlings from the environment.
Achievement progress can be tracked on the "Lion's Arch Exterminator" achievement page in the "Explorer" sub-category in the "General" category in the achievement panel.
Karka hatchling locations[edit]
| Search YouTube for videos related to Lion's Arch Exterminator. |
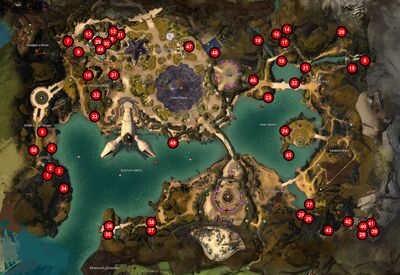
Karka Hatchlings are spread throughout the city in various hidden places, and your job is to find them in unique non-repeating locations where you cannot shoot the same location hatchling location twice (they are no longer seen once shot; they are gone). Finding and shooting all fifty of them completes the achievement. Be prepared as earning this achievement can be an involved and longer task which makes you earn that reward, even with the helpful hints provided below for each hatchling location.
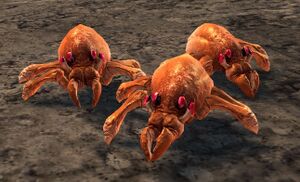
The Karka Hatchlings should all appear consistent size and shape. After you accept the rifle from Turl Sharptooth and start the achievement, stop and look on the wall to his left as there's a sample of what you should be seeking (size and shape). Look at that un-hidden hatchling, and familiarize yourself with this one which is not hidden at all, as doing so can really help you understand what you are seeking for those well-hidden hatchlings later. Before shooting it, maybe use that one to adjust your sound settings (see next paragraph), and then it's first one you can shoot, which is the sixth one in the list below (Commodore's Arch: Easy Pickings)
The Karka Hatchlings make a loud tapping or chittering sound, which can easily be heard with the environment volume turned up and only while the rifle is equipped. The sound is sometimes partially masked by other loud environmental noises like waterfalls. You may want to adjust the sound settings for that first hatchling before shooting it, using it as a way to adjust your sound settings so you can hear the hatchlings when close (and with rifle equipped).
The table below contains a list of all 50 hatchling locations in the order they appear in the achievement panel in-game. However, they are not necessarily in the ideal order which you'd actually do the hunting or fastest work on this achievement. For convenience, here are the numbered locations grouped by area:
- In Commodore's Quarter are 6, 7, 9, 10, 11, 12, 13, 29, 30 & 44.
- In White Crane Terrace are 1, 2, 3, 4, 5, 34 & 50.
- In Eastern Ward are 14, 16, 17, 18, 19, 23, 46 & 48.
- In Postern Ward are 8, 15, 20, 21 & 22.
- In Inner Harbor are 24 & 45.
- In Bloodcoast Ward are 25, 26, & 27.
- In Sharkmaw Caverns are 28, 39, 40, 41, 42 & 43.
- In Western Ward are 31, 32 & 33.
- In Sanctum Harbor are 35, 36, 37, 38 & 49.
- In Trader's Forum is 47.
| Collectible | Type | Subtype | Map | Location | Description | Notes | |
|---|---|---|---|---|---|---|---|
| 1 | Karka Hatchling | Item | Trophy | 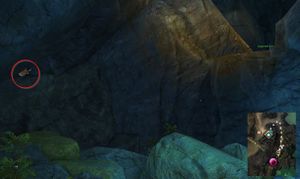
|
White Crane Terrace | Explore the cavern where the skritt buys your globby purple stuff. | Hints: Hatchling is on the roof of the cave beyond Apprentice Mekteki (the Apprentice Mekteki page describes how to reach them from a water entrance) in the far western / southwestern area of Lion's Arch. Note that location point #34 below, is on the way. After you get to skritt Apprentice Mekteki, pass them and watch out as you head to the back because there's a ledge drop-off into a deeper portion of the cave at the back (which is near difficult to get out if you slid down the edge and get stuck in between larger rocks where you cannot jump out or mount). You don't have to go off the ledge to see the hatchling, which is not directly above you but more straight out and slightly up.
An alternate path to the hatchling is the land side entrance which is behind the waterfall seen from the sea, where the beach slopes up to shrubs and a cave entrance; the entrance is the far end of the back of the cave, past the ledge drop-off, and will not allow you to reach Apprentice Mekteki but you can still see and shoot the hatchling. |
| 2 | Karka Hatchling | Item | Trophy | 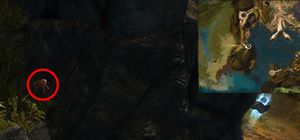
|
White Crane Terrace | Peer down at the boulders where the ledges are diverse. | Hints: Reach this hatchling location by climb up around the hill east of Diverse Ledges Waypoint — . This location and next location are very close together, so read both hint blocks. Just before last couple jumps to the top, look across the path you climbed toward the waypoint. The karka is in the small grassy area below; you may need to jump onto the small ledge north of the top if the karka is beyond shooting distance. If you jump to the grassy flat space farther to the west, you will hit the edge of the allowed movement in this zone, and may fall down right near the hatchling to your right-side. *It is clearly visible to the north from rock plateau #3 is on |
| 3 | Karka Hatchling | Item | Trophy | 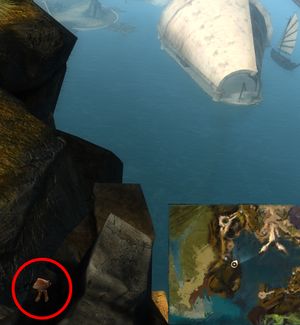
|
White Crane Terrace | Hop high in the diverse rocks. | Hints: Reach this hatchling location by climb up around the hill east of Diverse Ledges Waypoint — . From the pillar/platform at the eastern-most part of the path to the top the karka can be seen and shot when facing toward the ectoplasm merchant (WSW). This one seems a little more difficult than some of the others, as you have to really search to find the correct spot, so use the picture and your vista to compare the edge of rock shape/pattern to help you. As you head up the trail and are in between high pillars on both sides, you will head southerly where you can see out over the ocean to south; stop, as the hatchling is actually above you on your left-side but cannot be seen from below. The trail goes to the left, past a touch and should see a "lost rat"; out to the east the vista may appear like the provided hint picture, but it's not from there but higher up. Follow the hint of a trail up to the left more, circling around where you need to get to the top of the eastern-most pillar which has several palm shrubs and other plants plus grass. Head west slowly, don't fall off, to the edge (note this is where can jump farther west, hit the end of the zone, and fall next to the second hatchling, above); turn back to east and notice a slightly lower rectangular rock to your right, and to the right of that is another parallel tab-like part (yet above the trail where you stopped to see sea to south). The hatchling is in a groove between the grassy pillar top and that rectangular spot, which is too far below for a normal character to jump back up onto the grass. This is one that is helped by the sound. Shoot it and jump down to trail right near where you first saw the southern sea vista. |
| 4 | Karka Hatchling | Item | Trophy | 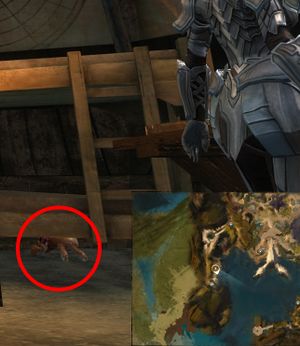
|
White Crane Terrace | The Priory's bed bugs prefer bunks. | Hints: Travel to the Durmand Priory Research Site, north of Diverse Ledges Waypoint and down on the beach, and go into the tent. The hatchling is located underneath the bunk bed, but it's near impossible for average to tall races to get it from the front, so go to the back and look under the corner farthest from the door of the tent. |
| 5 | Karka Hatchling | Item | Trophy | 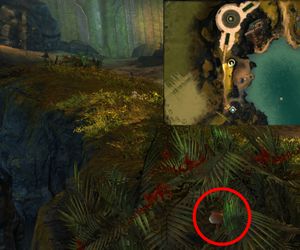
|
White Crane Terrace | Stop and smell the flowers between the magisters and the memorial. | Hints: Look at the shrubbery in between Shuttered Gate and Field of the Fallen. It's easiest to find the location if start at the Field of the Fallen, head southerly through the archway which places you in between the two ramps heading northerly, then pass the Memorial Guard pair at the end of the ramp. At the left or east of that location is a space between rock piles, which heads to the beach; more past that heading southerly, then get close to the rocks on your left or east and head slightly uphill around the large rock, where you turn easterly on a flat space and should see palm shrubs on the edge of the ledge. Hatchling is right in edge of rock under palm shrubs. |
| 6 | Karka Hatchling | Item | Trophy | 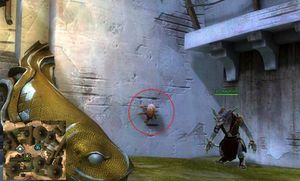
|
Commodore's Quarter | Easy pickings. | Hints: This one is on the wall directly next to Turl Sharptooth at the start of the achievement event. If this one isn't obvious when you start, then you need to read the wiki pages carefully and study what a hatchling looks like, in order to have less problems with this achievement - or you're going to hate this achievement. |
| 7 | Karka Hatchling | Item | Trophy | 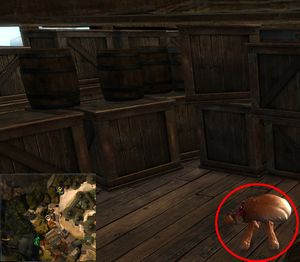
|
Commodore's Quarter | Head up the ramp between the crate and barrel. | Hints: Starting at the Commodore's Quarter Waypoint, head down the street southwesterly to the intersection with a street running ~north to south in front of the cross-section ship hull housing. When you hit that intersection, turn right or head northerly (and heading straight through the intersection takes you to the location #9, below). To the north the street narrows versus how appears to the south heading, and you head up a hill. At the top of the rise, look to the west side where there is a short low ramp heading directly into a hull plus a longer steeper ramp heading southerly up to a higher level hull. Head up that ramp, look for the two skritt and a bunch of crates and barrels, head to the left of the skritt and behind them boxes and barrels where there's an aisle, and go to the back where there is a space (to the right of the skritt but at the far back wall) surrounded by boxes and barrels which contains the hatchling that sporadically jumps up into better view if you're in the wrong aisle; listen for the hatchling to help you navigate; however, head directly to back wall and there's one barrel which you can jump over and be in the same space as the hatchling, and get it. The easiest exist is to teleport out to the Commodore's Quarter Waypoint, and start location #9. |
| 8 | Karka Hatchling | Item | Trophy | 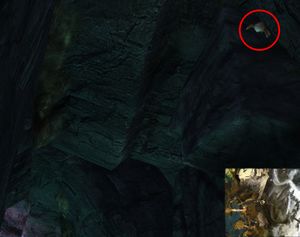
|
Postern Ward | Keep your chin up on the way to revealing the secrets of Urmaug. | In Urmaug's Secret jumping puzzle after working your way up the first wall you'll reach a gravel/sand area. Turn around so you're facing south and you'll see a rounded ledge slightly to your left. Jump onto the ledge and run to the end of it and jump to the small ledge on the right and jump to the another small ledge at the end (or if you have gliding you can jump glide to the last ledge). Turn around and look up and to your right to find the hatchling. |
| 9 | Karka Hatchling | Item | Trophy | 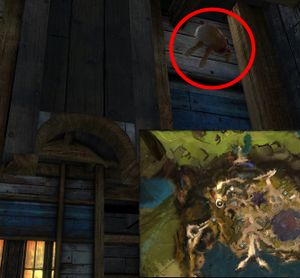
|
Commodore's Quarter | Search high in the houses that were hulls. | Hints: Start from the Commodore's Quarter Waypoint (northwest in the Lion's Arch map), go south-west down the street to the lowest intersection (intersecton with the street running east to west behind or north-side of the Orders of Whispers headquarters), and head straight across the to the wooden stairs which are on the west side of the intersection. Look for a wooden ramp in apartments within a cross-section of old ship hull, take the ramp to the second level, where on the south side there's an open door to a room, and the hatchling is in that small room up near the ceiling on side to hall or door-side. |
| 10 | Karka Hatchling | Item | Trophy | 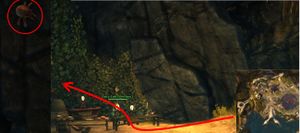
|
Commodore's Quarter | Take a close look at the salty pirate merchant's stash. | Hint: Jump over the boxes behind the merchant Salty Emil (Salty is in the Western Ward) and you will find a tunnel. The trick is that you have to jump a bit higher than the boxes, because the opening is higher and to the right of center behind the boxes…and the opening is not that large. Head in and back. Once you reach the end of the tunnel, there's a rough ledge which you can jump up onto. Look up for the hatchling, which is hidden to the side towards the direction from which you came. The easiest exit is to teleport to the Commodore's Quarter Waypoint and proceed to location #11 below. |
| 11 | Karka Hatchling | Item | Trophy | 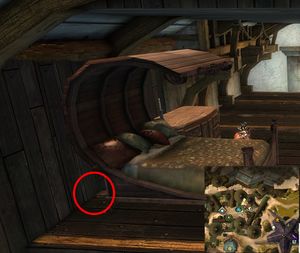
|
Commodore's Quarter | Search for bugs in lofty beds. | Hints: Head up the stairs to the west/left of Turl Sharptooth into the house, then turn left up stairs and sharp left turn up into the upstairs main bedroom (which looks like it's the only bedroom, but there's another one in #12 below). This hatchling is in this room between the wall and the bed on the east side or far side. the hardest part on this one is that the far side of the room has no floor, so you can easily fall to lower floor. Don't leave the room after shoot the hatchling - do #12 below. |
| 12 | Karka Hatchling | Item | Trophy | 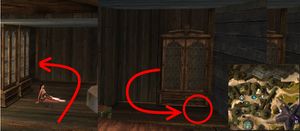
|
Commodore's Quarter | Jump around to find this karka in a lofty bedroom. | Hint: Head up the stairs to the west/left of Turl Sharptooth into the same house as #11 above, and to the same main bedroom where shot that hatchling. Across the bed there is a wall with a closed door to the second bedroom, down to the left near the ramp up to where you are. This hatchling is in the hidden/closed second bedroom, next to a dresser which is on the edge (of the missing floor) and actually is just on the other side of the wall from the foot of the bed. From that same edge (missing floor mentioned in #11 above) where you shot the last hatchling, head to the wall across from the bed, and carefully inch around the corner as far as you can to a point where you can jump left around the dividing wall and around the corner, and get into a space on the edge to look into the second bedroom. The hatchling is on floor to left as look into that bedroom. This one may be a little more challenging (wouldn't want to have to use a door!). |
| 13 | Karka Hatchling | Item | Trophy | 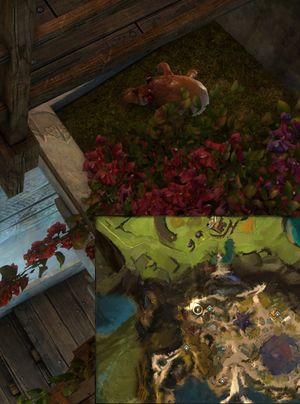
|
Commodore's Quarter | Take aim at the flowers over the door. | Hints: From the Commodore's Quarter Waypoint head southwest down the street to the intersection but do not cross; on your left is a gray rock and on your right is a round-base tower, turn right and follow the edge of that curved town wall into a dead-end stairwell, and head to the end then look up. The hatchling is above and left of the door you should now be facing. If you hug the left-side wall and back up you can occasionally see the karka jump above the left-most bracket of the bump-ut above the door, which has plants/flower-bed. Stand at the door's left corner and aim almost directly up, between the two bracket-like supports of the stone edge, on the left side of the flower bed. (Note: If you're having trouble, this GIF will show you how to hit the karka), but the best hint to take multiple shots. The composite picture (should be to the right) is a view looking down. |
| 14 | Karka Hatchling | Item | Trophy | 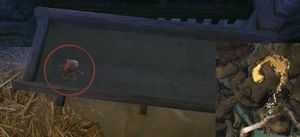
|
Eastern Ward | Find this thirsty karka in the Lion's Shadow. | Hints: From the Eastern Ward Waypoint to the north-east there's a door labelled the Lion's Shadow Bed and Breakfast (which may have info to help you). The Lion's Shadow Bed and Breakfast is not accessible by day (see GW2 timer for day/night times, to know when have access times). Get in there (the password is "password"), you can head upstairs to location #17 below, before head downstairs below the main floor. In the basement, head to the left then follow the caverns around to the left which narrows before widening out. After it widen's out, curve to the left and there's a stable on the left side; go to the first stable, enter, look to the left and there's a water trough with the hatchling (explains why horses will not drink). Don't leave as location #16 below, is nearby. |
| 15 | Karka Hatchling | Item | Trophy | 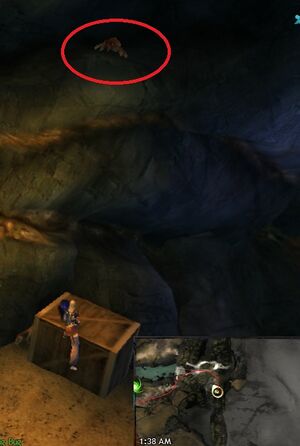
|
Postern Ward | Check above Urmaug's crates. | At the fork within the cave on the path to Urmaug's Secret jumping puzzle, take a right, go to the back room, and stand on the chest. From atop the chest you should be able to see and target the karka on the upper ledge across the room. |
| 16 | Karka Hatchling | Item | Trophy | 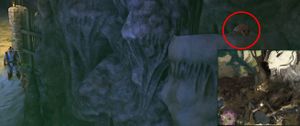
|
Eastern Ward | This karka is a little too shy to dance in the Lion's Shadow. | Hints: The Lion's Shadow Bed and Breakfast is not accessible by day (see GW2 timer for day/night times, to know when have access times). Starting from location #14 above below Lion's Shadow in tunnels, head farther around the curve to the left (curving west to southwest to south) and through the tunnels to the dance floor. Face the way you came in and look up at the ledge to your right, where times the hatchling jumps up to be seen. |
| 17 | Karka Hatchling | Item | Trophy | 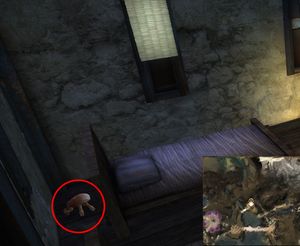
|
Eastern Ward | Take care of the inn's bed bug infestation. | Hints: From the Eastern Ward Waypoint to the north-east there's a door labelled the Lion's Shadow Bed and Breakfast (which may have info to help you). The Lion's Shadow Bed and Breakfast is not accessible by day (see GW2 timer for day/night times, to know when have access times). Get in there (the password is "password") and head upstairs. Upstairs in the inn bedroom behind the headboard of the bed in the corner is the hatchling. Location #14 and 16 is nearby, downstairs. |
| 18 | Karka Hatchling | Item | Trophy | 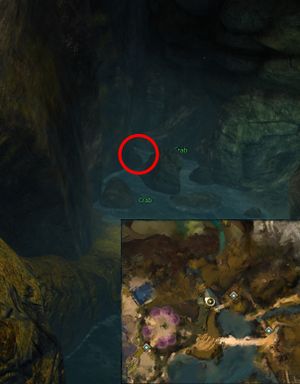
|
Eastern Ward | No amount of butter will make this karka taste like crab. | Hints: Head southwest from the Eastern Ward Waypoint to the bridge, then on the north side of the bridge head into the stream beneath a bridge and upstream to the north to the end. Go past the Ornery Crab, and the hatchling is behind the rocks and in the water along the rock wall. |
| 19 | Karka Hatchling | Item | Trophy | 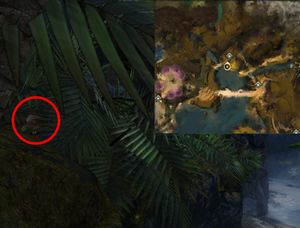
|
Eastern Ward | Beat the bushes near the bed and breakfast. | Head southwest from the Eastern Ward Waypoint towards the start of the bridge where you'll see two tall palm trees. Jump down to the ledge where the right palm tree is growing from. In the bushes to the left (if facing the water) is where the hatchling is. If you don't see it, try several spaced shots. |
| 20 | Karka Hatchling | Item | Trophy | 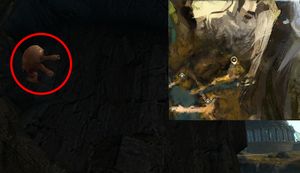
|
Postern Ward | Search the steps near the ogre's cavern. | Under the rock steps to the north of the waterfall in the northeast corner of the map. |
| 21 | Karka Hatchling | Item | Trophy | 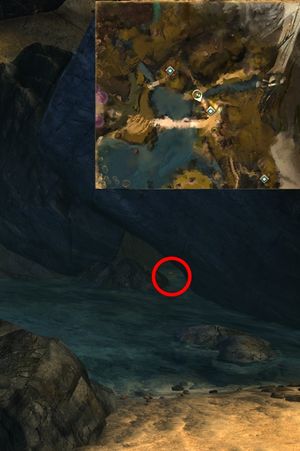
|
Postern Ward | Find this karka bathing in the shade. | In a crevice underneath two boulders at the mouth of the river to the northwest of the Guild Bluff Waypoint. |
| 22 | Karka Hatchling | Item | Trophy | 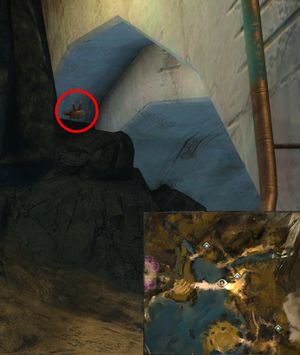
|
Postern Ward | Back float beneath the arches. | Under the first arch of the bridge to the west of the Guild Bluff Waypoint. |
| 23 | Karka Hatchling | Item | Trophy | 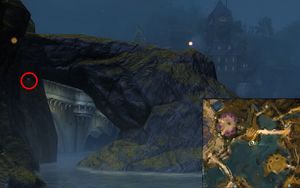
|
Eastern Ward | Find this karka under rock and over water. | Hints: From the Eastern Ward Waypoint head southwest across the bridge and then the trail heads almost due south; along that same projected line, on the edge of the water behind or south of a steep hill-shape. You can follow the trail south to southwestern then around that hill to the shore and to the water, continue southeasterly then east past the vistas point up above, and you should see a natural stone arch. Under the natural stone, look where the arch connects with the hill, for the hatchling. |
| 24 | Karka Hatchling | Item | Trophy | 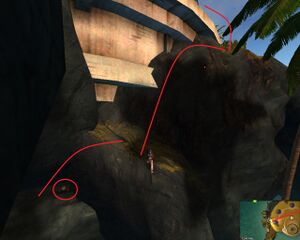
|
Inner Harbor | Find a shelf below the garden island. | On the west side of the Deverol Gardens where you see a tree on a rock pillar, drop down on the low ledge between the pillar and the garden (or jump to the tree's pillar and then to the ledge); note that this is not the ledge immediately under the garden wall, but a lower, smaller ledge. Look on a shelf under the garden. Also note that although clearly visible, this karka may be hard to target; try to find a good position. |
| 25 | Karka Hatchling | Item | Trophy | 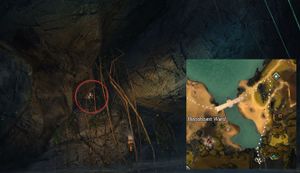
|
Bloodcoast Ward | Look low in the cave under three falling streams. | Go into the cave behind the waterfall southwest of Farshore Waypoint. Look up and behind the vines on your left (east). |
| 26 | Karka Hatchling | Item | Trophy | 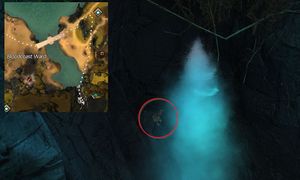
|
Bloodcoast Ward | Hunt high in the cave under the three falling streams. | Go into the cave behind the waterfall southwest of Farshore Waypoint. Look up near where a misty shower of water falls into the cave. |
| 27 | Karka Hatchling | Item | Trophy | 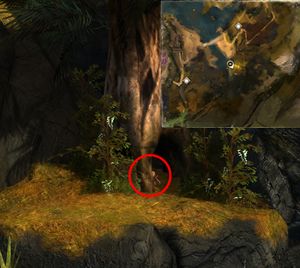
|
Bloodcoast Ward | This karka has taken root at the top of a waterfall. | From Farshore Waypoint, proceed as you would be going to the Sharkmaw Cavern jumping puzzle Weyandt's Revenge. In the first area just past the hay bales, go down the hill and jump down to the big tree on a ledge. Look under the tree. |
| 28 | Karka Hatchling | Item | Trophy | 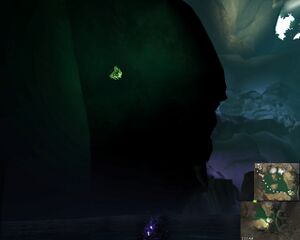
|
Sharkmaw Caverns | Scour the dark, misty corners. | After the initial fall down the waterfall in the Sharkmaw Cavern jumping puzzle, enter the water in the first cavern and swim to the south-eastern corner. Look west at the underside of the rock above you. (When on the surface of the water while skills appear inaccessible, if you press the shortcut button for skill slot 1, typically the 1 key on a keyboard, you can still shoot.) Helpful Tip: Numbers 39 to 43 are also in the Sharkmaw Jumping puzzle so it's helpful to do those all at once. |
| 29 | Karka Hatchling | Item | Trophy | 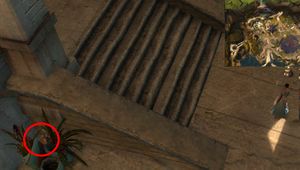
|
Commodore's Quarter | Smell the flowers, buy a gift, exterminate a bug. | Hints: From Commodore's Quarter Waypoint, head south across the street and down some steps, to a small rectangular courtyard, but stop on the steps. To your right beside the steps are some flowerpots. The hatchling is behind those on the ground. |
| 30 | Karka Hatchling | Item | Trophy | 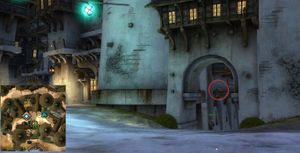
|
Commodore's Quarter | Rednax keeps losing his staring contest with this karka. | From Commodore's Quarter Waypoint, stand to the right of Legendary Collector Youngblood and face south. Look through the arch and you should see a wooden ledge hanging off the left side of the wall. The karka hatchling is on that wooden ledge. |
| 31 | Karka Hatchling | Item | Trophy | 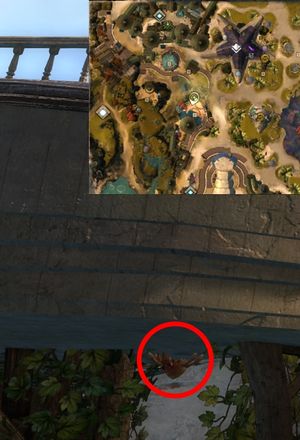
|
Western Ward | Get below decks at the Crow's Nest. | The karka is under the Crow's Nest building's circular balcony, just to the north of the balcony circle's center (east/left of the hanging basket). This can be seen from ground level near Marcello DiGiacomo. To get in range to shoot carefully jump from circular blacony onto horizontal beam, then drop down onto net below. Alternatively, you can fall from the beam onto the top of the rocks. You can shoot it from there. |
| 32 | Karka Hatchling | Item | Trophy | 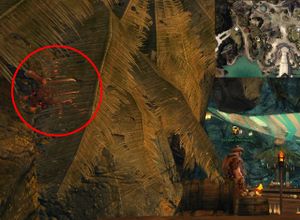
|
Western Ward | Check the cave filled with lanterns and libations. | Go to Trader Jikk's bar. Stand directly in front of the bartender, then look just to your left. At the left end of the rock behind him, up against this side of the rock, is a cluster of palm-tree leaves whose coloration sort of blends in with the surrounding terrain (it's right next to a curved table with a watermelon on top). Look inside this cluster of palm-tree leaves to find the karka. |
| 33 | Karka Hatchling | Item | Trophy | 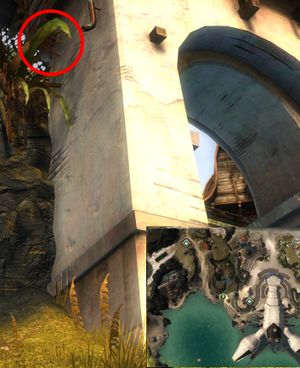
|
Western Ward | Even the tiny karka can't find its way into this house with a view. | Go west from the Sanctum Harbor Waypoint. Go down the stairs through an arch pillar to the edge of the water. The karka is on the north face of the northern arch pillar. |
| 34 | Karka Hatchling | Item | Trophy | 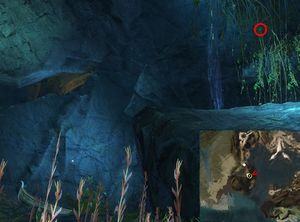
|
White Crane Terrace | Search near the skritt's subterranean rowboat. | Hints: On the way to reach Apprentice Mekteki (the Apprentice Mekteki page describes how to reach them from a water entrance) in the far western / southwestern area of Lion's Arch. Note that this location is on the way to location #1 above. After surfacing from the underwater entrance, climb the big central rock which points towards ectoplasm merchant and face that way too. The waterfall or ceiling leak should be on your left, with a sparse curtain of weeds hanging from the ceiling to the right of the waterfall. The karka is not easy to see or hear; you can find it behind the curtain of the weeds. Up and to your right and to the right of the weeds appears a pointed ledge ( call it ledge "a") which points away from the direction of the merchant; find that and then look towards the waterfall and weeds where there's a ledge (call this ledge "b") below that pointed one (""a") and there's a second ledge (call it ledge "c") below that one ("b"). The hanging greenery is sort of in a V-shape made between ledge "b" and ledge "c". The hatchling is on the ledge of "b" but away from the center of the V-shape. Take a few shots and you should hit it. Note: You might need to hide your chat window to see it. |
| 35 | Karka Hatchling | Item | Trophy | 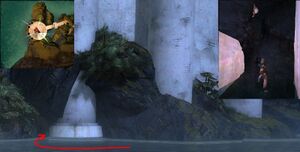
|
Sanctum Harbor | You'll have a better chance spotting this karka in the fog than a sailor would. | There are 4 columns on the lighthouse. Swim on the surface to the northern-most column. Swim around the column, then swim under water to access the small passage that leads underneath the lighthouse. Go to the back of the passage and look up between the rocks to find the karka. |
| 36 | Karka Hatchling | Item | Trophy | 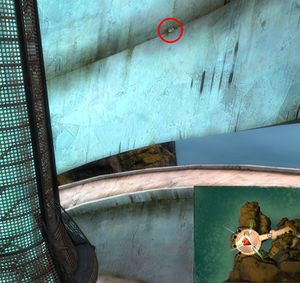
|
Sanctum Harbor | Search the nest where the phoenix roosts. | At the lighthouse go up the ramp until you get to the north side for the first time. Look across the inside of the lighthouse to the right of the central device. It's barely visible on a narrow interior ramp. |
| 37 | Karka Hatchling | Item | Trophy | 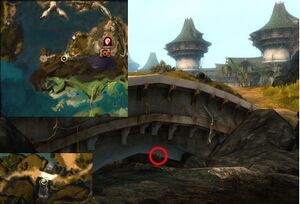
|
Sanctum Harbor | Go under the bridge, then head toward the light. | Search under the bridge midway between Claw Island Portage Waypoint and the lighthouse; the karka is just below a waterfall. |
| 38 | Karka Hatchling | Item | Trophy | 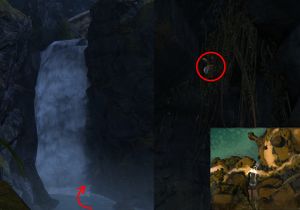
|
Sanctum Harbor | Search behind the falls beneath the bridge. | Look in the cave behind the bottom of the waterfall under the bridge midway between Claw Island Portage Waypoint and the lighthouse. Look up behind the vines. |
| 39 | Karka Hatchling | Item | Trophy | 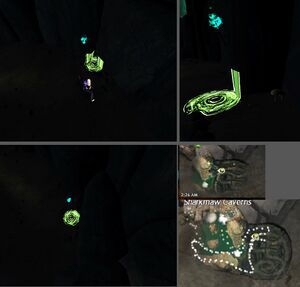
|
Sharkmaw Caverns | Someone swore they saw a karka walk through a wall. | In the fake wall in the north-western corner of the maze of the Sharkmaw Cavern jumping puzzle. Stand inside the fake wall and look west. It is very dark here, but you should be able to just make out the karka hatchling on the ground. |
| 40 | Karka Hatchling | Item | Trophy | 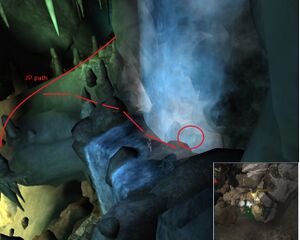
|
Sharkmaw Caverns | Search for the showering karka. | During the Sharkmaw Cavern jumping puzzle before you enter the section with the traps, look behind the waterfall that is just to the right of the entrance stairs. Stand in the waterfall and look down. |
| 41 | Karka Hatchling | Item | Trophy | 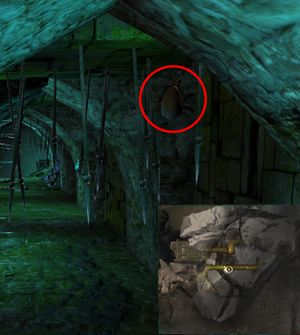
|
Sharkmaw Caverns | Don't get skewered hunting this karka kabob. | Halfway down the first hallway of the traps section of the Sharkmaw JP, stop under the 3rd arch and turn around. |
| 42 | Karka Hatchling | Item | Trophy | 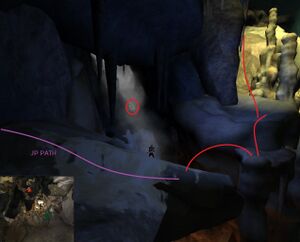
|
Sharkmaw Caverns | Search the spray above the bones. | After the traps section of the Sharkmaw JP, proceed toward the dark room, but stop on the ledge just after jumping off a pillar near a waterfall. Look at the waterfall to your right.
(Tip: Make sure not to pick up the torch in the dark room section otherwise you will lose the rifle and have to restart the jumping puzzle to reacquire the rifle. You can instead use the targeting circle of skill 1 to help light the area where your cursor is.) |
| 43 | Karka Hatchling | Item | Trophy | 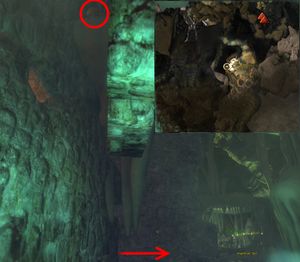
|
Sharkmaw Caverns | You might starve tracking this karka. | Finish the dark room of the Sharkmaw JP, and after you jump off the final waterfall (take the right mouth), just as you leave the pool take a right (the landing area of the middle mouth) and go to the rear. Turn around and look about 45 degrees up. The Karka is on a shelf in the corner of the solid wall and the partial wall you walked through.
(Tip: Make sure not to pick up the torch in the dark room section otherwise you will lose the rifle and have to restart the jumping puzzle to reacquire the rifle. You can instead use the targeting circle of skill 1 to help light the area where your cursor is.) |
| 44 | Karka Hatchling | Item | Trophy | 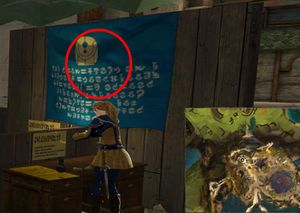
|
Commodore's Quarter | Find this karka celebrating in a cubicle. | Hints: South of Commodore's Quarter Waypoint in the Consortium office located one street down (or head from location #30 head down the stairs, turn right and then enter the doors on right side). When first enter, there's a reception-like desk facing you and the door, where there is a reception representative standing in front of a wall with a wide narrow blue banner; go behind that wall. On the opposite side of the wall you will see a large blue banner, which the karka hatchling is behind. You can get it by aiming at the middle of the sign (sign will not be damaged), which seems to bell out from the wall. Note: The tooltip on the achievement page describes this location as Grand Piazza. |
| 45 | Karka Hatchling | Item | Trophy | 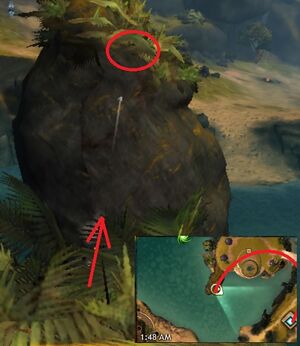
|
Inner Harbor | Snipe from the chapel island to have a chance at this karka. | Step past the Marriner Plaque on Deverol Gardens and look southeast towards the Farshore Waypoint. The karka hides in the bushes atop a rock pillar. |
| 46 | Karka Hatchling | Item | Trophy | 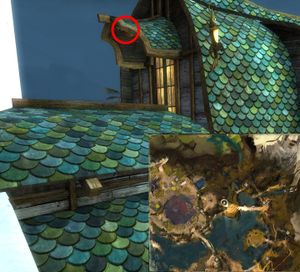
|
Eastern Ward | Search the eaves of a gate near the gates. | Hints: From the Eastern Ward Waypoint head to the Coriolis Plaza (where the circle of Asura fast travel gates are located). Leave the plaza through the gate towards the east. As soon as you enter the first archway in the white wall between two round towers, slow down and look up for a wooden arching walkway. Head to the right-side wall and turn around facing the way you came from, and look up to the roofs above the doorway you entered. If you are coming from Coriolis Plaza, then stop under the wooden arching walkway, you're facing the correct location, and look up at the roofs ahead of you. You should see a row of four windows facing you, and above it one single window centered above those four and facing westerly, then look to the left or north side and slightly higher where there's a single window racing northerly. Above that window is an eaves; in that eaves is the hatchling. It seems a longer shot but you can hit it from the ground. |
| 47 | Karka Hatchling | Item | Trophy | 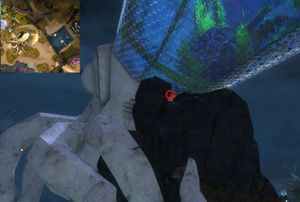
|
Trader's Forum | The bankers have an eye on this karka. | On the back side of the bank, face the bank and move back and left from the water bucket until you can see the hatchling in a nook up near the glass octopus head. Aim above the karka to hit it. Perhaps an easier shot is from the top of the shorter, pointy white rock. Use your springer to get up, dismount, and stand on the point of the rock, then aim and fire from there. |
| 48 | Karka Hatchling | Item | Trophy | 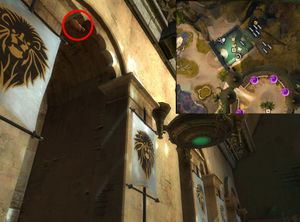
|
Eastern Ward | There's no location too secure for a karka. | In the first room of The Vaults with all the weapons specialists, go to the third arch on the right and look up. |
| 49 | Karka Hatchling | Item | Trophy | 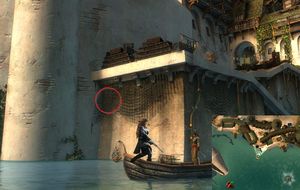
|
Sanctum Harbor | Haul in a fresh karka catch. | On the docks south of Grand Piazza, jump onto the fisherman's boat and face the docks. Aim at the upper left corner of the nets hanging down. |
| 50 | Karka Hatchling | Item | Trophy | 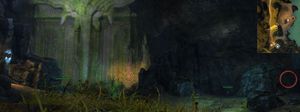
|
White Crane Terrace | Squeeze into stony confines near the door to the dominion. | Hints: Pop out from a teleport to the Diverse Ledges Waypoint, and you should be facing directly away from the location. To narrow down the location, turn around and face northwest, where the wall of the Shuttered Gate is on your left across the trail (as the trail turns towards the southwest), and where you should see a pair of torches stuck in the ground right near the waypoint plus look in the distance across the trail where you should see a ledge with a medium-large tree. Standing there, line up the torches and the tree so they are equally distant from you, and in the distance across the trail you should see a cliff face overhang sloping down to the ground and a large round boulder. The boulder will also appear directly across the trail from the Priory Explorer that provides the speed-bonus. Face the boulder, then curve around the right side of it, and the hatchling is behind it on the ground in gap between the boulder and the cliff wall. Note that an earlier description of this location said to hug the wall north of the wall of the Shuttered Gate, but that's farther away and just that description doesn't get you to the actual spot. |
Notes[edit]
- Even though there is a karka hatchling in Farshore Ward (hidden behind rocks in front of the bridge leading to Deverol Gardens), it doesn't make any sound nor can it be killed with the rifle. It is unknown whether it was intended to be part of the achievement or if its presence here is purely for lore's purposes.
- Another karka hatchling that doesn't make any sound is located inside the underground cave bar at the Western Ward. It resides behind some rocks where a passed out Citizen is lying on the ground.
See also[edit]
- Day and night — for a timer
