Hunt the Dragon!
From Guild Wars 2 Wiki
Jump to navigationJump to search
Hunt the Dragon! was a series of three achievements that appeared in the Boss Week Living World category.
Achievements[edit]
| Hunt the Dragon! (Historical) | Boss Week | 10 |
|---|---|---|
| Search for 10 clues of dragons in Sparkfly Fen. | Tracked 1 Dragon Clues | 1 |
| Tracked 10 Dragon Clues | 9 | |
| Hunt the Dragon! (Historical) | Boss Week | 10 |
| Search for 10 clues of dragons in Blazeridge Steppes. | Tracked 1 Dragon Clues | 1 |
| Tracked 10 Dragon Clues | 9 | |
| Hunt the Dragon! (Historical) | Boss Week | 10 |
| Search for 10 clues of dragons in Frostgorge Sound. | Tracked 1 Dragon Clues | 1 |
| Tracked 10 Dragon Clues | 9 |
Walkthrough[edit]
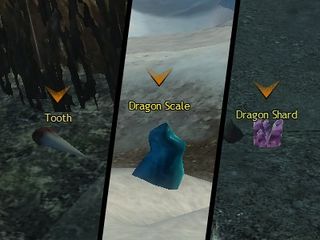
Parts of three dragon bosses have been scattered around their respective lands, Sparkfly Fen, Blazeridge Steppes, and Frostgorge Sound. You must help Rox by hunting them down. Each of the three maps has 10 hidden clues.
These hunts do not need to be completed in a particular order to progress the achievement.
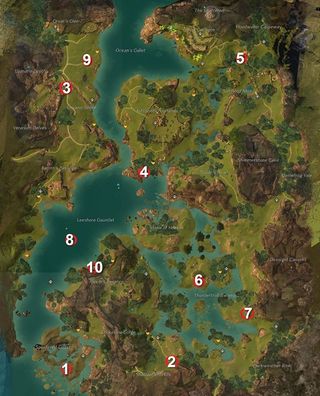
Sparkfly Fen[edit]
| # | Area | Closest Waypoint or Point of Interest |
Notes |
|---|---|---|---|
| 1 | Splintered Coast | Splintered Coast Waypoint — | West of the waypoint, hiding in grass. |
| 2 | Chokevine Gorge | Caer Brier Waypoint — | South of the waypoint, on the stone "bridge" above the ravine. |
| 3 | Orvanic Shore | Ocean's Gullet Waypoint — | To the north-west of the waypoint, on the rock above the waterfall. Go through Uzanarin Depths to achieve it. |
| 4 | Astrozintli Forelands | Toade's Head Waypoint — | To the north-west of the waypoint, to the west of Southwatch Post — . |
| 5 | Floodwater Causeway | Saltflood Waypoint — | To the north of the waypoint, on top of the ruined stairs on the lower level. To get to this point you need to run due north through all the slimes past the turn for the view point. when you get to the farthest north edge of the ruins turn left keep going straight until you see a hole in the walkway. Jump in the hole to get the tooth. |
| 6 | Thundertroll Swamp | Dryground Village Waypoint — | To the west of the waypoint, on top of the hill. |
| 7 | Thundertroll Swamp | Darkweather Waypoint — | To the north-west of the waypoint, on the edge of the rock. Just north west from the wyrms. |
| 8 | Leeshore Gauntlet | Brooloonu Waypoint — | To the south-east of the Wreck of the Argent Warrior — , on top of the underwater rock. It is halfway between wreck of the argent warrior and the heart. Look for a large rock. |
| 9 | Orvanic Shore | Orvar's Glen Waypoint — | To the south-east of the waypoint, near hylek turrets. Just left of the fire pit, but in the bushes. There are 3-4 spiders to kill. |
| 10 | Aleem's Penance | Brooloonu Waypoint — | To the north-east of the waypoint, on the coast, on a rock ledge, south-west of the task heart. |
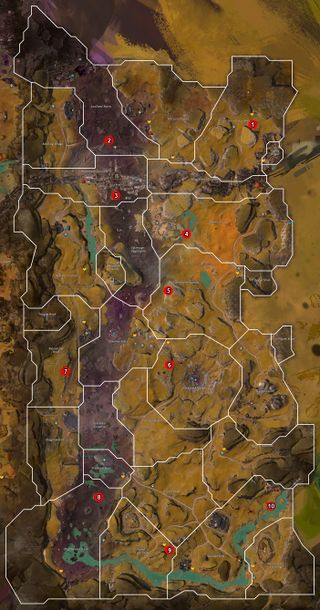
Blazeridge Steppes[edit]
| # | Area | Closest Waypoint or Point of Interest |
Notes |
|---|---|---|---|
| 1 | Terra Carorunda | Terra Carorunda Waypoint — | East up the small hill, facing north on the cliff edge towards the renown heart. |
| 2 | Lowland Burns | Lowland Burns Waypoint — | Directly northwest of the waypoint. |
| 3 | Monument Grounds | Lowland Burns Waypoint — | Head south into the hallway in the ruins. When emerging, head east around and into the small corner. |
| 4 | Heretic Plain | Guardian Stone Waypoint — | Head east out the camp and stay to the right along the cliff wall. The shard will on the ground in water near the end of the wall. |
| 5 | Unbroken Expanse | Expanse Waypoint — | Head south following the path. Head west immediately after passing the lake and go up the cliffs. Go west again after reaching the second cliff level. The shard will be overlooking Hazmagic Aggregate. |
| 6 | Pockmark Roughs | Refuge Sanctum Waypoint — | Head east out of the camp, but go up the rocks immediately on the south side of the path. Make your way south along the cliff's edge. The shard will be overlooking the skill point. |
| 7 | Ratcatcher Knoll | The Last Whiskey Bar Waypoint — | From the waypoint, head north following the path that heads up the cliff, but stay on the cliff edge. The shard will overlook the lower path. |
| 8 | Blightwater Basin | Tumok's Waypoint — | Head directly north from the waypoint. The shard is located in the center of the metal dome scraps. |
| 9 | Tumok's Last Stand | Splintercrest Fort Waypoint — | Head south out of the fort and west up the cliffs just southwest. The shard will be on the edge of the cliff in the southwest corner. |
| 10 | Splinter Hills | Splintercrest Fort Waypoint — | Head east out of the fort and follow the river north. The shard will be located along the river in the middle of a few small trees. |
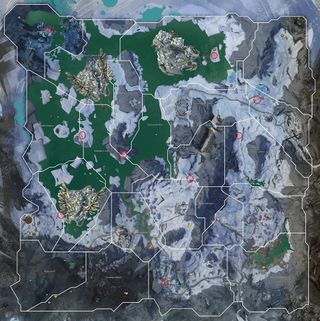
Frostgorge Sound[edit]
| # | Area | Closest Waypoint or Point of Interest |
Notes |
|---|---|---|---|
| 1 | Drakkar Spurs | Drakkar Waypoint — | Head southeast from the waypoint, though the sound, hugging the right hand wall, to a point near the skillpoint. The target is on a spur overlooking the water. |
| 2 | Frostwalk Tundra | Earthshake Waypoint — | Follow the road to the northwest from the waypoint to the Vigil gunnery site. Look to the right along the ledge for the item. |
| 3 | Wayward Climb | Ridgerock Camp Waypoint — | Head due north from the waypoint through the ruins to the cliff overlooking Despond Precipice. The item is on the northeast corner of the cliff. |
| 4 | Leopard's Tail Valley | Skyheight Steading Waypoint — | Go east from the waypoint to the river, then turn south. The item is located on the east side of the river, close to the waterfall. |
| 5 | Watchful Fjord | Honor of the Waves Waypoint — | Go north east from Honor of the Waves waypoint towards Watchful Waypoint. The item can be found underwater a bit west of the Moshpoipoi point of interest. |
| 6 | Highpeaks | Highpeaks Waypoint — | Head southwest from Highpeaks Waypoint, the item is just north of the Barrowstead point of interest. |
| 7 | Stonesledge Draft | Blue Ice Shining Waypoint — | From the Blue Ice Shining Waypoint follow the wood ramp north through the tunnel and up to the next level. Turning right head towards the fire beacons. As you approach the ramp going down turn right again and you will see the item. Move along the cliff side going west to reach it. |
| 8 | Maladar's Inlet | Twoloop Waypoint — | From Twoloop Waypoint swim north until you reach the inlet. Switching to your Map you want to get up on the stretch of land closest to the M in Maladar's Inlet. The item is exactly due east of Zuckermaloo Point of Interest and due north of the Twoloop skill point. |
| 9 | Maladar's Inlet | Twoloop Waypoint — | Swim northeast from Twoloop Waypoint towards the Iron Horse Mines point of interest. The item will be on shore on the left hand side of the channel before entering Grimstone Mol. |
| 10 | Trionic Lattice | Earthshake Waypoint — | From Earthshake Waypoint follow the path northwest towards the first merchant than head dead south following the path along the cliffside that over looks the trolls. The item will be south east of Firesnake's tail. |


