Defeat Mordremoth's champions
Defeat Mordremoth's champions
- Location
- Central Silverwastes
(The Silverwastes) - Event type
- Group event
- Part of
- The Breach
- Level
- 80
- Preceded by
- Foothold
- API
- API
| Interactive map |
|
Interactive map (Underground) |
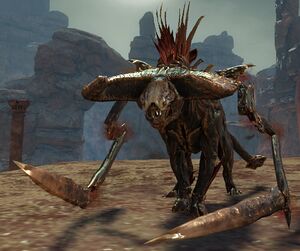
Defeat Mordremoth's champions is a level 80 group event that occurs underground beneath Indigo Cave in Central Silverwastes during The Breach meta event in The Silverwastes. Enter the breach and defeat Mordremoth's twin Champion Mordrem Teragriffs Silver and Gold.
Objectives[edit]
Rewards[edit]
| Reward tier | Experience | Karma | Coin |
|---|---|---|---|
| Gold | 26,670 | 378 |
88 |
| Silver | 20,003 | 284 |
66 |
| Bronze | 13,335 | 189 |
44 |
- Heirloom Seed Pouch
- One of the following:
- Bandit Crest (8 or 11)
- Carapace Shoulder Box
- Chance at the following:
Walkthrough[edit]
Basics[edit]
The Champion Mordrem Teragriff Silver and Champion Mordrem Teragriff Gold continuously charge around the circular tunnel, damaging and knocking down anything in their path. Located around the tunnel are Gas Bubbles which, when destroyed, leave behind a poisonous white circle AoE field that lasts for a few seconds. If either of the bosses make contact with the AoE, it is affected by Foul Odor and disabled for a period of time. Both Teragriffs also have a channeled AoE attack which occurs when they meet at the same point, where they will use Shriek and gain 25 stacks of Synergy. They will switch charging directions after their channeled AoE or after being disabled.
Strategy[edit]
In order to defeat the Teragriffs, the Gas Bubble will need to be burst just as, or right before, either Teragriff charges into the bubble. The temporary disable will allow players to safely damage the boss and its defiance bar. The optimal strategy is for players to divide up into two groups, and force the Teragriffs into charging in opposite directions. This will ensure that they meet and perform their channeled AoE attack. While both bosses are occupied, players should get ready to burst the Gas Bubble directly behind both bosses. This will restrict their movements to charging back and forth within a quarter of the room, allowing players to keep damaging them continuously without being in danger from the damage trail.
- Should the above strategy fail due to poor timing, dodging towards the inner and outer wall is a good way to avoid both the charging attack and the damage trail left behind.
- When they meet and use their channeled AoE attack, they are stationary and vulnerable to ranged damage. It is not advised to stand within 600 range or so, as the attack could down you in seconds.
- Do not pop bubbles needlessly since the white AoE field only lasts for a brief amount of time.
NPCs[edit]
Allies[edit]
- Magister Wiggs (above ground)
Foes[edit]
Dialogue[edit]
- Event start
- Magister Wiggs: There's a breach. What are you waiting for?
Related achievements[edit]
 The Silverwastes: Silver and Gold — Defeat Champion Mordrem Teragriff Silver and Champion Mordrem Teragriff Gold. Active during The Breach after Pact Assault Preparations has been fully completed. (5)
 Luminescent Leggings: Mordrem Teragriff Bladder
 Luminescent Headgear: Mordrem Teragriff Eye
 Luminescent Gloves: Mordrem Teragriff Fang
 Luminescent Coat: Mordrem Teragriff Kidney
 Luminescent Footwear: Mordrem Teragriff Spleen
 Luminescent Shoulderguard: Mordrem Teragriff Tendon
 Twilight III: Dusk: Breach's Silver Gloom — Use the Gloominator to capture the gloom near the corpse of the Silver Teragriff inside the Breach beneath Indigo Cave in the Silverwastes.
Notes[edit]
- A Luminescent Pollen Cloud appears after defeating the champions.
See also[edit]
- [Group Event] Defeat Mordremoth's champion (80) (Amber Sandfall)
- [Group Event] Defeat Mordremoth's champion (80) (Blue Oasis)
- [Group Event] Defeat Mordremoth's champion (80) (Red Rock Bastion)


