User:Floodbars/Sandbox
Options for Presenting Collectibles[edit]
...as a list (current approach)[edit]
- Baubles:
 x2
x2  x2
x2 - Shops: 0
- Furniture Shops: 0
- Hidden Rooms: 2
- Locked Chests: 1
- Digging Spots: 0
...as columns[edit]
| Baubles | ||||
|---|---|---|---|---|
| +2 | +2 | |||
| 2 | 2 | 0 | 0 | 0 |
| Shops | |
|---|---|
| +2 | |
| 0 | 2 |
| Others | ||
|---|---|---|
| +2 | +1 | |
| 2 | 1 | 0 |
...as Rows[edit]
| Baubles | ||
|---|---|---|
| +2 | 2 | |
| +2 | 2 | |
| 0 | ||
| 0 | ||
| 0 | ||
| Others | |||
|---|---|---|---|
| Shops | 0 | ||
| Furniture Shops | 0 | ||
| Hidden Rooms | +2 | 2 | |
| Locked Chests | +1 | 1 | |
| Digging Spots | 0 | ||
Options for Presenting Sections[edit]
...as Ordered Lists (with spoilers template)[edit]
| Others | |||
|---|---|---|---|
| Shops | 0 | ||
| Furniture Shops | 0 | ||
| Hidden Rooms | +2 | 2 | |
| Locked Chests | +1 | 1 | |
| Digging Spots | 0 | ||
| Baubles | ||
|---|---|---|
| +2 | 2 | |
| +2 | 2 | |
| 0 | ||
| 0 | ||
| 0 | ||
|
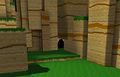
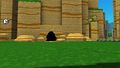
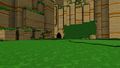
Following the cutscene, you will find yourself standing on the picnic cloth amongst four pieces of food, which can be picked up to restore hearts—though right now, you won't need them.
|

.jpg)


...as Ordered Lists (with no spoilers template)[edit]
| Others | |||
|---|---|---|---|
| Shops | 0 | ||
| Furniture Shops | 0 | ||
| Hidden Rooms | +2 | 2 | |
| Locked Chests | +1 | 1 | |
| Digging Spots | 0 | ||
| Baubles | ||
|---|---|---|
| +2 | 2 | |
| +2 | 2 | |
| 0 | ||
| 0 | ||
| 0 | ||
Following the cutscene, you will find yourself standing on the picnic cloth amongst four pieces of food, which can be picked up to restore hearts—though right now, you won't need them.
- (Optional) Climb the tree in the lake to your immediate right for #1.
- (Optional) Head to the waterfall (A) at the far end of the lake.
- Pick up the key by
 Locked Chest #1 and unlock it for #2.
 - Open the passage to
 Hidden Room #1 by throwing a Mini Bomb at the waterfall.
 - Enter the hidden room and climb the short jumping puzzle for #3.
- When you reach the first rock platform after jumping on the water spouts, continue along the wall on the right-hand side to avoid hitting the ceiling.
- Pick up the key by
- Follow the Helping Hand towards Checkpoint #1. Watch out for snakes!
- On the way you will find Gourdon the Racing Choya (B) where you can start the
 Super Adventure 1-1 race.
- On the way you will find Gourdon the Racing Choya (B) where you can start the
- (Optional) When approaching Checkpoint #1, turn left at the wall and throw a bomb at the far corner (C) to reveal Hidden Room #2, which contains #4.
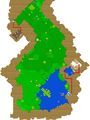
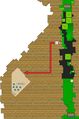
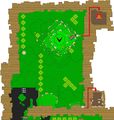
Map
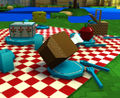
Picnic cloth with food
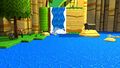
(A) Hidden Room #1: Rushing water
(B) Gourdon the Racing Choya start of Super Adventure 1-1 race
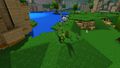
(C) Hidden Room #2: Left before the checkpoint
...as ???[edit]
| Baubles | ||
|---|---|---|
| +2 | 2 | |
| +2 | 2 | |
| 0 | ||
| 0 | ||
| 0 | ||
| Others | |||
|---|---|---|---|
| Shops | 0 | ||
| Furniture Shops | 0 | ||
| Hidden Rooms | +2 | 2 | |
| Locked Chests | +1 | 1 | |
| Digging Spots | 0 | ||
Following the cutscene, you will find yourself standing on the picnic cloth amongst four pieces of food, which can be picked up to restore hearts—though right now, you won't need them.
- (Optional) Climb the tree in the lake to your immediate right for #1.
- (Optional) Head to the waterfall (A) at the far end of the lake.
- Pick up the key by Locked Chest #1 and unlock it for #2.
- Open the passage to Hidden Room #1 by throwing a Mini Bomb at the waterfall.
- Enter the hidden room and climb the short jumping puzzle for #3.
- When you reach the first rock platform after jumping on the water spouts, continue along the wall on the right-hand side to avoid hitting the ceiling.
- Pick up the key by
- Follow the Helping Hand towards Checkpoint #1. Watch out for snakes!
- On the way you will find Gourdon the Racing Choya (B) where you can start the Super Adventure 1-1 race.
- On the way you will find Gourdon the Racing Choya (B) where you can start the
- (Optional) When approaching Checkpoint #1, turn left at the wall and throw a bomb at the far corner (C) to reveal Hidden Room #2, which contains #4.
Picnic cloth with food
(A) Hidden Room #1: Rushing water
(B) Gourdon the Racing Choya start of Super Adventure 1-1 race
(C) Hidden Room #2: Left before the checkpoint
...as a Filterable Table[edit]
Abusing ids here to show/hide all optional rows... while sacrificing maintainability and step numbers. It's also annoying to figure out prerequisites for any given step.
| Starting Area | ||
|---|---|---|
| (Optional) Climb the tree to your immediate right for | ||
| (Optional) Pick up the key by the waterfall (A) and open | ||
(Optional) If you have the Mini Bomb, lob one at the waterfall (A) to open the passage to
| ||
| Follow the Helping Hand towards Checkpoint #1. Watch out for snakes! | ||
| (Optional) On the way to the checkpoint, you will find Gourdon the Racing Choya (B) where you can start the Super Adventure 1-1 race. | ||
| (Optional) When approaching Checkpoint #1, turn left at the wall and chuck another bomb at the far corner (C) to reveal | ||
| First Shop | ||
|---|---|---|
| (Optional) Jump to the ledge with the monkey and onto the tree to pick up | ||
| (Optional) Hop off the platform and go through the door beneath (A) to enter | ||
| (Optional) Buy a key or kill snakes and monkeys until they drop one, then climb to the top of the highest platform and open | ||
| (Optional) Jump onto the tree near the tallest platform and down onto the ledges nearby to find | ||
| (Optional) Bomb the rubble-filled hole in the wall between the Shop and Checkpoint #2 (C) to access | ||
| When you're done, proceed to Checkpoint #2. | ||
Walkthrough[edit]
Start to Checkpoint 1 (First area)[edit]
| Others | |||
|---|---|---|---|
| Shops | 0 | ||
| Furniture Shops | 0 | ||
| Hidden Rooms | +2 | 2 | |
| Locked Chests | +1 | 1 | |
| Digging Spots | 0 | ||
| Baubles | ||
|---|---|---|
| +2 | 2 | |
| +2 | 2 | |
| 0 | ||
| 0 | ||
| 0 | ||
Following the cutscene, you will find yourself standing on the picnic cloth amongst four pieces of food, which can be picked up to restore hearts—though right now, you won't need them.
- (Optional) Climb the tree in the lake to your immediate right for #1.
- (Optional) Head to the waterfall (A) at the far end of the lake.
- Pick up the key by Locked Chest #1 and unlock it for #2.
- Open the passage to Hidden Room #1 by throwing a Mini Bomb at the waterfall.
- Enter the hidden room and climb the short jumping puzzle for #3.
- When you reach the first rock platform after jumping on the water spouts, continue along the wall on the right-hand side to avoid hitting the ceiling.
- Pick up the key by
- Follow the Helping Hand towards Checkpoint #1. Watch out for snakes!
- On the way you will find Gourdon the Racing Choya (B) where you can start the Super Adventure 1-1 race.
- On the way you will find Gourdon the Racing Choya (B) where you can start the
- (Optional) When approaching Checkpoint #1, turn left at the wall and throw a bomb at the far corner (C) to reveal Hidden Room #2, which contains #4.
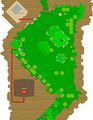
Map
Picnic cloth with food
(A) Hidden Room #1: Rushing water
(B) Gourdon the Racing Choya start of Super Adventure 1-1 race
(C) Hidden Room #2: Left before the checkpoint
Checkpoint 1 to Checkpoint 2 (First shop; digspots)[edit]
| Others | |||
|---|---|---|---|
| Shops | +1 | 1 | |
| Furniture Shops | 0 | ||
| Hidden Rooms | +2 | 4 | |
| Locked Chests | +1 | 2 | |
| Digging Spots | +2 | 2 | |
| Baubles | ||
|---|---|---|
| +24 | 26 | |
| +1 | 3 | |
| 0 | ||
| +1 | 1 | |
| 0 | ||
- (Optional) Jump onto the ledge with the monkey.
- Jump onto the tree to pick up #5.
- Turn left around the corner and continue across the treetops to pick up #6–8, taking care to avoid the monkeys' projectile attacks.
- On the platform at the end you will find a barrel containing a
 Damage Boost.
- Jump onto the tree to pick up
- (Optional) Hop off the platform and go through the door beneath (A) to enter Hidden Room #3. This is the first Shop; see below for vendor details.
- (Optional) Walk up the ramp and jump to the next platform and climb up. You will need to climb it multiple times to collect all the baubles.
- Unlock the Locked Chest #2 for
 #9.
#9.
- Keys can be purchased from the shop or they have a chance to drop from snakes and monkeys.
- You will also find #10 on the shorter platform nearby.
- Jump onto the tree near the tallest platform (B). These do not count towards the Associate of Baubles achievement.
- Jump down onto the ledge to the right for Digging Spot #1.
- Fall to the ground and climb the platform again to get to this same tree.
- Jump onto the tall column to the left, up the tree and to the furthest ledge for Digging Spot #2.
- Jump down onto the ledge to the right for
- Unlock the
- (Optional) Bomb the rubble-filled hole in the wall between the Shop and Checkpoint #2 (C) to access Hidden Room #4, which contains #11–30.
- When you're done, proceed to Checkpoint #2.
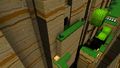
Map
(A) Hidden Room #3 (Shop #1): At last, a customer!
(B) Digging spots
(C) Hidden Room #4: Suspiciously spaced rubble


Shop #1 items[edit]
| Item | Cost | Description |
|---|---|---|
| 20 |
Grants one extra life. | |
| 100 |
Dig anywhere for a 10% chance to find buried treasures. | |
| 25 |
Used for opening chests. | |
| 5 |
Restores one heart. |
Checkpoint 2 to Checkpoint 3 (Chasm corridor)[edit]
| Others | |||
|---|---|---|---|
| Shops | 1 | ||
| Furniture Shops | 0 | ||
| Hidden Rooms | +1 | 5 | |
| Locked Chests | 2 | ||
| Digging Spots | 2 | ||
| Baubles | ||
|---|---|---|
| +6 | 32 | |
| 3 | ||
| 0 | ||
| 1 | ||
| 0 | ||
- Jump across the chasm towards Checkpoint #3, taking care to avoid the monkeys guarding each checkpoint.
- (Optional) Backtrack across the ledges.
- After activating Checkpoint #3, take advantage of the boost it gives you to land on the rock ledge on the left wall.
- Use the bushes in front of the checkpoint to reach it if you missed your chance.
- Carefully backtrack across the treetop to another ledge.
- Bomb the wall (A) to access Hidden Room #5, which contains #31–36.
- After activating Checkpoint #3, take advantage of the boost it gives you to land on the rock ledge on the left wall.
Map
(A) Hidden Room #5: Between two checkpoints


Checkpoint 3 to Checkpoint 4 (Maze; honeycomb)[edit]
| Others | |||
|---|---|---|---|
| Shops | 1 | ||
| Furniture Shops | +1 | 1 | |
| Hidden Rooms | 5 | ||
| Locked Chests | 2 | ||
| Digging Spots | 2 | ||
| Baubles | ||
|---|---|---|
| +3 | 35 | |
| +2 | 5 | |
| 0 | ||
| 1 | ||
| 0 | ||
A swarm of Bee Dogs will spawn as you enter this new area and collect baubles from the flowers, like nectar. Follow them to visit the Queen Bee Dog, Honeycomb, and Furniture Shop #1, or skip to main step 2 to head straight to Checkpoint #4.
- (Optional) Enter the maze by following the Bee Dogs (or, if you've lost them, the right-hand wall) until you reach the corner, then slip inside the niche in the wall. To your right you will see the two entrances to the Maze.
- (Optional) Take the nearest entrance and make a U-turn to the right to find #37. Backtrack out again.
- Take the furthest entrance and follow the main path; you should encounter #38 and #39 before you run into any major forks.
- (Optional) From bauble #39, take the left path at the first major fork.
- Bomb the floor once you reach a dead-end and drop inside to visit
 Furniture Shop #1.
 - This room is another maze (A), this time filled with Exploding Barrels and deadly Spikes that will kill instantly upon touch.
- Bomb the floor once you reach a dead-end and drop inside to visit
- From bauble #39, take the forward path at the first major fork and pick up #40
- Exit the Maze to emerge into an open area infested with monkeys and snakes.
- To your right is a bush leading to a hole in the wall which will allow you to quickly return to Checkpoint #3.
- (Optional) Run past the hill ahead to encounter the Queen Bee Dog. You may wish to take advantage of the Damage Boost in the barrel nearby. Upon death, she drops a
 .
.
- She will perform a spinning attack which deals damage and allows her to evade; she may also shoot a stream of Bee Dogs from her mouth. Circle-strafing will allow you to avoid the latter attack, and using ranged weapons (or simply moving out of her way when she begins spinning) will allow you to avoid the former. She is immune to stun.
- (Optional) With the Queen dead, the
 Honeycomb is all yours. Destroy it to spawn twenty-four baubles. (These do not count towards the Associate of Baubles achievement.)
 - Backtrack to the bush mentioned earlier to exit the area.
- (Optional) Take the nearest entrance and make a U-turn to the right to find
- From the flower corridor, follow the left-hand wall around the corner to emerge before another chasm. Follow the Helping Hand up onto a block that will allow you to easily reach the platform in the center of the chasm. You will find #41 here, along with a barrel containing an
 Invincibility boost.
 - Jump to the next platform and kill or avoid the two monkeys before approaching Checkpoint #4.
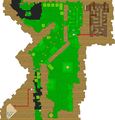
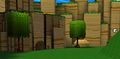
(A) Map
The Maze (entrance is in top right corner)


Checkpoint 4 to Checkpoint 5 (Second shop; mountain)[edit]
| Others | |||
|---|---|---|---|
| Shops | +1 | 2 | |
| Furniture Shops | +1 | 2 | |
| Hidden Rooms | +2 | 7 | |
| Locked Chests | 2 | ||
| Digging Spots | 2 | ||
| Baubles | ||
|---|---|---|
| +3 | 38 | |
| 5 | ||
| +1 | 1 | |
| 1 | ||
| 0 | ||
- Jump onto the platforms ahead of you, picking up a
 Speed Boost from the barrel if you wish. Collect #42–44 as you jump from the large platform to the final area; this jump is easiest to accomplish while affected by the speed boost.
 - (Optional) Turn right and run towards the far corner, taking care not to get hit by any snakes or sneaky monkeys hiding in the trees.
- Bomb the wall (A) to uncover Hidden Room #6 and the final bauble, #45.
- Bomb the wall (A) to uncover
- (Optional) Run around to the far right-hand side of the mountain and through the door (B) to enter Hidden Room #7.
- This is the second Shop; see below for vendor details.
- Begin climbing the mountain from the corner closest to Checkpoint #4; there will be Helping Hands guiding you in the right direction. If you wish, you can grab an
 Invisibility boost from the barrel at the base of the mountain, just behind the tree, to avoid being harassed by monkeys while climbing. There will be another barrel containing a Damage Boost about half-way up. Make your way to Checkpoint #5.
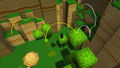
Map
(A) Hidden Room #6: Tucked away in a corner

(B) Hidden Room #7 (Shop #2): The mountain has a back door


Shop #2 items[edit]
| Item | Cost | Description |
|---|---|---|
| 5 |
Restores one heart. | |
| 20 |
Grants one extra life. | |
| 150 |
Stuns foes. | |
| 25 |
Used for opening chests. | |
| 100 |
Dig anywhere for a 10% chance to find buried treasures. |
Checkpoint 5 to Boss (Top of the mountain)[edit]
| Others | |||
|---|---|---|---|
| Shops | 2 | ||
| Furniture Shops | 2 | ||
| Hidden Rooms | 7 | ||
| Locked Chests | 2 | ||
| Digging Spots | 2 | ||
| Baubles | ||
|---|---|---|
| 38 | ||
| 5 | ||
| 1 | ||
| 1 | ||
| 0 | ||
- (Optional) Betty Bauble can be found just ahead of the checkpoint. Speak with her to check if you've collected all the baubles in the zone.
- Climb to the peak of the mountain and attack the Cage.
- Lord Vanquish's head will be floating above the Cage, and every so often he will point towards a player and shoot a laser. Side-step out of his way when he turns to look at you, and try to remain out of his field of view so that it becomes obvious when he turns to you to attack.
- Alternatively, stand on the tallest hedge and attack the Cage from there. This will prevent Lord Vanquish from noticing you and targeting you with his laser attacks.