User:Jesself/GM Guide
Hawk's Guild Missions Guide[edit]
Disclaimer - this is a tweaked version of my guide for the ZAP guild - target audience is for PvE missions and guilds that are already at max level.
General Q&A[edit]
Q: When are they hosted?
A: This information is typically in the guild Message of The Day - visible in the Guild panel ![]() (default G) on the first tab
(default G) on the first tab ![]() , in the top right.
, in the top right.
Q: Why do them?
A: Why not? They can be a fun group activity to do with the guild. Each mission rewards Guild Commendations that can be used to purchase guild stuff, like ascended trinkets, armor, weapons (one of the very few ways to get stat-selectable account-bound exotic weapons), and random daily offerings from the guild commendation trader, Siggy, like festival rewards, materials, and WvW supply boxes (that provide WvW XP! - save some for Daily WvW World Ranker days).
Q: Are there pre-requisites?
A: To be kind to your guildies, yes:
- Communication - it is very helpful if you at least listen in to the GM's host via a Discord server to ease communications. If you want/need to leave GMs early, please leave the squad to prevent everyone from waiting on you to show up for the next mission.
- Waypoints (WPs) - please bring characters with the most Tyrian waypoints explored for faster travel to prevent your fellow guildies from having to wait on you. If you don't happen to have a nearby WP in a given area, please say so (either in Discord or in squad chat - /d), so a guildie can help you WP to keep the missions rolling along.
Q: Are there any details about guild missions I should know?
A: Yup!
- Commendations: Know that max-level guilds don't need to complete GMs to advance, so completing missions isn't needed - guildies can consider a mission complete after receiving their commendation loot. Mission credit requires that you start a mission with the GM group. Some missions only require one person to succeed (races if they are bugged-good) or participation in one part (one bounty/trek/puzzle-segment), while others require full participation.
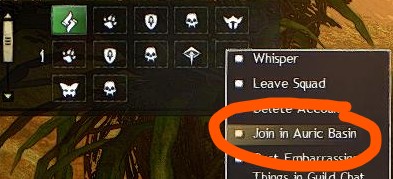
- Map Instances - understand them and be aware. There can be multiple instances of a map and we all need to be on the same instance. If you are in the destination map and your GM host is too, but their squad icon isn't green, you need to join their map instance by right-clicking on the GM host's group icon and selecting Join in <map name>.
- Guild Portal - free travel to races, challenges, and puzzles. It's in the guild hall near the spawn point/main WP. Interact with the blue orb anytime - the second tab is for guild missions and provides free travel to races, challenges, and puzzles. If the portal isn't opened for you, you can select a mission and then the Travel Now button (also nice for free and distant map access for newer toons when not doing guild missions). Get to the guild hall using the Guild panel's (
 icon in the tippy-top left) Guild Hall button (on the first tab, in the top right).
 - Loot Check - after a mission success the GM host will typically issue a Squad Ready Check to check if everyone got their commendation bouncy chest - if you did, select
 . If you missed the poll, pull up the squad interface to access the poll input. If you're unsure, check the guild missions tab in the Guild panel to see whether you've gotten credit.
 - Guild Missions tab
 - available missions can be seen in the Guild panel's Missions tab, third icon/tab down on the left. This tab will also show if you've gotten credit for a mission for the week (they reset at the GW2 weekly reset time).
 - Wiki - Details about each mission is available in the GW2 Wiki - just type /wiki guild mission in the chat window to open the wiki (section 2.3 - PvE). This guide is for PvE missions.
- Overlays (completely optional!) - an overlay utility with guild mission info is very helpful for races and bounties, namely TacO or BlishHUD (both read TacO datasets); the ReActif guild missions dataset works well.

Missions[edit]
Races[edit]
Each difficulty must be completed within a given time limit.
Race is a horrible name for these survival missions - if you're unfamiliar with them, take your time.
- Go to the start and WAIT until everyone else gets to the start so everyone can get credit.
- AFTER the GM host triggers the event, interact with the start banner and transform into the race's critter.
- Get your critter to the finish line and/OR get a bouncy chest of success.
There are painful traps that you can detect with action 1 - it's good to set this to auto-trigger with a Ctrl-<right-mouse-click> on its action button. Detecting traps has limited range that you can typically out-run - waiting a couple seconds for detection to come off cool-down in a safe location is usually preferable to finding a spike trap with your body. Remember you can still dodge through the traps! There are a couple other skills provided and little unique tricks that help on most of the races. Every single checkpoint (set of guild flags) must be passed through for personal completion of a course - the next flag is always displayed in your mini-map as a blue flag icon.
Once you get credit for passing through just one checkpoint you will get credit for the race if the guild is successful in the race's completion. The overlays mentioned above can show safe paths that make the races far less daunting. Once mission success is acquired (a bouncy chest), our primary objective of getting the commendation has been achieved - the race may be ended. The GM host may close the mission before full mission success is achieved for the guild, which will report as a mission failure, but we got our loot, so... next! If you're new to a race course and having trouble finding your way, consider using an overlay or since you should have already made it through a checkpoint (so you'll get credit), de-transform and follow a fellow transformed guildie who knows the course to support them and learn the path by helping them through. Seldomly the rewards are buggy and delay for up to a few minutes after successful completion, so be prepared to equip some patience.
Bounties[edit]
Each difficulty must be completed within a given time limit.
- Easy - one bounty for one of three do-badders.
- Medium - three bounties from a list of many more do-badders. You only need to tag one to get credit for this, but all three must be completed.
- Hard - five bounties from a list of all available do-badders, and some are really mean. You only need to tag one to get credit for this, but all five must be completed.
Treks[edit]
The Treks require everyone to be on the 'shiny' at one time when it is Activiated/touched in order for everyone to get credit (DON'T TOUCH THE SHINY! / DO NOT INTERACT... until the GM host gives the go-ahead). The GM will normally choose one trek location and provide a WP to get close, and some markers on the map to help find it (assistance from others can happen too). It's polite to gather around the shiny, not on top of it, until everyone is there and ready.
Challenges[edit]
These vary in duration and difficulty. They are one event that everyone works to complete within a time limit.
Puzzles[edit]
These are multi-room/event missions including a short jumping puzzle and events that involve mechanics that the host will explain. If you fall to a JP's floor level (dead or otherwise), stay put for guildies to help you - do NOT restart at a checkpoint.
Post-Missions[edit]
When guild missions are complete, several folks typically look to hang out and partake in some post-mission shenanigans, like strike missions, a world event, a dungeon, or some other fun thing subject to the group that remains.