File:Thunderhead Keep Volatile Delivery map.jpg
From Guild Wars 2 Wiki
Jump to navigationJump to search

Size of this preview: 523 × 599 pixels. Other resolutions: 209 × 240 pixels | 419 × 480 pixels | 670 × 768 pixels | 894 × 1,024 pixels | 2,312 × 2,648 pixels.
Original file (2,312 × 2,648 pixels, file size: 2.66 MB, MIME type: image/jpeg)
Licensing[edit]
| This screenshot contains property of ArenaNet or NCSoft which is used with permission. The terms of the permission do not include third party use. It is not released under the GFDL. Please see Guild Wars 2 Wiki:Copyrights for further information. |
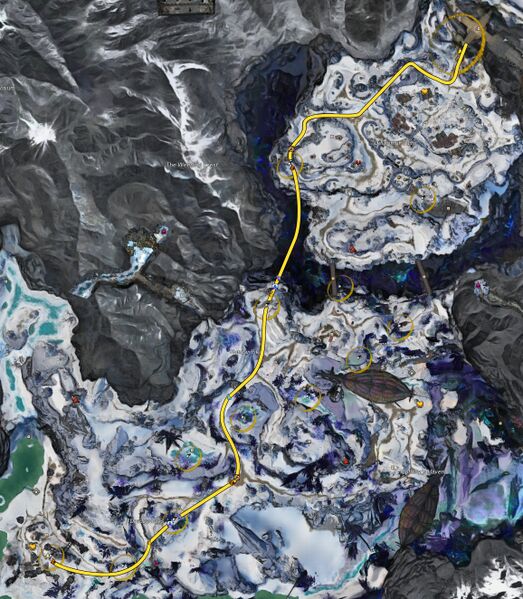
Route[edit]
- Pre-charge
 Rollerbeetle endurance.
 - Start the mission.
- Rollerbeetle floor it up the hill, skipping the first cooler.
- Switch to
 Springer after rounding the corner/the Branded Dredge.
 - Scale the cliff. Avoid the Dredge and jump up into the high-up cooler. While in midair, dismount with Bond of Faith and switch to
 Griffon.
 - Dive down to gain speed, heading northeast.
- When you hit the ground, switch back to Rollerbeetle. Use Bond of Vigor to recharge endurance and floor it up the hill to the cooler at the top of Hundar Pike. If you lose speed, swap to
 Jackal.
 - Grab the cooler and jump up the cliff with Springer.
- Switch to Griffon, dive down into the abyss to pick up speed, heading north.
- Pull up out of the abyss to land on the cooler.
- Switch back to Rollerbeetle. If Bond of Vigor recharges, use it.
Easily capable of a sub 1 minute 50 time.
File history
Click on a date/time to view the file as it appeared at that time.
| Date/Time | Thumbnail | Dimensions | User | Comment | |
|---|---|---|---|---|---|
| current | 13:09, 12 January 2019 | | 2,312 × 2,648 (2.66 MB) | Chieftain Alex (talk | contribs) | |
| 12:51, 12 January 2019 |  | 2,312 × 2,648 (2.58 MB) | Chieftain Alex (talk | contribs) |
You cannot overwrite this file.
File usage
The following page uses this file: