User:SarielV/Statistics/Condition Percentage
From Guild Wars 2 Wiki
< User:SarielV | Statistics
Jump to navigationJump to search
Condition Damage vs. Condition Duration[edit]
- In times of old, increasing condition duration was a difficult but simplistic proposition. There were sigils and runes which gave flat increases, usually to specific conditions, but unless you were throwing away a Rampager's or Dire weapon to work with a Giver's set, you usually weren't giving up straight Condition Damage to get an increase to Condition Duration. Nowadays, you can get armor and weapons which increase Expertise, which is an indirect increase to Condition Duration, but it comes at a price. To get a boost to Expertise, you have to give up some Condition Damage (likely expressed as giving up Sinister stats to work with Viper instead). The tradeoff is generally considered beneficial, but no one has bothered to delve too deeply into the math.
- Thanks to the way Condition Damage is calculated, the specifics vary according to the condition in question. The underlying math, however, is the same for each.
VARIABLES[edit]
- c = condition damage (stat)
- d = additional condition duration (%)
- t = time
- base = condition base damage per stack per second at level 80 (damage/stack/s)
- factor = condition damage per stack per second per Condition Damage stat (damage/stack/s/stat)
- d0 = base damage per stack for a stack lasting t0 time (damage/stack)
- d1 = increased damage due to increased duration (damage for a stack lasting t1 time) (damage/stack)
- d2 = increased damage due to increased condition damage = d1 (damage/stack)
- t0 = stack's original duration (s)
- t1 = stack's increased duration due to increased condition duration. (s)
- c0 = initial condition damage (stat)
- c1 = condition damage required to cause d1 damage in t0 time (stat)
- deltac = difference between c0 and c1 (stat)
EQUATIONS[edit]
- damage/s/stack = base + (factor*c)
- damage/stack = (base + (factor*c)) t
- d0 = (base + (factor*c0)) t0
- d1 = (base + (factor*c0)) t1
- t1 = t0*(1+d/100)
- d1 = (base + (factor*c0)) t0 (1+d/100)
- d2 = (base + (factor*c1) t0
- c1 = c0 + deltac
- d2 = (base + (factor*(c0+deltac)) t0
- d2 = d1
- (base + (factor*(c0+deltac)) t0 = (base + (factor*c0)) t0 (1+d/100)
- (base + (factor*(c0+deltac)) = (base + (factor*c0)) (1+d/100)
- base + factor*c0 + factor*deltac = (base)(1+d/100) + (factor*c0)(1+d/100)
- factor*deltac = (base)(1+d/100) + (factor*c0)(1+d/100) - base - factor*c0
- factor*deltac = (base)(d/100) + (factor*c0)(d/100)
- deltac = (base)(d/100)/factor + (c0)(d/100)
- tradeoff factor CD/EX = the gain in Condition Damage for a single point of Expertise = deltac/(15*d)
- CD/EX = deltac/(15*d) = (base)(d/100)/factor/(15*d) + (c0)(d/100)/(15*d) = (base)/(1500)/factor + c0/1500
- What we find is that the gain in overall Condition Damage depends on the original Condition Damage and the increase in Duration, but it is independent of stack duration. The tradeoff factor is a function of base Condition Damage and the Condition used.
| Condition | Factor | Base | Condition Damage |
|---|---|---|---|
| 0.06 | 22 | 1133 | |
| 0.155 | 131 | 655 | |
| 0.06 | 33.5 | 942 | |
| 0.035 | 10 | 1214 | |
| 0.0625 | 49.5 | 708 | |
| 0.0375 | 37.5 | 500 | |
| 0.4 | 444 | 390 | |
| 0.045 | 15.9 | 1147 | |
| 0.09 | 31.8 | 1147 |
- With your Condition Damage below the Break-Even point, a point of Condition Damage is worth more than a point of Expertise, as far as you using the respective Condition is concerned. Above the Break-Even point, a point of expertise will give you more bang for your buck than one more point of Condition Damage. With Burning and Fear, Expertise is generally better, as the Condition Damage thresholds for those two are easy to meet. For other conditions, there is a margin where boosting your Condition Damage will serve you better. If you are using dedicated Condition Damage gear such as Sinister or Dire, the increase in Expertise from Vipers will always compensate for the loss to Condition Damage.
- So, is there a situation you would want to use Condition Damage anyway? The advantage of Expertise is raw damage output. What it lacks in is rate. An increase to Expertise will give more damage per skill use, but it will require an extra second or two for all of that damage to accumulate. If your target is able to periodically cleanse itself of conditions or become invulnerable, you may want to get more damage in for the time the target is available. If the target can FREQUENTLY cleanse itself, you'll probably see better results from a power build.
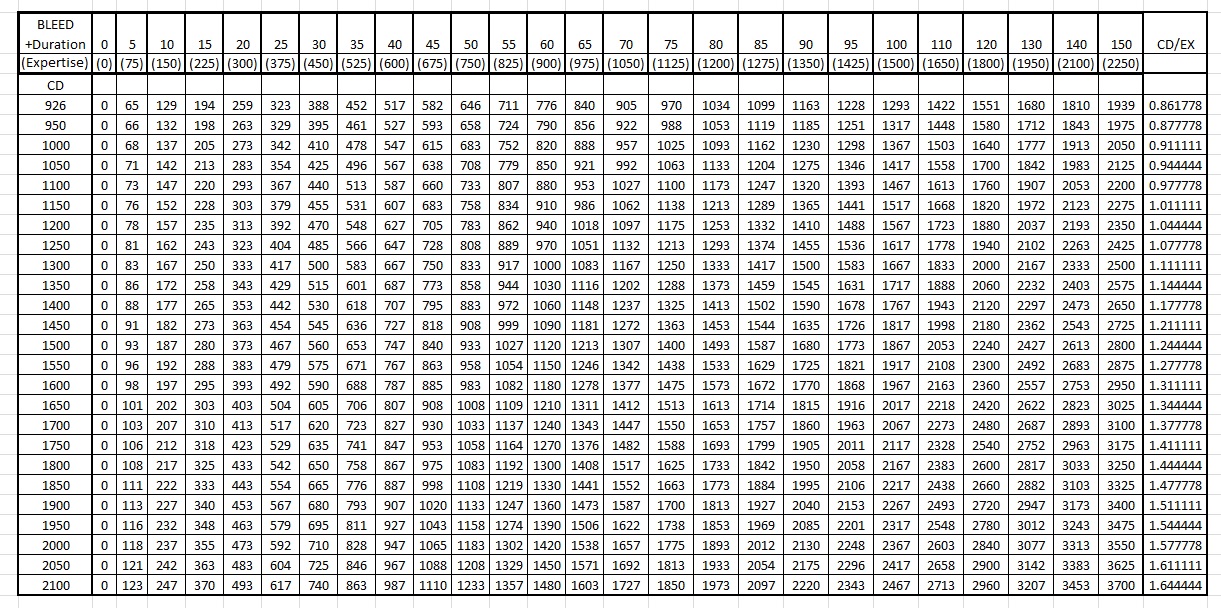
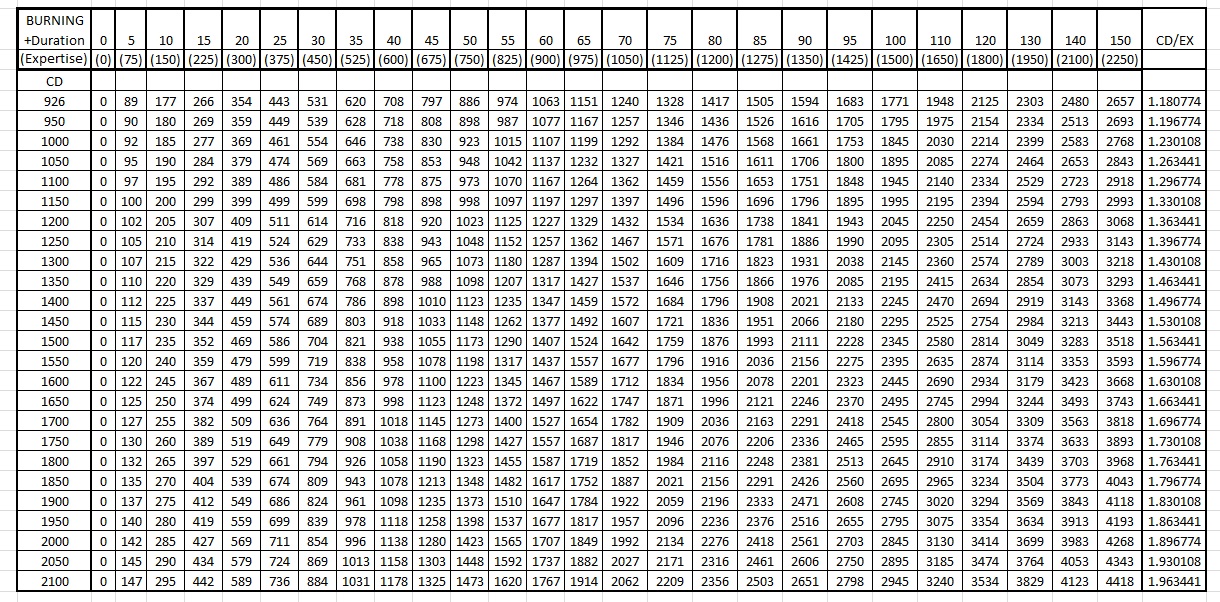
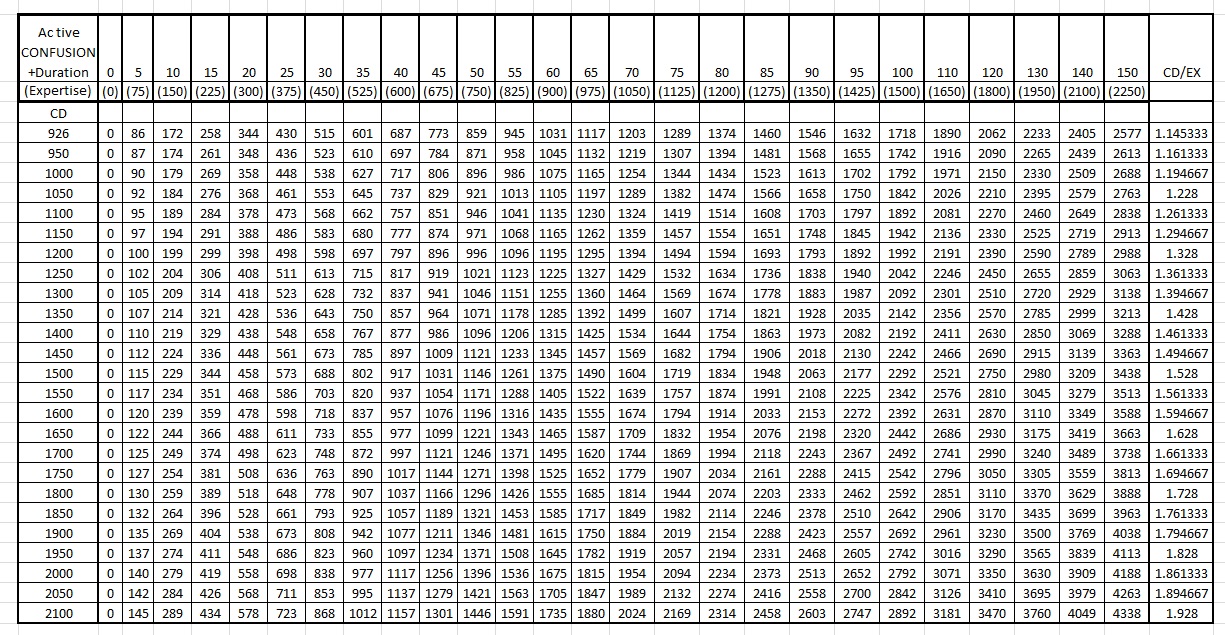
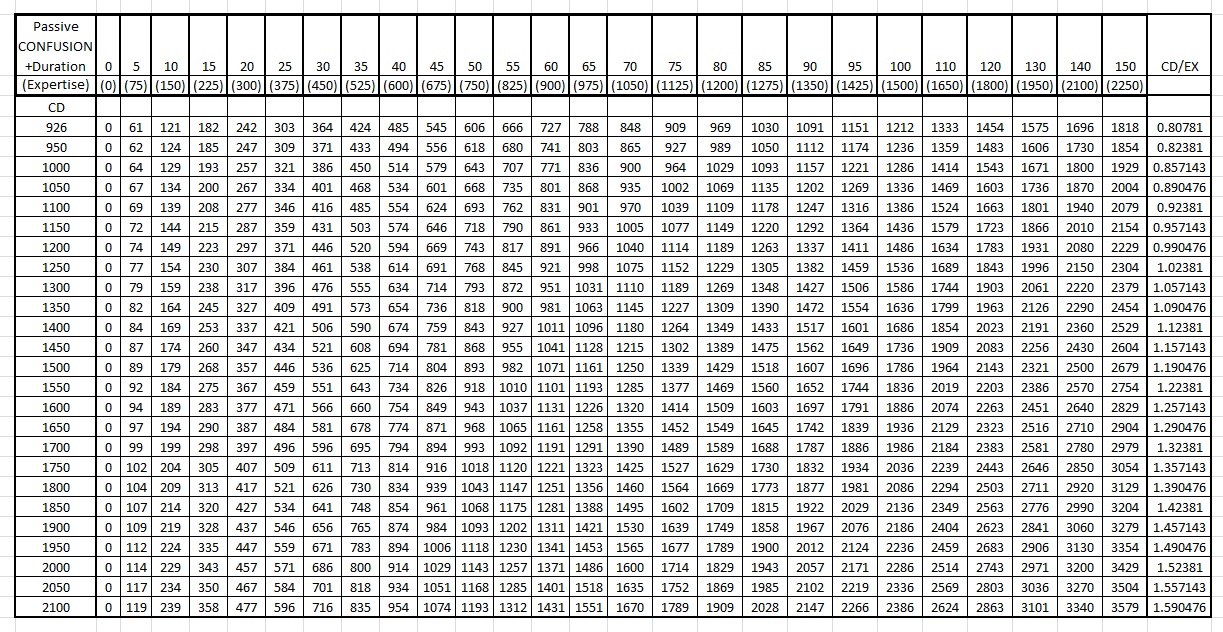
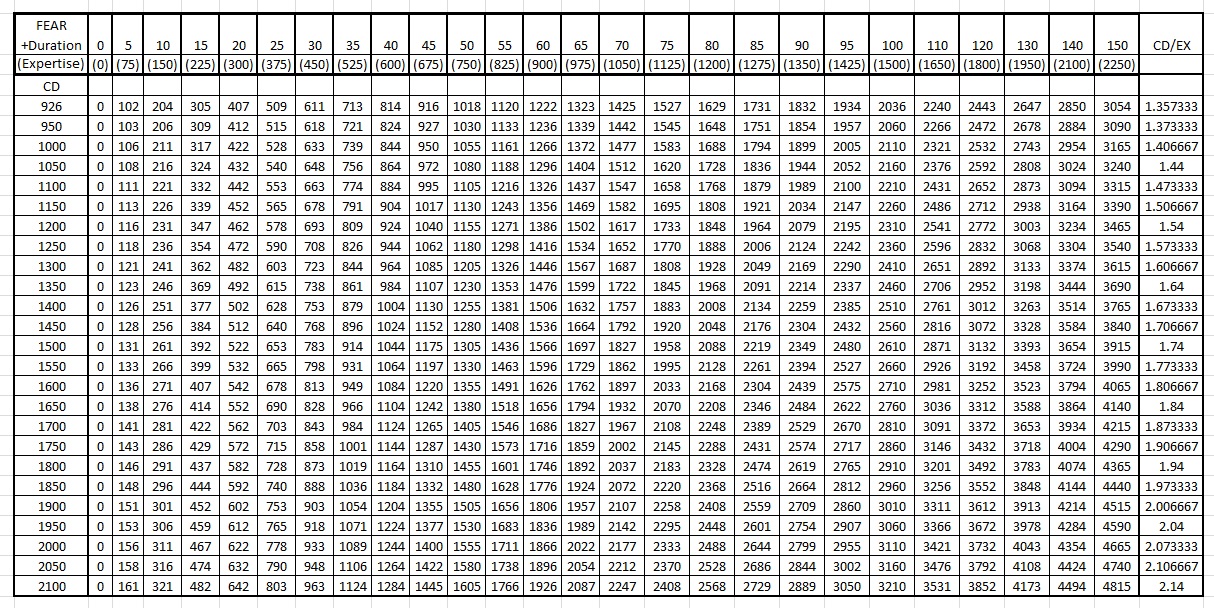
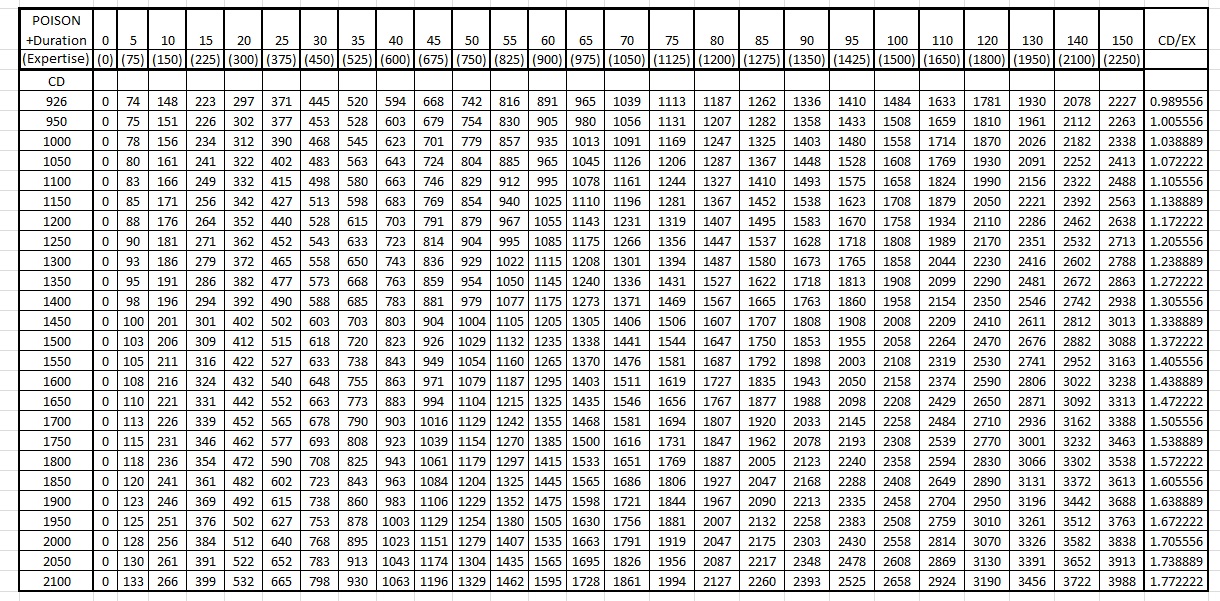
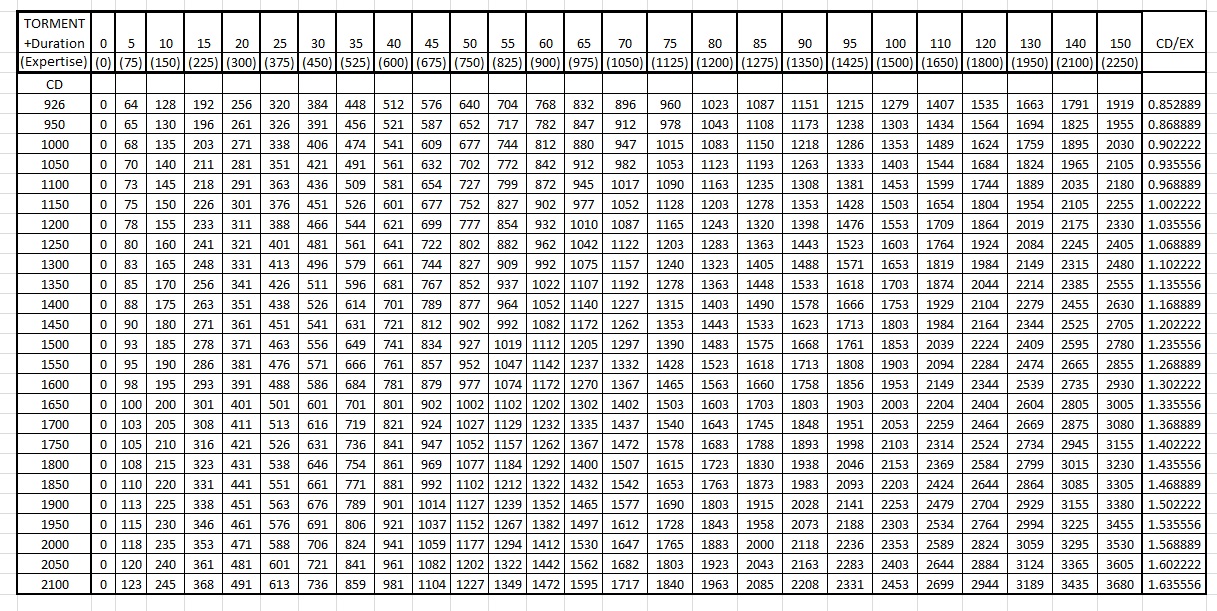
Charts[edit]
- Equivalence between Condition Damage and Condition Duration
- at Condition Damage CD, an increase of Condition Duration (%) is worth how much Condition Damage
- Bleeding (Also passive Torment and Confusion in PvE)
- Burning
- Confusion (Active Portion, PvP/WvW)
- Confusion (Passive Portion, PvP/WvW)
- Fear
- Poison
- Torment (PvP/WvW)