User:Yevuard/How to Lead Content
How to Lead Content[edit]
- Step up and do it
Useful tips[edit]
- Know the content
- Be comfortable and confident in your build - heals or boon DPS preferred if leading instanced content
- Be prepared to answer questions
How to train[edit]
- Cover a few key points - what makes this fight unique?
- Don’t write too much - it takes too long and people will forget it anyway
- Timebox - try a few pulls, then adjust as needed or move on. Don’t slam your face against it for a while, just try again next time.
- Ask "have you noticed anything you could improve on which could be useful to share?" after a few pulls
- Focus on positive outcomes
A longer useful reference from another experienced trainer.
How to LFG[edit]
This as much as anything is an art. Balancing being welcome and open with requiring enough preparation to be able to actually clear the fight, and have all players demonstrating equal respect for the time and preparation of each other.
I like to post for healers and boons exclusively at first, such as "Daily <strike> | LF 1x healany 2x boonany" - expecting to fill one of the healing roles myself. Comms don't have to fill a role other than comm if training, though it can make it easier to get the required roles. If any DPS join during this point I kindly advise them to rejoin later when we are looking to fill DPS.
Asking to show KP or titles can be effective, but: it doesn't filter for competence, and can exclude otherwise competent players. Similarly, asking to ping gear or builds can feel unwelcoming. One approach I've seen which seems reasonable is to ask people to ping "a three-word item" (or some other simple arbitrary request which requires some amount of thought) before entering the instance - this ensures willingness to read and follow instructions from the commander, without excluding anybody for lacking experience.
On the whole the training subgroup in LFG seems rarely checked, by experienced and inexperienced players alike - inexperienced players will sometimes try to join "exp only" groups to learn mechanics by failing them - a frustrating experience for most squad members. I've found some recent success posting "Daily <strike> w/brief explanation | LF..." in exp, especially for strikes which have very few people actually needing training. A brief explanation suggests that players new to the strike will get an essential overview of mechanics, and suggests to experienced players that they won't have to waste time waiting around for a long training - which means other experienced players will also join. Many seem willing, but do not check the training LFG subgroup. Many trainees (and semi-exp who have not been trained) don't check the training LFG subgroup, and would benefit from a brief explanation and callouts during the fight, as would be done in a training run anyway.
Standard Pug Squad Message[edit]
I would love to say "all welcome" to all content, but I really can't. It is not fair to those who come prepared in good faith to have to carry someone who has done no preparation and does not wish to learn that minimal preparation. However, justice requires rules. This squad message tersely provides a rubric by which painful decisions to kick may be made.
Please post role on joining.
DPS provides 10k+ on boss (=20k in aerodome).
Boondps provides 5k+ on boss and 80%+ boon uptime.
Healers provide 80%+ boon and health over 90% uptime.
Avoid damage then res downs then DPS.
Strike CM Pug Squad Message[edit]
Please post role on joining.
Familiarity with your role/build and the fight mechanics is required.
Avoid damage then res downs then DPS.
Advanced Common Game Mechanics[edit]
Players of high-end group game content need to be generally aware of these things. If you notice somebody repeatedly causing issues for the group, use a whisper first if possible. Otherwise, you may phrase it as a general “reminder”. Generally praise in public, correct in private.
- Preferred player priorities
- Avoid damage, especially telegraphed w/ground AoEs
- Perform mechanics which enable or increase damage, such as CC and reviving downs
- DPS rotation
- Restated: Avoid damage, Enable damage, Deal damage
- Implications:
- DPS has primary responsibility to revive downs (enable damage). Boon DPS second. Healers last - they need to keep healing those getting people up.
- CC is everybody’s responsibility: know which of your skills CC (enable damage)
- Generally stack tightly together to get healing and boons; even if you can damage from range doesn’t mean you should
- Circles
- Get out of circles w/a red outline. If the circle is filled in, even more so. If the circle has a fancy/spicy border, it will probably kill you.
- If a red circle is following your feet, drop it/let it trigger off group
- If a circle is following the feet of multiple people, do not let two (or more) circles overlap you or other players
- Only move enough to avoid overlap, then stop moving
- Share green circles with your group
- If you have a purple marker over your head, you are fixated and the boss will follow you
- "Experienced" usually means around 10-20+ clears and comfortable with the fight's mechanics. "Semi-experienced" means you've seen the fight and participated, and have at least 1 clear.
- Combo Fields
Commanders Should Know[edit]
Important Information
- A subsquad should have a healer which provides quickness or alacrity, a DPS providing the other of those boons, and 3 DPS.
- Also ensure might is kept at 25 stacks, and 25 stacks of vulnerability on the boss, and 100% Fury uptime
- Regen, Protection, and Resolution are all quite valuable and usually healing builds aim to maximize uptime of these boons
- How to broadcast messages to squad member’s screen
Useful information
- Calling a target only affects your subsquad
- Max squad message length is 199, max pasted line length in chat is 199
- Thief (and firebrand?) condi builds should often avoid sharing a subgroup, as they grant a damage bonus effect to subgroup players which doesn't stack
The Standard Squad[edit]
I use a standard squad to judge clear times of 20k for 6 DPS players, 0 DPS for 2 heal+boon players, and 0 DPS for 2 boon dps players. In practice, some DPS might do less, and so we set the boon DPS to 0 to average out. This also varies widely in fights if the DPS cannot be applied off phases, or if the boss has lower than average toughness, etc. In my standard squad message I require at least 10k DPS on the boss; half the standard squad.
Notes for Specific Content[edit]
These have the following sections:
- Copypasta blurb for semi-exp groups to remind of key mechanics.
- Important Information - this is what players new to the content must keep in mind. It is kept as short as possible so it can all be easily stated and kept in mind.
- Useful Information - this leads to mastery. Cover these if relevant during the fight or after 1-2 failed pulls.
- Notes for leaders - this is what you need to do to make the run successful
Strikes[edit]
General notes for leaders
- “IBS Fast 5” usually starts with Boneskinner in experienced groups as people otherwise may drop after the “easy 3”. I've listed these strikes in the common order below.
- In IBS strikes it is common to trigger the NPC ready check early to unlock the strike, then use a squad ready check for the actual ready check. This also works in SoTO strikes, XJJ, and KO. It does not work in AH, HT, and OLC however.
- Need Path of Fire to join Eye of the North strikes, but don't need IBS unlocks
- OLC is the only strike open to Heroic accounts, via Lion's Arch.
- SoTO strikes were targeted to be “EoD but easier”, and are easier than HT and OLC. Due to larger health pools, I suspect SoTO strikes have a higher DPS expectation for the "standard squad"
IBS 4 - Boneskinner[edit]
Dodge LEFT (clockwise) when it raises left hand/small danger circles. Stack tight on tag to keep floor clean. Dodge the jump back early to avoid the hit. Healers can't afford to hold much back.
Important information:
- Small danger circles - stack tight on commander tag and dodge left/clockwise
- Lifts its left hand just before too
Useful information
- Dodge just before Boneskinner jumps back, as the damage arrives a bit early
- Healers - the arena pulses damage, and quite a bit
Notes for leaders
- Fairly high pulsing arena damage + wisps
- Scourge running Blood has a very convenient low-cooldown downed player pull
IBS 5 - Whisper of Jormag[edit]
Don't kill friends w/chains - keep them short and hold still. Stack in greens, don't overlap foot circles. Avoid the balls/AoE ring around boss after 25%, and kill your reflection at 75% and 25%.
General mechanics:
- Stack on green
- Spread circles
Important information:
- Chains - don’t move left-right when you get one, they really hurt friends
- Last 25% the big balls and middle AoE ring will down you, avoid them
- Kill your reflection
Notes for leaders
- Necro flesh worm can block the balls if placed in the middle of the boss' hitbox, allowing relatively simpler DPS during the final DPS phase. Engi Mech may also work.
IBS 2 - Bears[edit]
Aim to kill both w/in ~10 s. Start w/Voice (bow), swap at ~20%. Rein in pets to cleave both at start.
Important information:
- Should kill both w/in around 10 seconds
- Start w/Bow (Voice), switch to Claw @ 25%
Useful information
- Chase the hot slice if you trigger the enrage mechanic
- Can cleave both at start if pets don't distract Claw.
Notes for leaders
- Switching at 25% means condi will bring it down to ~10%. Can switch later if running more power, but 25% is typical, and healers should be able to handle a short pie phase.
- It may be common to swap at 30%, but I find this is too early
IBS 3 - Fraenir[edit]
Stack in mid to not get frozen. Stack to the side the shaman flies to avoid a knockback.
Useful information:
- Stand in middle to not get frozen
- Stand to the left side of the ice golem’s back to avoid knockback sweep attacks
IBS 1 - Shiverpeaks[edit]
Teleport to the top with the beacon when it's ready. Stack up for heals and boons and practice your best raid rotation. If DPS is really good, we can skip the big attack at the end.
Important information
- Once someone completes the JP, there is a teleport to the top; icon like in Siren’s Landing (LW3-6). Take it when it’s up.
Useful information
- Invuln at 50% for ~10 s
- Gives credit as a giant kill
- Does the post-50% slam after ~30 s, so need to do around 195k squad DPS to prevent it; about 28k per DPS (+14k per boondps)
Notes for leaders
- It is rare (< 10%, likely < 5%) for pugs to pass the 195k DPS check
IBS 7 - Cold War[edit]
More kills means more reward chests. Prioritize champs when they're up. Save 'zookas for 'choppas, and be sure to spread out when Varinia calls for assassins.
Important information
- Do not overlap small circles when the boss calls for assassins
Useful information
- More kills = more reward chests
- AoE special action from killing Dominion Bombers (choppers) w/Charzookas
- Varinia Stormsounder’s named attacks repeat in the same order after she calls all five
Notes for leaders
- It is common for competent PUGs to get 6 bonus chests. The wiki says that up to 9 are possible; don’t set expectations too highly
- It is useful to put a marker roughly equidistant from the three spawn areas as a “home base” area where melee can run to for heals - right where the tank tread tracks turn
EoD 1 - AH[edit]
Aetherblade Hideout
Stack on commander for spotlight phase. Don't overlap someone else when you're given an AoE circle, and keep lightning off the group.
Important information:
- Spotlight phase - stack on commander
- Lightning off group
- Don’t overlap another character w/your AoE circle
Useful information
- Swap in extra CC
- Spotlight - bisect the circle into 60/40 from the attack. Stand perpendicular to this line in the larger half, around halfway between the edge of the circle and the line.
- Split at 30% original, 80%, and 40%.
- Special mechanic (spotlight or bombs) at 60% and 20%.
AH CM[edit]
Break square bomb, and run the X's to the other two. Pause, and swap if the group is covered. Kill the NE elite first, and stack w/your green group. Avoid shockwaves, which give you Exposed.
Important information
- Bomb phase - do not cross over the group
- "Avengers logo" mechanic - A
- Greens - split into 3 groups (boons/sub 1 dps/sub 2 dps or markers + float work)
- Kill the NE elite ghost first
- 2 lightnings now - stack together to S and W sides
- Exposed from shockwave and Dorito attack; jump/dodge and avoid
Useful information
- Reflect the spinning orbs to reduce damage pressure
- CC big boss when it's striking the ground for exposed and stun
- Taking two greens kills you
Notes for leaders
- Dark spot past Mai is where the NW elite spawns, for placing markers
- Standard markers are "1-2-3" left to right at start and around elite
- Comm is usually not an assigned spot to fill in an emergency
- Can also split DPS top sub/DPS bottom sub/heals and boons, esp if comm is heals or boons.
- Self assignment is typical though
EoD 2 - XJJ[edit]
Xunlai Jade Junkyard
Most floor AoEs "suck" and will kill you very quickly, as will Quaggan bombs. CC side mobs when Ankka is invulnerable, and if you get wight fixate, keep it off group.
Important information
- Floor AoEs which "suck" will kill you very quickly.
- So will quaggan bombs.
- CC side mobs phase
- If you get fixated by the wight, don’t lead it onto the group
Useful Information:
- Condi cleanse is great here
- Phase at 75%, 40%
XJJ CM[edit]
Quaggan bombs are slow and deadly. CC is critical. In the final phase, start far and stack tight. Dip into white circles to avoid debuff. CC spites first then kill eye. Stack tight to lead boss.
Important information
- Quaggan bombs are slower and much deadlier. Don't get bombed.
- Final phase - run to white circles occasionally to avoid stacking DoT debuff
- Start in the far white circle
- Hatred appears and tethers and stunlocks a player - CC and kill it to rescue your friend
- CC spites, then kill Eye
- Stack self and pets on comm to lead Ankka's jumps
Useful information
- CC is even more important - bigger bars, and boss buffs if failed
- Drop timed hands in the corners
- Lich is more dangerous - keep it off group
- Lich spawns in corners; treat as unsafe zones
- Careful with the snake heads - can knock you into deadly mechanics
- Ankka spawns extra small hands for each player out of melee range w/her - so stay close
- Ankka jumps over a random player/pet/etc - she can be lead to jump to preferred spots by controlling where the group stands.
EoD 3 - KO[edit]
Kaineng Overlook
Avoid Li's charge and the mech's blast. Mindblade fixate on group, Enforcer fixate off Mindblade. Spread if you get a circle around your feet. Numbers spread on the same wall or corner far from Li.
Important information
- Numbers - Li and Mech; don’t move, stack near each other, and downed/dead if between Li and number target
- Don’t stack circles; stay in slash area and dodge
- If fixated, keep mindblade and enforcer separated
- Li will kill you if downed and down you if not when he charges
- Mech blast
During the fight
- Ritualist/Mindblade/Enforcer
- Which sub goes Mech/Sniper (I adjust based on who’s alive, bigger sub mech)
Useful information
- Equalization between mech and sniper
- Mech rain really hurts, so don't stand in it
- Can CC sniper to stop sniping, and there’s an achievement for doing it
- Round 1 is corner to mid, Round 2 charge is clockwise, 3 is counterclockwise.
- Mech lazor is always towards the first player to load into the instance
Notes for leaders
- If you have a mech tank, can have the whole group focus on sniper for a slightly quicker (?) kill
- Announce if you have a mech tank or are splitting subgroups for mech/enforcer
EoD 4 - HT[edit]
Harvest Temple
Healers push ball, DPS kill crabs. Drop puddles at the edge. Face middle to jump Mordremoth waves. Avoid bees/goop from 2nd ball. Careful w/final ball - don't attack if it's moving away from you.
Important information
- Ball push mechanic
- Drop the two death puddles on top of each other, to the side. Middle during Mordremoth
- To jump the Mordremoth phase, face camera to the middle of the platform
- Final ball phase the ball must be balanced between sides
Useful information
- Beware hand slap, same as Soo-won in Dragon’s End
- Usually step left for Kralk
- Kill crabs during ball push
- Orb bees/puddle
- Rev tablet bubble is great for final ball projectiles
Notes for leaders
- Often Heals push ball, sometimes healers + boondps (supports)
- The Mordremoth phase and final ball phase are both training PUG killers.
EoD 5 - OLC[edit]
Old Lion’s Court
Surprise CC is bad CC - follow policy. Stack on blue's toes, don't let green pull you in. Hokey pokey w/Red - start IN. Death puddles on edge - a blue foot circle or furthest player from green.
Important information
- GRaB loot - puzzle phase solution
- CC policy
- Blue/green puddles - drop on edge
- Green pulls, blue pushes - stay far from green and close to blue
- Red circles - hokey pokey
- CC flips
Useful information
- Red - 4 swings then puddle w/a gong sound
- Need second kite during R-G phase and R-G-B phase
- Blue doesn’t move, blue fixate stay on group
- Proximity fixate - closest person to the spicy circle
- Green tether on furthest person
- Tanks keep B-G apart when both are out
- Does not require EoD - can join from LA w/o it
- Can evade green’s damage pulse
- Timings
- Blue foot circle - 2 s
- Triple Threat - 20 s, knight drops each second from start
- Green/Red/Blue support - 12 s
- Red Hokey Pokey - 4 s
- Blue push - 5-6 s
- Blue tether - 5 s to yoink/drop
Notes for leaders
- Assign green kite/red fixate (often comm)
- CC policy
- Nothing = Just puzzle - simple
- First 3 - teaches flip mechanic
- First 3 and reds during 40-10%
- More space, but requires group to be able to CC quickly
- Ranged CC is best
- Everything - prepares for CM title run, more Exposed, but running around out of position can cause messes
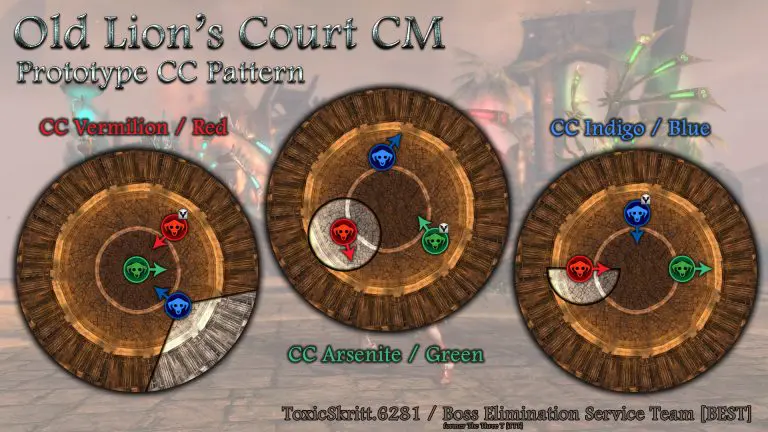
OLC CM[edit]
In CM, bigger puddles and failed mechanics boost boss DPS. Importantly, puzzle phases aren't fixed. Green in mid = CC red. Red facing out = CC green. Red/Green on mid line = CC blue.
Important Information:
- Puzzle isn’t fixed, starts w/puzzle
- Easiest to focus on Red's direction, most information earliest
- Red facing Green in mid - CC Red
- Red facing outward/equilateral triangle (none in mid, no mid line) - CC Green
- Red facing Green across mid - CC blue, lands in the green hot zone
- https://hardstuck.gg/gw2/guides/end-of-dragons/old-lions-court-cm/#2-puzzle-phases has diagrams
- No puzzle is repeated in a pull, so if you can remember which you've already CC'ed you can ignore those
Useful Information
- 13m timer, empowered +5% damage per stack if fail mechanic
- Bigger puddles, more HP/CC
- Start w/support - phase at 60%/20%/0%
- Drop green's puddles on red kite so they stack
- Common? to only CC the Red one when it’s supporting at 20% and attacking green (60-20% phase)
SoTO 1 - CO[edit]
Celestial Observatory
If the green arrow is on you hide behind the squad. CC matters. Use the floor pickups to kill the chasing red circle. Don't get hit by overlapping foot circles.
Important information
- Green arrow hide behind friends - stack
- CC is important
- Use white floor grabbies on chasy red circle - target it first
Useful information
- Boss takes a while to put down
- Spin attack is pretty painful
- Kill adds to make her vulnerable again
- Explosion every 25%
CO CM[edit]
Use 2 floor grabbies to make vulnerable (usually healers). 5 numbers as Li: spread. Stack all in greens. Phase every 25%. Kite Soul Feast away from group. Avoid spin projectiles. CC or die.
Important information
- Numbers as Li
- Overstack greens as AH CM; understack is wipe
- Floor pickups to break bosses damage invuln; more of them. 2 needed each time, 5 stacks each.
- 5 of mind control circles spawn - target icon over your head. Kite these off group
- CC or die
- Avoid spin attack projectiles or you are significantly weakened
Useful information
- Healers are typically responsible for the floor pickups
- Usually the special action lasts if you pick one up with < 10 seconds left on Dagda's purple vulnerabilty effect.
- Failing mechanics gives weakness and the boss shield... making the timer unreachable even if everybody is alive.
- Overstack greens is currently meta; probably can't for title when that comes out.
- CC evil friends to convert them back
- Min of 5? Between arrow and target
- Cardinal lines are safe from blast segments
- Time is locked to 3:07 AM; Sigil of the Night is a power DPS boost over Sigil of Force
- Stab is quite useful when killing the champs
SoTO 2 - TF/ToF/Febe[edit]
Temple of Febe
CC or the boss heals. At split kill big Envy, Malice, and Despair first. Spawn clones far back from the boss. Don't drop puddles near the boss. Stack greens. Bodyblock sucked orbs.
Important information
- CC or boss heals
- Wall = Envy = Top priority - corrupts boons
- Spawn malice clones back, don’t let them touch boss
Useful information
- 6 key mechanics
- Green circles (regret) - stack, even if 3
- Big circle blast (rage) - stay, dodge it, heal up
- Wall (envy) - CCW like Sabetha; corrupts boons
- Foot circles (despair) - drop far off boss; esp if big
- Orbs (gluttony) - body block; debuff does ticking damage
- Clone (malice) - move away so it has further to walk, then call target on it
- 3 are big first time, other 3 next time. Random by week which
- The big ones not killed empower the boss’s ability
- Always kill 2 big ones; suggested priority:
- Envy > Malice > Despair > Gluttony > Rage > Regret
- Envy - double wall + steals (instead of just corrupt) boons
- Malice - three clones instead of 1
- Despair - big puddles instead of small
- Gluttony - orbs - empowered the debuff which ticks damage is permanent
- Rage - unblockable AoE becomes unavoidable and bigger
- Regret - 1 green becomes 3 - stack all three
- Req 3+ players per circle, 5s
- 47,188,800 HP; standard squad of 120k DPS will take 6.5 mins to clear; longer due to non-golem mechanics. Call it ~8 minutes?
- Slow squad of 10k/dps would double this time
Notes for leaders
- Can do the mission ready check w/o starting it
- Always kill the big ones - use the priority list from the wiki above or make your own
- Envy, Malice, Despair, Gluttony/Rage/Regret don’t care. Can almost always get the first three (unless all come out together - in which case drop despair)
Febe CM[edit]
Notes from Snowcrows stream:
- Arrow on side glide in from. Circle 90 right, heart 180, behind.
- Unsure what other markers for - box halfway out at 90 left, triangle at 90 right halfway, swirl ~135 right halfway
- Squad DPS is around 250-300k; seems barely enough to clear.
- 6 condi virt, 2 qHeralds, HS, druid
- 4 virts appear to be burning malice clones, and have portals
- HS is locking down malice clones - slow at least. At around inner circle; cleave likely
- 30 s resistance can't strip/corrupt; have to spawn them far away for it to wear off
- Fight on markers for greens - assigned to groups. Comm (qHerald) and healers have marks - baiting greens, not perfectly. Distance?
- HS sand portal to avoid blast, then take it back in
- Mesmers portal to edge, malice clone targets take it then back
- Stack at circle for the bonus wall, right after main wall
- Kill Envy and Gluttony
- Stack circles close, dodge out. ~0.5 s before they tick damage?
- Grab every orb; healers go out during split phase.
- Need three to body block each orb
- Practice idea - kill only big envy. Not gluttony (orbs), rage (AoE), regret (greens), malice (shadows), despair (blast).
Fight progress
- Green 9:49, shadow (portal far back from arrow), spread, wall (slight left of arrow), shadow, spread, blast, bonus wall (stack circle, then opp), spread, wall (should skip this wall) - CC
- Envy - 80%, 8 m left
- Markers, bonus blast (walk out), spread while out, line (slight left of arrow), shadow, blast, markers, spread, spread, wall, bonus wall (circle, then chase first wall to opp circle), shadow, markers, blast, bonus blast, circles, CC
- Gluttony. 5:14 mins left, 50% left
- Markers, bonus blast, wall, shadows (swirl), blast (everybody swirl portal), stay and drop - port between swirl/triangle long line right, shadows (go far while dropping), drop again, stay for greens, bonus wall, wall, in and markers, bonus blast, blast, clone - all take far swirl fan edge, stay out for greens, drop line right dodge left to corridor, and wall run in, bonus wall - circle then opp, markers, blast, shadows, bonus blast, drop line S of arrow, markers, wall, shadows, drop - not triangle, blast, bonus wall, CC - 10%
- Drop fan by triangle, markers
Raids[edit]
W1 - Spirit Vale[edit]
Requires the Updraft Gliding mastery
Vale Guardian[edit]
Important information
- Blue circles cause random teleport; can dodge, can’t aegis/block (blocks must be channeled to avoid teleport).
- Red is only vulnerable to condi
- Blue requires boonrip to damage
- Must CC all splits at 1% to kill
- Platform gets spicy during the 2nd and 3rd phase, so follow tank
Useful information
- Toughness tank
- Green spawns in the slice VG is in, so from 33% to 0%, tank needs to move VG off each slice ASAP so the green isn’t on a hot slice
- Blue circles trigger after ? s; can dodge; tank should dodge back into arena wall
- If not on platform when the fight starts, instant death
- During split, being in wrong slice ticks damage
- Platform starts heating at 66% in the green segment, rotating clockwise every ~20 s. At 33% the green and blue segments are both hot, rotating clockwise slightly more often
- When doing greens, stand at an edge so TP circles don’t cover it if they spawn
Notes for leaders
- Two tanking strategies
- Big heals - ignore greens except during split, healers pressured
- Greens - tank takes VG near the green; movement reduces DPS from ground-targeted AoEs
- Split strategy - usually 2-3 condi to red, can instead pull red to blue and have someone off at green pull green as blue dies
Spirit Woods[edit]
Green Circles
Important information
- Stand in the green circles as they open
- Kill things as you do to reduce healing pressure
Useful information
- Around 20-21 of these
- More people in circle makes it close faster
- Mesmer portals are helpful, as are Rev Centaur stance roads
Anybody need the torch?
Useful information
- Stack behind a pillar on the left near the back of the room to draw in and cleave down all the enemies blocking progress
- There’s a torch on the back wall from where you come in; needed to unlock a bonus chest after Buttons, which chest is needed for Envoy I. Can’t weapon swap while holding it or it’s gone for the instance.
Run like the wind
Important information
- Run forward. DPS walk through green circles, support stay and close them
- DPS break the walls in front
- Jump and glide after 3rd wall
Useful information
- 7 circles; 1, 1, 2, 3 before each wall. Don’t miss the 3nd at the 4th wall.
- DPS stands in the 2nd circle of wall 3 to DPS it
Notes for leaders
- One strategy is to have DPS wait in the 3rd circle of wall 3 to close or until support catches up before breaking the wall
Buttons!
Important information
- 5 buttons; stand on all 5 at the same time to clear
Useful information
- Enemies despawn on clear, so mostly ignore them
- Buttons
- Niche by stairs to the left
- 2 up the stairs, along tree limb; JP success and in a hut for JP almost success
- Over the branch and straight
- Past that, in grave buildings along right wall, in a niche facing the wall
- 3 bonus chests - torch; bouncy mushroom to glide; then drop to Run balcony; on ground under balcony
Gorseval[edit]
Important information
- Kill order of spirits during invuln phases
- DPS check or wall strategy
- Finish CC at ~85%, ~45%, and ~15%
- Spirit traps/eggs during 33% phase
- Blue circles/golden orbs
Useful information
- Immobilize is useful during spirit phase
- If a big spirit reaches Gorseval during spirit phase, game over
- Can break wall and glide on updraft once each to escape world eater
- DPS check - phase, escape platform, or die
- Toughness tank, as Vale Guardian
- Should rejoin group during tantrum phase
- Rampage rings detonate after 3s giving 25 stacks of vulnerability
Notes for leaders
- Spirit kill order strategies
- Just kill things - may require a fair bit of immobilize
- Immune to hard CC
- Start ?, rotate CW
- Sub 1 kill two, Sub 2 kill 2 - move same direction so an Entangle can hit the late two
- Just kill things - may require a fair bit of immobilize
- Tank strategies
- Hold mid, DPS check - higher DPS, but no fallback if you fail the check
- Bring to wall to cleave wall - can escape world eater, but reduced DPS during movement
Sabetha[edit]
Important information
- The flame wall will kill you. No evade, no block, no invuln, no downstate. Dead.
- Anybody might get a foot green circle with a special action; must throw this to the canon lunch point
- They come in pairs ~5-10 s apart; if the first works, throw the second on the boss
- Need 2 DPS to canon jump + 1 backup jumper. Not healers, not boondps.
- Must CC Knuckles (2nd champ add)
- Bombs off group
- Platform bombs - interact to remove, everybody needs to do it
Useful information
- DPS race - platform dies or Sab dies
- The flame wall is technically a pulse, so if you are lucky to stand or dodge between where it pulses, you might live. This is very rare; don’t count on it
- Flame wall spins CCW
- The fight triggers by going too far along the bridge; the halfway point is safe. The fight triggers somewhere around the ¾ point.
- Green bomb throw range is ~½ platform
- Flame wall starts pointing at a random player, so best to stack together with backs to next canon launch point
- Need a flak kiter to keep flak off the group; ranged DPS or boon/heal
- Helpful for canon jumpers to have the Explosive Launch mastery
- SWNE-SNWE is the order of the canons; “sweenie snowie”
- Foot bombs are every 15 s, 2 at once after 50% - person closest to Sabetha gets this one
- Helps a lot if ranged DPS kills Karde’s flame turrets
- You can blink/shadowstep past flamewall
- Can bait green bomb - west-most player opposite launch point. Flak kiter should prefer this area
- Sabetha Timer or other timer is very helpful for at least comm and canons to have up
- Stand w/back facing the next cannon launch point (slightly CCW from it). Flamewall is predictable and in range to throw green.
Notes for leaders
- Roles to assign
- Jumper 1|3, Jumper 2|4, backup jumper, flak kiter
- You will probably need to call out which canon is next, in voice or chat
- Typical markers over canons are 1-4, starting S and going clockwise
W2 - Salvation Pass[edit]
Slothasor[edit]
Important information
- Blue circles - dodge or long knockdown, when the second (third?) one appears
- Slubling - don’t kill your friendly slubling
- Shake/coconuts - very high condi pressure, so dodge/2x dodge
- Random fixate tank - draw Slothasor down the path
- Poison w/special action key down the path a bit and against the wall
Useful information
- Turn and face the entryway so you can see better @ start when wall falls
- Shake projectiles appear to be blockable like TT Husks are - stand in the middle of the boss and activate a total invulnerability skill
- If a slubling, drop off poison before eating your mushroom, or it’ll drop when you turn
- Fixate also drops off slubs when they turn
- Slothasor sleeps every 20% and is invulnerable until CCed.
- Pull in slublings and cleave down on boss
- Can block projectiles from regular slublings; at 50% evolved slublings spawn w/unblockable projectiles which corrupt boons.
- The floor is poison - don’t stand on it
- Slublings - eat shrooms in straight line to next marker, then back and DPS
- Flamethrower - stack on butt, tank dodge into hitbox then back off
- Stack to control blue circles - not dodge into someone else’s
- Stability is bad for the fear - stunbreak, dodge, resistance
Notes for leaders
- Need to assign 4 slubling roles. These should be from the 6 non-boon DPS in the squad.
- Put markers over slubling mushrooms; 1-4 is normal, CCW
- I like to marker the slubling players with the same mark
- May be asked about eating outside or inside
Golden Slubling notes
- Despawns if held by any one player for 30 seconds
- Ineligible in emboldened mode
- Easiest approach is to have a dedicated player who tosses it to a designated player every 20 seconds - that player immediately tosses it back.
- When it's time to trade, stand away from the group - by wall, or in front of Slothasor are good.
- Bring a class w/profession skills and utilities which do not swap bundles.
- A third healer may be suitable
- Not: Firebrand, Engi w/any kits, Bladesworn, Ele w/conjurations, ?
- Feasible: Heal Tempest, Mesmer, Mechanist w/o kits?
Bandit Trio[edit]
Important information
- Knock down and stack beehives near S and oil near NE entrances.
- Use weapon swap to drop it w/o using it
- Don’t point Zane (2nd) at the cage - stack inside W entrance to avoid it
- Keep mobs dead and/or away from the cage
- To clear snipers, lower group sticks nose in SE corner of S doorway after clearing mobs on the field
- Which sub is clearing up and which down
Useful information
- Mortars and saboteurs need to know when they spawn; https://hardstuck.gg/gw2/guides/w2-salvation-pass/bandit-trio/#7-timer has a list of the times
- Mortars releases the upper Wargs on their way back to Zane
- Mortars just needs to CC as they’re setting up the mortar; the last wave has 3
- Can quickly CC the saboteur/mortars or just kill before it reaches the cage/mortar site
Notes for leaders
- Assign one player to mortars and one to saboteurs; the later needs the Nuhoch Stealth Detection mastery
- Assign a player to throw the bees and oil
- Standard split at the start is 1 up 2 down
Mathaias Gabriel[edit]
Important information
- Tends to focus the first person to the threshold - so wait for the reflect to go first
- Bring extra CC for sacrifices
- Corruption run to pools, poison (special action key) run to statues and drop off
- Avoid ghosts that run through group
- Invulnerable while barrier is up; wait for reflect to break it
- Don’t overlap foot circles w/a player in one
Useful information
- Be very careful with conditions near the sacrifice - high toughness, but not resilient to conditions
- Hadouken - during ice and abom phases
- Running around during water phase gets you knocked down
- Cloud does fairly painful damage
- Fight is easier by stacking in mid w/healers when possible; outer mid ring until sacrifices are done at 40% health.
- Poison is every 10 s only during heat phases; it drops itself after 8 s.
- Don’t reflect the circle of projectiles back to the boss or he does a lot more DPS
- Proximity trigger to start fight, but only quite close
- Melee focus occasionally swaps to furthest player
Notes for leaders
- Assign a reflect and backup reflect
- Usually markers on the pools clockwise starting from the door 1-4
W3 - Stronghold of the Faithful[edit]
Siege the Stronghold[edit]
Important information
- Back and front warg - kill Glenna if they reach her
- Mines - outer ring to uncover, inner ring is instant death
- Boss color mechanic
Useful information
- Hard CC (except float) doesn’t work
- The wargs do not run faster, though Prides in W4 do
- They run faster as they get closer to Glenna
- Tower capture - outnumber in circle; full wave respawn on last enemy death
- Glenna dies if fear stacks drop to 0 from 15 by not being near a player too long
- Except during boss phase
- Stack on uppermost stairs where warg spawns during boss fight to cleave warg w/boss
- There’s a bunny in a cave near the entrance that you can carry till after the boss for an achievement and bonus chest
- Still have 6-0
- Have to move Glenna to the white circles on the ground to progress the fight
- Mine inner ring kills everybody in mine outer ring too
- Mesmer or mesmer+healer goes through the tunnel to get to the first tower. Mesmer ports the party up to capture, then they pop back down. Needs some Poison mastery or other to survive in there.
- Wargs spawn on tower capture
- Mines respawn; back warg killer beware
Notes for leaders
- Assign one player to kill the back warg and another to be responsible for Glenna’s positioning
- Assign the tower team - mesmer, mesmer + healer, or etc.
Keep Construct[edit]
Important information
- Min of 2 per green circle or die
- Champions fixate - do not let two champs merge
- Don’t stand in pain puddle at feet of boss when it’s blasting out attacks
- Body-block balls of your color; use zone defense and stay close to the boss for heals
- Kill 2 champs on top of boss then CC hard
- Spread out big foot circles; fixate stays on top of boss (w/tank? or does tank move out?)
Useful information
- Glowey statue on wall is where next champ will spawn. Tank should drag boss there
- First one is along left wall from doorway
- Bring extra CC
- Toughness tank
- Tank cannot get fixate
- If two champs merge, just ignore it; groups can survive 1-2 on the field sometimes. It’s very important to not merge them though.
- Orb mechanics - pushed away from any attack that hits it, from direction of initiating player
- Stack mid during orb phase. Don’t hit the orb - careful of piercing and AoE attacks
- If DPS is low or CC too slow, should do the ghost mechanic - kill all ghosts of your color or die (can survive a couple still on the field).
- CM mode is not much harder - can’t stand right at the edge of the arena. That’s pretty much it
- Two champs spawn at the start, then a new one spawns each time one is killed after a delay
- You cannot block balls not of your color - they damage you and pass through you
- Orbs - 15 stacks decent, 20 risky, 30 deadly
Notes for leaders
- Assign one player to push the orb to rifts.
- Can help if you assign people to split locations
- CM is a fairly trivial upgrade over normal, and worth doing
Twisted Castle[edit]
Important information
- Stare at the statues so they don’t move
- 5 buttons to clear
- Dodge forward (don’t jump!) skip
- Don’t face your character towards the central pillar
- Have to kill the white mantle groups to progress - stay together and kill things
- Run through dodge roll doorway and all the way to the end; only need one to reach it
Useful information
- Madness - 1 stack every 5 s, or 1/s if character (not camera) faces the pillar
- Stability is useful
- Healers should heal the group before the dodge roll skip
- Usual path: https://wiki.guildwars2.com/wiki/File:Twisted_Castle_Guide.jpg
Notes for leaders
- Assign someone to skip (druid skip/leap) button, left button, and triple statues (doorway by the falling skip) button
- Skip needs a leap - Engi Rocket Boots, Druid Staff sth, Warrior Sword 2
- Guardian GS 2? is too short
Xera[edit]
Important information
- 99 stacks of derangement is fatal. Getting hit builds stacks.
- Stay out of the gravity well/jello/wall - 25 stacks right there
- Protection skill - don’t use early or late. Ground-targeted special-action skill.
- Buttons/orbs - coordinate who will do each. Usually button person does same orb
- Healers, Ranged DPS, non-ranged Boon DPS, then coordinate the rest
- Orbs go Clockwise
- Orb mechanics - pushed away from any attack that hits it, from direction of initiating player
- During platform teleport, you are responsible for buttons/orbs, even if you weren’t before
- During “glider boss” phase, have to kill the crystal to move on
- Press and hold jump - it will deploy your glider as early as possible that way
Useful information
- Standing near a crystal when it breaks cleanses a few stacks
- “Clear heart” means killing 3 crystals
- The crystal AoEs pulse condition to boon conversion on Xera
- Orb is easy if you knock it outward once, then clockwise twice into the rift
- Blurred frenzy after every 9th AA (so, 10th, or is the 9th?)
- Tank positioning guide: Xera tanking guide.pdf
- half-circle AoE rotates ¼ turn each time, CW first phase, CCW second. Crystals spawn in the opposite direction as AoE rotates
- Laser + orbs every 60 s, so need to pull to the edge to avoid them
- Healers should usually take the portal back if teleported to the side platform
Notes for leaders
- More common tanking pattern/guide https://imgur.com/axqJHq0
W4 - Bastion of the Penitent[edit]
Cairn[edit]
Important information
- Agony off group
- Mini red TP circles
- Greens
Useful information
- Stand inside middle circle to avoid knockback
- Pool noodle attack
- Furthest person gets agony
- Running - stacks
- No reflects
- Shaders must be medium or higher for this fight
Notes for leaders
- 4 markers, at edge of fancy circle in middle
Mursaat Overseer[edit]
Important information
- Spikes
- Lit floor
Useful information
- Roles
- Claim - tank and clear glowy floor w/special action
- Protect - soldier tank
- Dispel - remove invuln from soldiers
- Best if ranged DPS, can kill soldiers
- Fight starts when last role claimed; usually dispel
- Spikes stab up in 5 s
- If gliched (arena pulses damage and boss doesn't heal), can possibly grab the 3 roles and quickly kill
Notes for leaders
- Assign roles
CM changes
- Blues - kill in 4 s, based on boss HP
- For CM, optimal DPS may be 150-170k to keep blues nicely synced
- Or just kill it
Samarog[edit]
Important information
- Friends/Donuts/Spoons
- Shockwaves
- Stay behind boss
- Bring Extra CC
- Fixate stay in mid
Useful information
- Tank is furthest from Samarog when CC is done
- First tank is the second person into the arena
- Spears
- Alternate Firebrand Sanc
Notes for leaders
- Useful to put markers to left and right of Sammy’s nook; gather at the one to your right facing Sammy during add phases
- Assign pusher
Deimos[edit]
Important information
- Pizza delivery
- Do NOT trigger oil
- Mindcrush ward
- Greens
Useful information
- Nice to break all 4 statues at the same time
- Close tears (don’t use up aegis, but damage)
- Prides
- Most people take green
- Don’t hard CC prides - they speed up
Notes for leaders
- Assign a Hand Kite
- SAS - ask these experts about the role
- Krug - Soulbeast
- Nihilist - Spellbreaker
- Seraphina/Yacob/Jared? - Herald
- SAS - ask these experts about the role
- Toughness tank
CM differences
- Saul stays in the box and can't be healed
- No ward - must have subgroup aegis
- TODO - anything else?
W5 - Hall of Chains[edit]
Soulless Horror[edit]
Important information
- Walls
- Don’t CC the TD. Don’t kill the TD on group.
- Edge
- Avoid TD puddles
Useful information
- Swap in extra CC - CC or die
- Teleports are extremely useful when cornered by a big wall
- 2 tanks - the off-tank is where the Tormented Dead goes
- Tanks swap via special action key; typically after two TD kills
- Tanks should lead SH over the flesh wurms to cleave them down to reduce damage pressure
- The scythe corrupts boons to conditions
- Every other big splat AoE there’s a CC right after (I think, instead of HP levels)
- Pusher/Tank
- TDs start to spawn 20 s after 90%, then every 20 s
- Swap tanks at 90%, then every 2? TDs
- Tanks try to stay at opposite sides of platform - usually healers for self-sustain
- Platform falls at 90%, 66%, and 33%
Notes for leaders
- Assign a pusher and 2 tanks
- It’s useful to put a marker over the two tanks
- Can be useful to put 4 markers on platforms for calling moves in voice comms
River[edit]
Useful information
- On ready advance group jackal dash 3x then leap (1)
- Escort group starts encounter right after the leap
- Escort DPS kill rifts - 10 hits to close them
Notes for leaders
- Assign escort group. Healer + Superspeed seems good stay back to escort, the rest clear in front
- Might need a 3rd healer so there are two in front
Statues[edit]
Important information
- 3 bosses, distinct mechanics
- Statue of Ice - Ice guy - toughness tank. Catch greens. 4th stack downs you.
- Statue of Death - Mouth guy - toughness tank. Punch til ~50%, kill spider to get gold orbs, throw those to glowy domino, kill, repeat from spider. Greens people need 5, can leave arena to go down instead of dead. Don’t grab two gold orbs at once.
- Statue of Darkness - Split area - 1 N 2 S. Give lui to somebody to mark the other eye.
Useful information
- Statue of Darkness
- Per wiki, avoid Daze, Fear, and Knockdown on the eyes; other CC is good
- Know what CC your weapon skills do
- Minotaur can be avoided if the eye is kept stunned from 71-55%
- Designated stunner triggers flare right before stun wears off on eye
- Healers can take Sigil of Paralyzation
- Ranger/Druid Marksmanship -3- gives longer stun
- Ele - air
- Stunner typically also does group alac
- Don’t move while using 2 or it cancels
- Collect 3 orbs before beginning
- Statue of Death
- Goal is to collect 20 red orbs; eater vomits 10 per revive - then kill
- Must collect 5 orbs w/in 30 seconds or die - can dash out to be downed instead
- Green controls are like the SAB bee race
- Puke - if he looks anywhere but the tank, puking. Shows very late.
- Targets the closest non-tank player - so can bait it like oil
- Statue of Ice:
- Aim for 10-13k DPS, boondps for 5-7k DPS. Squad DPS 70-92k.
- Getting frozen (4 stacks of debuff) seems to trigger T pose bug
Notes for leaders
- Statue of Ice
- 45 seconds/stack of green, 49 total greens, 9,831,000 HP and 10 players in squad. Enrage timer 3.5 mins.
- Min squad-wide DPS: 47k (nope, 43k? timer pauses at 1%?)
- Max (unsafe) squad DPS: (19 stacks need to wear off, so time to get to 62% + 45 s from 62% to 1%) 135k dps, clear in 72 s.
- Note, 6 DPS players should generally do 20k each pretty easily, though running around chasing greens/downs/etc means this’ll be hard to hit, esp w/o missing a green
- Could go faster if you let everybody freeze at the end…
- Safer and fast - everybody has 2 stacks average: (29 stacks need to wear off, so time to get to 42% + 45 s) 92k DPS, clear in 107 s.
- DPS should try to hit ~13k each, boondps ~7k each
- Safer - 1.5 stacks average: (34 stacks to wear off, so time to 32% + 45 s) 70k DPS, clear in 141 s
- DPS should aim for ~10k each, boondps ~5k each
- Conclusion: DPS aim for an average of 10-13k DPS, boondps for 5-7k DPS. Squad DPS should be 70k-92k.
- Statue of Death
- Can do sub 1|2 for the greens, or assign a couple players, etc.
- 0/0/5/5… is one approach. 2/2 is another.
Dhuum[edit]
Important information
- Small dip
- Big dip - back to the wall
- Chains
- Bomb
Useful information
- The spiders tend to focus on star/doorway, so have a DPS clear them off (often G1) and send heals there occasionally
- Chain - two people closest to Dhuum. Throne/Door - call. Yellow screen border.
- Greens - 5, try to get the big one - if not say something so tank can adjust
- Tank - typically stay put in NW unless adjusting for a missed big orb
- 2 steps clockwise from where the person who missed it went up
- G1 clears star after going up
- Bomb is deleted by big dip, and irrelevant if going up
- 75% at big dip is enough to kill
- Final greens - you have 15 s up there
Notes for leaders
- Assign G1, G2 + messenger kiter, G3 + tank, and someone to do the first G2 for messenger kiter
- Can also make these dedicated roles - though tank should probably still heal
- Mark CW starting from left of Dhuum’s throne, facing it
- Its better to put markers in front of the circles instead of on them, so the reapers don't cover them
- Prepare to call out timings for the various fight mechanics
- This is probably the most difficult non-CM fight in the game, though Q6 may be harder
- https://imgur.com/a/CRlTLts - times
- I like the timer at https://gw2raids.info/timers/dhuum/
- BlishHUD’s hero’s marker pack can help w/your hitbox and put up a guardrail around the bugzapper
- Also hitbox viewer, esp useful for higher ping people
- Hero’s Marker Pack: https://github.com/QuitarHero/Heros-Marker-Pack/releases - download the zip from assets
- Tank path: https://cdn.discordapp.com/attachments/978072435863736330/1143749529829658714/6cf51d1540c67800c33260ecdd698bbaa24e749d.png
W6 - Mythright Gambit[edit]
Conjured Amalgamate[edit]
Important information
- Don’t let swords and shields merge; pick them up and use the swords
Useful information
- Can damage boss during the junk wall, etc, so keep pouring it on
- Orb phase/boss damagable starts when an arm dies
- Clap - needs shields
- First junk wall spawns right, second left (side of most recently destroyed arm)
- Shields spawn mid-S to N then back and have a ring around them. Swords mid-N to S and don’t.
- Looks like swords give 50% super vuln per sword stack, so use them
- Spawns mobs when he slams
- Hold swords to hit shields and cleave arm w/it
- Swords have an AoE damage ring. Shields chill.
- Solo swords - grab 5, use immediately, then next 10
- Two, sword one grabs 5, uses, then stays on stack
- First clap @ ~7:11; three smashes then clap if two arms. Clap @ 25%
- Junk fall alt every two smashes
- Jackal is a bad choice to get over (hard to control, req 2 and starts the fight if you jump from the edge). Raptor w/Canyon Jump is intended, but can lean-glide over.
Notes for leaders
- Assign 2 people to grab shields during the suck phases, and 1-2 to grab swords
- First person shields wall, second person shields clap after second wall
Twin Largos[edit]
Important information
- Drop Nikare’s spreading death puddles on the South of the platform, together
Useful information
- Nikare is W/left (sub 1), Kenut (sister) is E/right (sub 2)
- Nikare
- furthest, furthest, tank - every ~22 s
- Death puddles every 14 s w/5 s to drop, Float every ~13 s w/2 s tell
- Kenut
- Kenut steals boons after she disappears - don’t get hit, every ~25 s till 50%, then ~21 s
- Aegis/block/dodge, ~1 s later
- Targets furthest?
- Kenut water wave - jump/dodge - every ~22 s, 1 s warn; multihit, so block less effective
- Usually next attack after boonsteal
- Kenut steals boons after she disappears - don’t get hit, every ~25 s till 50%, then ~21 s
- 1374 Toughness, 120 unit hitbox; 2 mins to defeat
- Kenut 15,877,066 HP = min 11k per DPS, 33k group
- Nikare 17,548,336 HP = min 12k per DPS, 37k group
Notes for leaders
- Make sure to balance DPS between groups
- Enrage = double damage if one group moves on too fast - so coordinate kills
- Low toughness means power; but motion means condi. Condi fight.
- Split strategy w/dual tanks is common; can also portal or glide back and forth w/single tank, but enraged sibling
Quadim[edit]
Important information
- Where to not stand
- Don’t shoot the lamp early
- Be very careful of pierce - don’t face lamp
- Everybody has a role. Know what yours is.
- Shockwave is most dangerous attack other than CC-or-die; can jump

Useful information
- Lamp players commonly spam mount action to indicate w/o a mic to break lamp
- Run towards the lamp at the start when Quadim says "water djinn"
- “Players in the creature’s hitbox during the second creature specific attack will be teleported to Quadim”
- 2 basic attacks, then either CC attack or the attack which TPs you
- Bite-bite breath, bite-bite break, bite-bite bounce
- Need lots of quick CC this fight
- Q6 CC - hits you with the damage you did if you fail the CC. So - not strictly CC-or-die
- Zomorros does 75% total (25% per hit, back and forth) to each Wyvern
- Kiter should know Quadim's attacks
- Kiter can leave Q when Zommoros shows up there
- Final Q phase at 15% - after the JP just close in and kill
- Mat tank keeps her facing away from the group
- Can portal from pyre guardians to Q
- Mesmer focus pull after first shockwave to kill slugs
Notes for leaders
- Assign 3 tanky people - Quadim kite + add slayer, creature tank, other wyvern (Matriarch) tank
- Assign 1-2 lamp people - usually 2 for the final lamp
- Assign pushers (/pulls) for the 3 slug groups
- Have pushers help w/pylons, and pylons help kill elites
- Assign the rest of the DPS to break the side platforms
- Lamp group can go S, qKite to protection - north west
- Common strategy - split sub 1 and 2 NW/NE of central hex - only kill those two, portal back to Quadim, then burn. Pull in the elementals for some reason?
- Pull in eles to separate from slugs, then they die to cleave
W7 - The Key of Ahdashim[edit]
Gate[edit]
Useful information
- Kill the 3 champs after door worked on to open w/o waiting for defense timer
Notes for leaders
- Assign two players to guard Glenna while the rest follow you to kill the champs
Adina[edit]
Basalt Arena Common first boss
Important information
- If not pillar bait, stand almost on boss’ toes - at least w/in middle green hex
- Get behind pillars
- Sand wall is instant death - one full circle, where to meet up
- Basic pillar bait mechanic, in case of downs or poor positioning
Useful information
- Reflect helps between hands and party (projectile destruction too?)
- Stack pillars if reduced players
- Mount up at start to avoid a bit of initial damage
- Toughness tank
- Keep boss facing stairs
- Don’t run over mines - jump or dodge
- Don’t place mines on mines - 3 s cone follow
- Beware knockback - orange AoE, 2 s.
- Can’t pillar bait
- Simple to run through mid after each reconfiguration phase
- Eye gives 2 s warning - move asap to not get blinded; then 4 s spread AoE - 6 s total
- She reflects damage once the eye appears
Notes for leaders
- Assign 5 pillar baiters
- Useful to mark the pillar spots, possibly the baiters w/same
- Warn to be aware of relative location - 1st CW, 2nd CW, 1st CCW, 2nd CCW, 3rd CW/CCW
- Turn off melee attack assist if not a pillar baiter
- 22,611,300 HP w/1374 toughness; to phase (25%) w/only 1 pillar drop (30 s)
- 188,427 squad DPS, or 31.4k DPS per DPS
- 2 pillar drops is a relatively easy ~15k DPS per DPS
- 8 min enrage timer
- We kill hand of erosion, then eruption, then erosion then eruption
- Eruption's attacks knockback and are projectiles. Erosion is not a projectile
CM
- Fall into sand = death
- 3 way wall instead of 2
- Pillars make permanent hole w/sand = death
- +~2.2 m HP
Sabir[edit]
Fractured Conservatory
Important information
- All spicy tornadoes are instant death
- Jump using tornadoes only before AoE pulse
- Where to stand to avoid tornadoes
- Safe bubbles
- Coordinated vs free CC
- Spread after free CC
Useful information
- The wisps on side platforms during final phase can wipe groups; best to manage them
- Wisp person does need to get to safe zone?
- 5 AA by boss charges your special action key = 500 CC + TP
- Can use special action to TP to dodge shockwave since you lose it anyway
- Phase
- 90% 15,000 CC
- Phase at 80%, 60%
- 75% is first wipe AoE
- 70% 15,000 CC
- 65% next wipe AoE
- 17 s after 60% start, coordinated CC 2500 = 5 special actions
- Does more damage and takes less the longer unbroken
- Big twister at 50%, and the safety zones start
- After each, wait 10 s then alternate wipe AoE + coordinated CC and safety zone
- 40% + 5 s, extra wisps spawn every 40 s. CC 600, spawn friend at 32 s.
- 30% platform 2
- 30% instead of coordinated CC next is a free CC
- 20% platform 3
- 10% platform 4 (can ignore this one, you’re at 10%)
- 29493000 HP
- To clear from 40% w/in 45 s (so no second wisp) requires 262k squad DPS, or 43.7k per DPS. Not happening.
- Try 20 s per 10%, kinda stagger wisps? - 24.5k per DPS. Harder, but doable, but not counting CC phases.
- Toughness tank, but stack together so irrelevant
Notes for leaders
- Organize a plan to manage wisps - bursty DPS w/CC to kill, or reflects, projectile destruction, etc
CM
- 5 lines instead of 3, 6 s really hard to res when downed, bigger coordinated CC bar, extra wisps on main platform (epi or go kill), +~3m HP
Quadim the Peerless[edit]
Important information
- Assigned death puddle drop positions - right first facing out - clockwise, then the other
- CC your assigned pylon
- Avoid knockback blasts
- Lightning strikes 3 times, each bigger. Off group. Orange screen border.
- Jump the sharks
Useful information
- Pylon kiters likely need some defensive/healing stats in gear
- Pylon kiters need at least 2 TPs/jumps w/min range ?, or a TP/jump and portal
- Every 5% except 80% and 60%;
- Healers should toss heals on Pylon kiters occasionally
- Pylon kiter role
- Must have good range 2 TPs/leaps
- Orbs spawn CCW from prior pull - start NE
- Ranged CC anoms in death puddles, near end just CC and kill
- Arrow attack - jump/dodge over it three times. Don’t blast party. Jump as soon as hits the ground
- Tank
- Never face Quadim towards a pylon or where the ball will fall. Need the carpet attack to go between the pylon and the circle where the ball falls
- Alternate on north side
- 20% needs to be first one in
- Pylon CC = 1000
- Entropic Distortion CC = 400; in 2 stacks of dropped lava
- 75%, every 40 s CW
- From 40%, every 30 s
- Bad tethers - 2 stack near tank opp side from group; last phase - pylon kiters
- Tank walks in, 2 kiters walk in (N, SW, SE deserves a break), then squad
- Pool party req 4 people, but not to kill the boss
- 47,188,800 HP, 12 m enrage timer (min of 11k DPS per DPS; double damage)
Notes for leaders
- Assign a toughness tank + 3 pylon kiters
- Assign remainder to starting pylons
- SW pylon needs good ranged CC
- SE pylon needs prolonged sustain
- Organize grab
- Pylon orb strategy: take CW (typically) or CCW
- Warn re boonrip on QtP
- Place markers for dropping death puddles
- Hardstuck: CW first, then CCW, equidistant from pillar to orb spawn
- Usually mid CW first, then inner CCW
- https://hardstuck.gg/gw2/guides/w7-key-of-ahdashim/qadim-the-peerless/#9-advanced-fire-deviation
- Distortion walks:
- 80%: from NE CCW to N, other two to SW
- 40%: from NE CW S to SE, other two same
- 30%: NW straight in, other two to SE
- 20% all straight in
- Test pattern
- 80%: inner diamond bracket SW - SE pylon drops pretty far out though; inner diamond CW from N. SE only pylon disrupted
- 60%: all midpoints of SE; N, NW disrupted
CM
- lighting leaves fire puddles where you walk… - TP away or run straight away from group to make a line
- Twisters in outer ring
- Stack in S and share stability to not get blasted out at 40%, 30%, and 20%
- Then collect 5 golden orbs then lifted player special action or wipe
- +~4m HP
Fractal CMs[edit]
Generally in Fractals, if there is a mechanic which takes a player away from the group, the Alac provider is responsible for it. This is because alac has a smaller impact on total DPS than quickness does, and they aren’t a full DPS. This applies even if they are an alac healer, though this can lead to a preference for a quickheal if heals are desired on group.
Alac handles (probably not complete)
- Pete’s canon in Siren’s Reef
- Artsariiv’s ball in Shattered Observatory CM
100 CM - Silent Surf[edit]
TODO Important information
- Drop medium foot AoEs away from group
- Use special action bundle 1 to jump to side islands if you hear dialog and see add there and kill it immediately, then bounce back
- Requires bouncy mushrooms mastery and zipline mastery ?
- Healer don’t bait a platform
- Can swap tether - don’t let healer go
- CC continues w/o recharge if you miss
- Axes target the closest player maybe?
99 CM - Sunqua[edit]
Title: Dances with Demons
- Can’t get this if you /gg between phases, which is a common strategy to change builds
Important information
- During dark fight, supports CC the first (66%) Sorrow, then (33%) CC the one left of the Guilt and DPS CCs the one to the right
- Don’t get touched by the Fears
Useful information
- No pre-boon
- First phase is essentially the same
- Fire meteors, go to the empty hole then walk clockwise as needed. Useful to have somebody drop a portal (white mantle) in mid first, then place entrance as the meteors target two players. Take the portal in mid just after the shockwaves pass the middle of the arena
- 2 remain, attack until on gets an AoE ring then stand next to and in front of the other one
- Water, run/portal to mid, then swap tether at 5-7. Tether spawns clockwise at cardinal directions
- Fire meteors, go to the empty hole then walk clockwise as needed. Useful to have somebody drop a portal (white mantle) in mid first, then place entrance as the meteors target two players. Take the portal in mid just after the shockwaves pass the middle of the arena
- Sorrow CC is 1500
- Many groups /gg after light phase to change builds to bring more CC
- Strategy
- Light: hold CC in mid as long as possible, to try to kill w/o mechanics. Decent DPS (~25k each) should be able to do this w/o issue
- Dark - CC every other breakbar at wall
98 CM - Shattered Observatory[edit]
Title: Leaves no Hero Behind
Skorvald[edit]
Useful information
- Can save a bit of time by portaling to mid from the last island
- If you don’t CC at all during the 66-33% phase, you can CC at the start of the 33% phase and kill easily w/minimal mechanics
- Stab is very nice on the islands; should give 2 stacks each
Artsariiv[edit]
Important information
- Need to kill the anomaly to spawn the bubble before chasing the boss
- Don’t stand in the spicy line AoEs
- Don’t face the boss when there’s a line between you and her to not get feared
Useful information
- Usually the alac provider does the ball
- Use the special action key, it’s refreshed when bouncing the ball
- Bring extra CC for the clones phases
- Reflect/projectile destruction and stability are useful when attacking boss in corner
- Dead players automatically respawn after clones phases
Arkk[edit]
Important information
- Must kill the anomaly to spawn the bubble
- Be in the bubble before exploding
- Don’t get feared, as w/Artsariiv
- Take your ball clockwise
Useful information
- Spread to cardinal directions/midpoints to get the ball fixates. Can run to the pillars then dodge back when the ball gets close
- If you use the special action key just as the small ball over Arkk’s head disappears, you’re in the air and don’t create death puddles and avoid the knockback
- Stability is useful during the last phase - lots going on and the floor falling out
- Use reflects, not projectile destruction if not using the special action key to dodge the balls. Projectile destruction still drops the red death puddles.
Notes for leaders
- Helpful to assign a DPS (not boon DPS) to kill the anom every time it comes up
97 CM - Nightmare[edit]
Easiest CM fractal
MAMA[edit]
Important information
- Stay out of the persistent red AoEs left by MAMA when jumps (just one if good DPS)
Useful information
- Slightly better to not /gg if going w/a condi party.
- Stability/Vigor are nice during this fight, lots of knockbacks and knockdowns
Altars[edit]
Useful information
- Pull/aggro the elite krait and kill them first
Siax[edit]
Important information
- Place personal markers at cardinal directions - DPS take 3, boondps and healer take the other
- Kill the one in that direction at 66%, then the one clockwise from there at 33%
Useful information
- Fast CC helps reduce damage pressure
- Best to stand inside Siax during the CC phase
- Marker - alt-leftclick on minimap
Ensolyss[edit]
Useful information
- Basically the same as non-CM
- After each circles phase, stability and fast CC are very helpful
- Dead players respawn after control point phases - do not resuscitate
- Flanking (esp behind) avoids most boss damage
Open Map[edit]
TT[edit]
Triple Trouble
Important information
- Need ~5+ to escort; If the escort fails, the event fails
- Must kill all three heads at the same time, so listen to the squad leader
- Crit is at ~15% - stop attacking the Wurm and wait for synchronized decapitation
- Don’t do mechanics unless told
Useful information:
- Achievements during the escort
- Egg Scrambler for all
- Cobalt - Kleptomaniac
- Crimson - Phytotoxin Enthusiast
- Amber - Bait
- Distinct mechanics
- Cobalt - run kegs to the arrow near the base of the wurm
- Crimson - fill extractors by picking up colored clouds and dropping them off
- Amber - kill husk, stand in AoE to get buff, stand in front of wurm to get eaten, grab the harpoon, shoot the valve, and save the last shot to hit the wurm once you’re regurgitated
- Amber fails the most often
Notes for leaders
- Place markers at key mechanics, and roughly where to get the achievement during escort
RIBA[edit]
AKA The Silverwastes
Important information
- Cap bases in the order Red, Indigo, Blue, Amber - RIBA
- Cycle in this order to farm events and keep the bases until Breach
- Kill Breach boss, pick a Vinewraith lane, kill it, then harvest chests with shovels until the meta resets
Useful information
- Breach
- Red - Husk - Condi
- Indigo - Teragryph twins - Ranged DPS
- Blue - Thrasher - Reflect + DPS friends
- Amber - Troll - Power DPS
- Vinewraith
- Bottom - Troll - Power DPS
- Mid - Thrasher - Reflect + DPS friends
- Top - Teragryph - Ranged DPS
Twisted Marionette[edit]
Need a minimum of 10 people per lane; strong preference for a commander per lane, as the public map can hold around 80 players. Possible w/only two commanders.
For a while the public reset + 2 timeslot was reliable. Never tried @ reset (too early) but some people say they've had success. This event needs more publicity, though the 50 players on-map is an extremely high coordination bar, despite paying better than Dragonstorm which usually runs multiple maps of 50+ (but is easy w/just 10).
Important information:
- Each lane needs minimum 10 people
Useful information
- Must CC Champ Twisted Nightmares before hitting 50% to prevent them from charging, then burn them down.
- Can't do multiple lanes; get [&BuZYAAA=] which lasts 8 minutes
- Lanes enter in order; CC Twisted Nightmares then wait at top when your turn.
- Lane boss mechanics
- 1: Must be struck from behind. Kill spawned adds.
- Marionette stomp - large AoE
- 2: Must be lured onto own mines to damage it
- Marionette kick - line AoE down the middle
- 3: Twisted Nightmare. Can 1-shot you, so kite and CC. Avoid getting jumped on.
- Marionette Lightning - many random medium size AoEs occasionally
- 4: Avoid black AoEs, applies confusion w/cone attack.
- Marionette Sword - huge AoE; stay by the Power Regulator
- 5: Splits when killed; AoE. Smaller ones die faster but hit harder.
- 1: Must be struck from behind. Kill spawned adds.
- Split into 2-3 per platform, can rally allies w/[&BiD0AAA=] special action key when you finish your boss and power regulator. 2 minutes to kill.
- Have to face the bosses in order, so 1 is most likely to need to fight twice
- Don't overstack in 1; you just guarantee other lane failures and a slower clear
- Event fails when the Aethercannon charge bar fills - fills when Watchwork minions get to the Energy Field at the top.
Wyvern Matriarch[edit]
Please stack on the Wyvern Matriarch. Stacking allows you to get boons and maximize your damage, and prevents her from charging you, taking her out of range of melee players and ground targeted AoEs.
Auric Basin[edit]
Useful information
- South needs pushes or knockbacks
- East is trivial - glide over and drop bomb; usually burns last
- North is simple - grab kits, set up turrets, then slowly blast octovine
- West is understaffed - turn into small weak mushrooms, get to octovine, and explode on it.
Chak Gerent[edit]
Important information
- Need ~15 in Nuhoch lane, ~10 in Rata lane, and 5 is plenty for SCAR and Ogre
Useful information
- Lanes have different mechanics
- Nuh - Stomp shroom nodules
- Rata - Throw ley energy to golem
- SCAR - kill Chak
- Ogre - break eggs
- Nuh fails the most, followed by Rata; together they account for almost all failed metas
Notes for leaders
- I’ve been on a map where SCAR passed w/2 heroes and one where it failed w/4. (Khenta claims to have soloed the pre-event for SCAR)
- I have never seen Ogre fail; people like to fill Ogre and SCAR because they are easy, so it is often necessary to encourage participation in Nuhoch and Rata to actually complete the meta and get rewards.
- I've seen Ogre pass with 6 and Rata fail with 6
- Ogre should dash to help Nuh, and Nuh and Rata should typically dash to help SCAR for a 1-burn.
Post event message:
Get the chest at [&BPUHAAA=], then [&BAwIAAA=] to the Grub Pit wallows for the Treasure Mushroom. You need Nuhoch Stealth Detection to see it. Kill it slowly.
Dragonstorm[edit]
It is useful to encourage Braham to jump toward the NW ledge as he just jumps up and down in place, even when other DPS players don't stack if you can bait his aggro just right.
If HP bars are unequal, don't call "slow DPS" - instead call for some players to move from the low boss to the one with more health. I like to suggest "Ryland/Braham needs more hugs", as they seriously both do.
Please attack Braham from his melee range. If he can't reach you he'll likely jump over and stomp on you. This slows DPS as he escapes placed AoEs and melee players have to chase.
Dragons End[edit]
Preparation[edit]
Important information
- Get minimum of 5 event stacks pre-meta to open all chests at top (+10% DPS boost)
Useful information
- Getting all 3 regions to High gives every player on the map an additional 10%(?) DPS boost during the boss fight
- Just need north + south maxed for full map buffs
- South has the fastest event cycle
- Get Offensive/Defensive protocols buff maxed while doing events
Notes for leaders
- Try to have quick + alac in every 5-player subsquad, with 5 healers total in a 50-player composition
- Can do 6 subgroups for easier coordination, but weaker boons
Pre-escorts[edit]
Important information
- Sub group split - 10 w/Caithe down mid, 1-4 west w/Fa, 5-9 east w/Kuunavang/Navan
- N/S split for corrupted magic at final stage of escort - half/half
- Essence throw split - 2 subsquads each
Useful information
- Top up on Offensive/Defensive protocols during escort
Soo-won[edit]
Important information
- 2-, then 3-way split
- Wisp phase, impact sites
- Tail/bubble policy
Useful information
- When no Soo-won, Thornhearts are priority, then trolls; kill in size order
Notes for leaders
- Put down 2 waystations - one just to the right of Soo-won (your right), and one just where the zipline puts you on the platform.
- If someone puts one in mid, no others will fit on the platform, so put them first
- Need to put them down again after the first platforms split (I think it was)
Dungeons[edit]
1. Ascalonian Catacombs[edit]
Merged Paths[edit]
Important information
- Don't touch Hodgins
Useful information
- Lovers (E), then N to big room and break 4 nests, defend Detha & kill boss. TP to staff search WP (res Hodgins) and trigger search for staff pieces, get all 5. S of W WP, trigger explore tunnels to spawn Howling King. Then kill both together.
Notes for leaders:
- How to set this up: Pick P3, then use a ghost event below the starting stairs, lure them up (ele and necro are best apparently) and kill Hodgins (and Detha?) at the camp. Res Hodgins after killing the first boss to start the scepter event.
Home Instance[edit]
Recruiting: spam to guilds, post in LFG.
In my homestead w/full nodes until :xx. If interested, please x or /join iiridayn.6109, then right-click on my name to join the instance.
Homestead w/full nodes until :xx. In party, right-click me to join the instance. No expansions needed. Tips not expected.
On loading the instance:
Be sure to grab the garden nodes first if you need them, since they can't be harvested once I grab them.