Sunny Glade
Sunny Glade

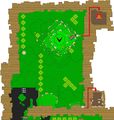
Map of Sunny Glade
- Tier
- World 1 Zone 1
- Type
- Area
- Dungeon
- Super Adventure Box
- Connects to
- World 1 House, Dark Woods, Hub
| Image(s) |
|
Click to enlarge. |

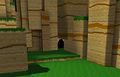
“We start our journey in a SUNNY GLADE, confident that we will find her.
— Loading screen description
Sunny Glade, or World 1 Zone 1, is the first level of Super Adventure Box. It contains 7 Hidden Rooms, 2 Shops, 2 Furniture Shops, 2 locked chests, 2 dig spots, and 45 baubles to collect.
Objectives[edit]
 Super Adventure Box
- Team Score: X (refers to the number of foes killed)
- Finished!
- Warping in: 0:15
Walkthrough[edit]
| Search YouTube for videos related to World 1 Zone 1. |
- For Tribulation Mode, see: Sunny Glade/Tribulation Mode
This walkthrough details the path through the zone in addition to the locations of all baubles and hidden rooms. It applies to both Normal Mode and Exploration Mode, though digging spots will not produce baubles in Exploration Mode.
Start to Checkpoint 1 (First area; adventure)[edit]
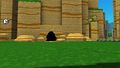
Following the cutscene, you will find yourself standing on the picnic cloth amongst four pieces of food, which can be picked up to restore hearts—though right now, you won't need them.
- (Optional) Climb the tree in the lake to your immediate right for
 #1.
#1. - (Optional) If you are doing the Super Adventurer's Quest, go to the highest point on the tree by the water and use Dig to unearth a chest that contains Extra Tiara. This can be given to the Fancy Proprietor located in Furniture Shop #1.
- (Optional) Head to the waterfall (A) at the far end of the lake.
- Pick up the
 key by
  Locked Chest #1 and unlock it for #2.
 - Open the passage to
 Hidden Room #1 (Associate of Secrets, World 1: Rushing water) by throwing a Mini Bomb at the waterfall. If you do not have a Mini Bomb, they can be purchased at Shop #2 in Dark Woods which is the first Shop that sells the Mini Bomb.
 - Enter the hidden room and climb the short jumping puzzle for
 #3.
#3.
- When you reach the first rock platform after jumping on the water spouts, continue along the wall on the right-hand side to avoid hitting the ceiling. You may need to dodge-jump to reach the next platform.
- Pick up the
- Follow the Helping Hand towards Checkpoint #1. Watch out for snakes!
- (Optional) On the way you will find Gourdon the Racing Choya (B) where you can start the
 Super Adventure 1-1 race.
- (Optional) On the way you will find Gourdon the Racing Choya (B) where you can start the
- (Optional) When approaching Checkpoint #1, turn left at the wall and throw a bomb at the far corner (C) to reveal Hidden Room #2 (Associate of Secrets, World 1: Left before the checkpoint), which contains #4.
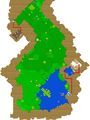
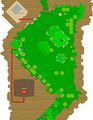
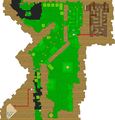
Map
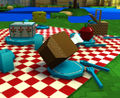
Picnic cloth with food
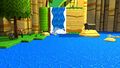
(A) Hidden Room #1: Rushing water
(B) Gourdon the Racing Choya start of Super Adventure 1-1 race
(C) Hidden Room #2: Left before the checkpoint

.jpg)


Checkpoint 1 to Checkpoint 2 (First shop; digspots)[edit]
- (Optional) Travel around the treetops hugging the wall.
- Jump onto the ledge with the monkey and onto the tree to pick up #5.
- Go around the corner and continue across the treetops to pick up #6–8, taking care to avoid the monkeys' projectile attacks.
- On the platform at the end you will find a barrel containing a
 Damage Boost.
- Jump onto the ledge with the monkey and onto the tree to pick up
- (Optional) Hop off the platform and go through the door beneath (A) to enter Hidden Room #3 (Associate of Secrets, World 1: At last, a customer!). This is the first Shop; see below for vendor details.
- (Optional) Climb to the top of the highest platform. You will need to do this multiple times to collect all the baubles.
- Walk up the ramp, jump over to the next platform and climb up to the chest.
- Unlock the Locked Chest #2 for
 #9.
#9.
- Keys can be purchased from the shop or they have a chance to drop from snakes and monkeys.
- You will also find #10 on the shorter platform nearby.
- Jump onto the tree near the tallest platform (B). These do not count towards the Associate of Baubles achievement.
- Jump down onto the ledge to the right for Digging Spot #1.
- Fall to the ground and climb the platform again to get to this starting tree.
- Jump onto the tall column to the left, up the tree and to the furthest ledge for Digging Spot #2.
- Jump down onto the ledge to the right for
- (Optional) Bomb the rubble-filled hole in the wall between the Shop and Checkpoint #2 (C) to access Hidden Room #4 (Associate of Secrets, World 1: Suspiciously spaced rubble), which contains #11–30.
- When you're done, proceed to Checkpoint #2.
Map
(A) Hidden Room #3 (Shop #1): At last, a customer!
(B) Digging spots
(C) Hidden Room #4: Suspiciously spaced rubble


Shop #1 items[edit]
| Item | Cost | Description |
|---|---|---|
| 20 |
Grants one extra life. | |
| 100 |
Dig anywhere for a 10% chance to find buried treasures. | |
| 25 |
Used for opening chests. | |
| 5 |
Restores one heart. |
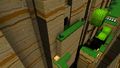
Checkpoint 2 to Checkpoint 3 (Chasm corridor)[edit]
- Jump across the chasm towards Checkpoint #3, taking care to avoid the monkeys guarding each checkpoint.
- (Optional) After activating Checkpoint #3, take advantage of the boost it gives you to land on the rock ledge on the left wall (use the bushes after the checkpoint to reach it if you missed your chance). Carefully backtrack across the treetop to another ledge, then bomb the wall (A) to access Hidden Room #5 (Associate of Secrets, World 1: Between two checkpoints), which contains #31–36.
- (Optional) Here you will also find a Fancy Proprietor which you can give the Extra Tiara that you could receive from the starting area. If you do so you will receive the Auspicious Hat for the Super Adventurer's Quest in return.
Map
(A) Hidden Room #5: Between two checkpoints


Checkpoint 3 to Checkpoint 4 (Maze; honeycomb; oozes; glitch)[edit]
A swarm of Bee Dogs will spawn as you enter this new area and collect baubles from the flowers, like nectar. Follow them to visit the Queen Bee Dog, Honeycomb, and Furniture Shop #1, or skip to main step 2 to head straight to Checkpoint #4.
- (Optional) Follow the Bee Dogs (or, if you've lost them, the right-hand wall) until you reach the corner, then slip inside the niche in the wall. To your right you will see the two entrances to the Maze.
- (Optional) Take the nearest entrance and make a U-turn to the right to find #37. Backtrack out again.
- Take the furthest entrance and follow the main path; you should encounter #38 and #39 before you run into any major forks.
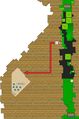
- (Optional) From bauble #39, take the left path at the first major fork. Bomb the floor once you reach a dead-end and drop inside to visit
 Furniture Shop #1. This room is another maze, this time filled with Exploding Barrels and deadly Spikes that will kill instantly upon touch; refer to the brown region in the top-right corner of the map (A).
 - From bauble #39, take the forward path at the first major fork to exit the Maze. Pick up #40 on your way through. You will emerge into an open area infested with monkeys and snakes. Ahead of you is a small hill; to your right is a bush leading to a hole in the wall which will allow you to quickly return to Checkpoint #3.
- (Optional) Run past the hill to encounter the Queen Bee Dog. You may wish to take advantage of the Damage Boost in the barrel nearby. She will perform a spinning attack which deals damage and allows her to evade; she may also shoot a stream of Bee Dogs from her mouth. Circle-strafing will allow you to avoid the latter attack, and using ranged weapons (or simply moving out of her way when she begins spinning) will allow you to avoid the former. She is immune to stun. Upon death, she drops a
 .
. - (Optional) With the Queen dead, the Honeycomb is all yours. Destroy it to spawn twenty-four baubles. (These do not count towards the Associate of Baubles achievement.) Backtrack to the bush mentioned in step 4 to exit the area.
- (Optional) Oozes can be found on the left of the hill just before the Queen Bee Dog and Honeycomb.
- (Optional) Glitch and its associated switch can be found at the exit of the maze. Inspect the wall at your left, you should see a red crystal (C). Hitting it will make several wooden platforms appear, follow them to access to the top of a wall. You should now see the glitch (D) not far from you.
- (Optional) Take the nearest entrance and make a U-turn to the right to find
- From the flower corridor, follow the left-hand wall around the corner to emerge before another chasm. Follow the Helping Hand up onto a block that will allow you to easily reach the platform in the center of the chasm. You will find #41 here, along with a barrel containing an
 Invincibility boost.
 - Jump to the next platform and kill or avoid the two monkeys before approaching Checkpoint #4.
(A) Map
(B) The Maze (entrance is in top right corner)
(C) Location of the Switch
(D) Path to the Glitch
(E) Location of the Glitch


Checkpoint 4 to Checkpoint 5 (Ooze farmer; second shop; mountain)[edit]
- Jump onto the platforms ahead of you, picking up a
 Speed Boost from the barrel if you wish. Collect #42–44 as you jump from the large platform to the final area; this jump is easiest to accomplish while affected by the speed boost.
 - (Optional) Ooze Farmer can be found on the ledge to the right after the 4th checkpoint.
- (Optional) Turn right and run towards the far corner, taking care not to get hit by any snakes or sneaky monkeys hiding in the trees. Bomb the wall (A) to uncover Hidden Room #6 (Associate of Secrets, World 1: Tucked away in a corner) and the final bauble, #45.
- (Optional) Run around to the far right-hand side of the mountain and through the door (B) to enter Hidden Room #7 (Associate of Secrets, World 1: The mountain has a back door). This is the second Shop; see below for vendor details.
- Begin climbing the mountain from the corner closest to Checkpoint #4; there will be Helping Hands guiding you in the right direction. If you wish, you can grab an
 Invisibility boost from the barrel at the base of the mountain, just behind the tree, to avoid being harassed by monkeys while climbing. There will be another barrel containing a Damage Boost about half-way up. Make your way to Checkpoint #5.
Map
(A) Hidden Room #6: Tucked away in a corner

(B) Hidden Room #7 (Shop #2): The mountain has a back door


Shop #2 items[edit]
| Item | Cost | Description |
|---|---|---|
| 5 |
Restores one heart. | |
| 20 |
Grants one extra life. | |
| 150 |
Stuns foes. | |
| 25 |
Used for opening chests. | |
| 100 |
Dig anywhere for a 10% chance to find buried treasures. |
Checkpoint 5 to Boss (Top of the mountain)[edit]
- (Optional) Betty Bauble can be found just ahead of the checkpoint. Speak with her to check if you've collected all the baubles in the zone.
- Climb to the peak of the mountain and begin wailing on the Cage.
- Lord Vanquish's head will be floating above the Cage, and every so often he will point towards you and shoot at you with a laser. Side-step out of his way when he turns to look at you, and try to remain out of his field of view so that it becomes obvious when he turns to you to attack.
- (Optional) Alternatively, avoid climbing to the top of the mountain; instead, stand on the tallest hedge and attack the Cage from there. This will prevent Lord Vanquish from noticing you and targeting you with his laser attacks.
Achievements[edit]
- For Tribulation Mode achievements, see: Sunny Glade/Tribulation Mode#Achievements
| Associate of Baubles, World 1 | Super Adventure Box: World 1 | 5 |
|---|---|---|
| Collect all of the baubles in World 1, Zone 1 in one playthrough. Baubles from foes aren't counted.All your baubles... | Collect All Baubles in World 1, Zone 1 | 5 |
| Associate of Secrets, World 1 | Super Adventure Box: World 1 | 5 |
|---|---|---|
| Find all of the hidden rooms (excluding furniture shops) in World 1, Zone 1.Even the one in the... |
7 Hidden Rooms Found in World 1, Zone 1 | 5 |
Digging spots[edit]
A total of 40 baubles can be dug up in Sunny Glade per day.
| # | Image | Last Checkpoint |
# of Baubles | Notes |
|---|---|---|---|---|
| #1a #1b |
 |
1 | (20)/(20) |
Between the first and second checkpoint, from the hill with the chest on top, you can do two separate jumps. If you take the left path (yellow), it will take you to one spot and if you take the right path (white), it will take you to the second spot. |
Glitch location[edit]
- Primary article: Unintended Coursework
Rewards[edit]
Exploration Mode[edit]
- 15
 Baubles
 - Glitched Chest (once per day per zone, only if the glitch in this zone has been destroyed)
Normal Mode[edit]
- 15 Baubles
- Glorious Chest (once per day per zone) containing:
- 2
 Bauble Bubbles
 - 1
 Continue Coin
 - A chance to get a Super Weapon Box
- A very rare chance to get a Kaiser Snake Weapon Box
- 2
- Glitched Chest (once per day per zone, only if the glitch in this zone has been destroyed)
- Bonus Reward Chest
- 5-50 Baubles (random amount)
- 5-50
Tribulation Mode[edit]
- 225 Baubles
- Glorious Chest (once per day per zone) containing:
- 2 Bauble Bubbles
- 1 Continue Coin
- A chance to get a King Toad's weapon skin
- A very rare chance to get a Kaiser Snake Weapon Box
- 2
- Glitched Chest (once per day per zone, only if the glitch in this zone has been destroyed)
- Bonus Reward Chest
- 1
 King Toad Z-1
 - 5-50 Baubles (random amount)
- 1
NPCs[edit]
Allies[edit]
- Betty Bauble
- Fancy Proprietor
- Gourdon the Racing Choya (Normal Mode only)
- Lord Vanquish (Cutscene only)
- Moto (Cutscene only)
- Princess Miya (Cutscene only)
- Shopkeeper
- Ooze Farmer
Foes[edit]
- Bee Dog
- Bunny
- Bun-nado (if all bunnies are killed)
- Cage
- Grumpy Cloud (Tribulation Mode only)
- Monkey (brown)
- Snake (orange)
- Queen Bee Dog
- Tribulation Cloud (Tribulation Mode only)
- Ooze
Objects[edit]
- Barrel
- Bouncy Mushroom
- Cloud Flag (Tribulation Mode only)
- Exploding Barrel
- Flower Bomb (Tribulation Mode only)
- Food
- Furniture
- Honeycomb
- Helping Hand
- Happy Cloud (Exploration and Tribulation Mode only)
- Jumping Rock (Tribulation Mode only)
- Spikes
- Spears (Tribulation Mode only)
Dialogue[edit]
- Opening cinematic
- Princess Miya: Thank you so much for coming to my picnic.
- Princess Miya: Oh no!
- Lord Vanquish: The princess belongs to me now. You can never have her back. Ha ha ha ha!
- Moto: Did you see that? You must rescue the princess! Here, take this POINTY STICK. Good luck with your quest.
- Player character: We must not give up. Our super adventure begins. Our time is now!
Notes[edit]
- The opening cinematic cannot be skipped in Exploration Mode, with the reason being that in older games cut scenes could not be skipped. In normal mode, it will automatically skip to the end of the cinematic if your account has already viewed it at least once in normal mode.
- If you join the instance of a player already viewing the cinematic, you will load into Sunny Glade as you would any other zone, and skip it entirely.
- In Tribulation Mode, the opening cinematic merely displays a red Super Adventure Box shield for a few seconds, skipping the kidnapping scene.
- Like most zones, there are two Fancy Furniture shops located in Sunny Glade, however the second shop is only available in Tribulation Mode.
- Bonus Reward Chest are given at the end of the timer for zone transition.
Trivia[edit]
- The zone is a possible reference to Green Hill Zone from Sonic the Hedgehog.
Bauble (1 ![]() • 5
• 5 ![]() • 10
• 10 ![]() • 20
• 20 ![]() • 50
• 50 ![]() ) •
) • ![]() Bauble Bubble
Bauble Bubble
Continue Coin • Infinite Continue Coin • ![]() Fancy Furniture Coin
Fancy Furniture Coin
| Skills and Upgrades |
• Purse
|
|---|---|
| Hub | World 1 House • World 2 House • World 3 House • World 4 House |
| World 1 | Z1: Sunny Glade • Z2: Dark Woods • Z3: Kingdom of Fungus • B: Cart |
| World 2 | Z1: Rapids • Z2: Pain Cliffs • Z3: Storm Top • B: Robbers |
| World 3 | Z0: Test Zone • Historical: Sparkling Pools |
| Adventures | Super Adventure Hub Super Adventure 1-1 • Super Adventure 1-2 • Super Adventure 1-3 Super Adventure 2-1 • Super Adventure 2-2 • Super Adventure 2-3 |
| Achievements |