Dark Woods
Dark Woods
![]()
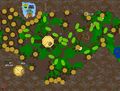
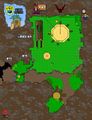
Map of Dark Woods
- Tier
- World 1 Zone 2
- Type
- Area
- Dungeon
- Super Adventure Box
- Connects to
- World 1 House, Sunny Glade, Kingdom of Fungus, Hub
| Image(s) |
|
Click to enlarge. |

“Now we venture into the DARK WOODS where shadows loom.
— Loading screen description
Dark Woods, or World 1 Zone 2, is the second level of Super Adventure Box. It contains 6 Hidden Rooms, 4 Shops, 2 Furniture Shops, 2 locked chests, 15 dig spots, and 73 baubles to collect.
Objectives[edit]
 Super Adventure Box
- Team Score: X
- Finished!
- Warping in: 0:45
Walkthrough[edit]
| Search YouTube for videos related to World 1 Zone 2. |
- For Tribulation Mode, see: Dark Woods/Tribulation Mode
This walkthrough details the path through the zone in addition to the locations of all baubles and hidden rooms. It applies to both Normal Mode and Exploration Mode, though digging spots will not produce baubles in Exploration Mode.
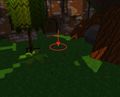
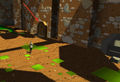
Start to Checkpoint 1 (First area; dark thicket; adventure)[edit]
There is a shopkeeper at the start who sells health refills; see below for vendor details.
- (Optional) Use the Bouncy Mushrooms to collect the baubles (
 #1–7) floating in the air. If you fall off, you will need to return to the beginning. When you reach the final mushroom, land on the large tree then climb to the top to retrieve #8.
 - (Optional) Use a bomb on the flat, boulder-strewn area to the left of the waterfall around the corner (A) to reveal
 Hidden Room 1 (Bachelor of Secrets, World 1: Near rushing water) and
  #9. Use the Bouncy Mushroom to exit. Head to the waterfall (B) to uncover Digging Spot #1.
 - Enter the dark thicket with towering trees. Turn right and hug the wall to head directly to Checkpoint #1, or turn left to begin bauble-hunting:
- (Optional) Having already turned left, turn left again to find #10. Jump over the tree roots by the wall to your right to find a barrel containing an
 Invisibility boost (you may use this to slip unnoticed past the snake), then turn left to find #11. Turn left again and scramble through the tree roots to find #12.
 - (Optional) On your way to #12, pause just before you climb past the tree root covered by a fern (C) and dig to uncover
 Digging Spot #2.
 - Head to Checkpoint #1, which should be visible from bauble #12. If you get lost, find the wall and hug it until you either reach the checkpoint or the entrance and regain your bearings.
- (Optional) Having already turned left, turn left again to find
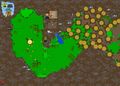
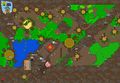
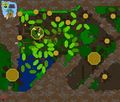
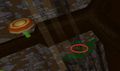
Map
(A) Hidden Room #1: Near rushing water

(B) Digging spot #1
(C) Digging spot #2


Shop #1 items[edit]
| Item | Cost | Description |
|---|---|---|
| 100 |
Dig anywhere for a 10% chance to find buried treasures. | |
| 5 |
Restores one heart. | |
| 150 |
Stuns foes. |
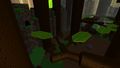
Checkpoint 1 to Checkpoint 2 (Hollow logs; second shop)[edit]
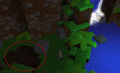
Welcome to the woods. The ground level of this area is crawling with spiders, while monkeys may be found up in the canopy, ready to knock you off the branches with their coconut attacks. There is a barrel containing a ![]() Speed Boost on the hill in a U-turn to the left of the checkpoint.
Speed Boost on the hill in a U-turn to the left of the checkpoint.
- (Optional) Run forward towards #13.
- (Optional) Head towards the Helping Hand in front of you and follow it to the left, up onto the hill built into the wall.
 Digging Spot #3 may be found at the top (A).
 - (Optional) Enter the horizontal log laying on the ground for #14, then hop inside the small tree stump nearby (B) to find a barrel containing an apple and Digging Spot #4.
- Follow the Helping Hands past the tree stump and around to the right until you reach a small pond with two lily pads and #15–16.
- (Optional) Run towards the door in front of the pond (C) to enter Hidden Room 2 (Bachelor of Secrets, World 1: Past the big hollow log). This is the second Shop; see below for vendor details. Pause immediately outside the shop (D) for Digging Spot #5.
- (Optional) Time to get
 Locked Chest #1. Buy a
  key or kill monkeys until one drops, then:
- Backtrack to the hollow logs and climb inside the diagonal log leaning atop the horizontal one, picking up #17–19 on your way up. Taking care not to get hit by monkey coconuts, run around the top rim of the log to the opposite side and jump onto the large leaf directly behind where you emerged. Jump across branches and leaves to your left until you reach the branch belonging to an adjacent tree.
- (Optional) At the major fork, turn left and attack the mushroom to unlock a shortcut Bouncy Mushroom that will allow you to quickly return to the canopy if you fall.
- (Optional) Take the right fork and head towards the wall. Bomb the area of wall with a small ledge below it (E) to open up a room with a
 1-Up inside.
 - Drop down into the giant tree stump. Pick up #20 before dropping to the lower level and open Locked Chest #1 for #21–22. Smash the pots for extra baubles (These do not count towards the Bachelor of Baubles achievement) and/or food if you wish, then use the Bouncy Mushroom to exit. Return to the small pond.
- Backtrack to the hollow logs and climb inside the diagonal log leaning atop the horizontal one, picking up
- Continue to Checkpoint #2, which is visible from the pond.
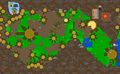
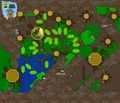
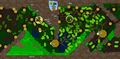
Map (ground level)
Map (canopy level)
(A) Digging spot #3
(B) Digging spot #4
(C) Hidden Room #2 (Shop #2): Past the big hollow log
(D) Digging spot #5
(E) 1-Up entrance


Shop #2 items[edit]
| Item | Cost | Description |
|---|---|---|
| 5 |
Restores one heart. | |
| 20 |
Grants one extra life. | |
| 200 |
Can be thrown or placed; requires ammo. | |
| 25 |
Used for opening chests. | |
| 150 |
Stuns foes. |
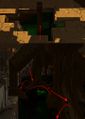
Checkpoint 2 to Checkpoint 3 (Shortcut wurm; honeycomb; oozes)[edit]
- Grab #23 from the tree root ahead of you and use the lily pads to climb out of the pond, picking up #24 from the fern.
- (Optional) Before exiting the pond, stand beneath the fern overhanging the lily pads (A) to find Digging Spot #6.
- You now have a choice between continuing the zone as intended or using Shortcut Wurm to skip directly to the end. If you intend to collect all baubles in the level, Shortcut Wurm is not optional. You will be able to backtrack to this area, so you are free to use the shortcut at any time you please; however, note that you will miss out on two digging spots if you choose to use the shortcut before unlocking the final checkpoint.
- Using Shortcut Wurm
- From the pond-exit fern, follow the rim of the pond to the right and climb up onto a root that overhangs the water, then drop into the niche by the wall (B). After a short introduction, Shortcut Wurm will open its mouth and allow you to climb inside.
- You now find yourself in the bouncy belly of the wurm. Cubes of digestive enzyme float about and will explode if touched, damaging one heart; however, they will not respawn. There are also pools of digestive juices on the floor, but these do not deal damage when touched. Bounce on through the wurm's gut, picking up #65–72.
- Exit the wurm through the, er, back end, and you will land directly atop Digging Spot #15 (C). You will also find #73 nearby. Your spawn point is now set to Checkpoint #4 for the rest of the level. Continue from Dark Woods#Checkpoint 4 to Boss (Final area) if you intend to head straight to the Boss.
- Continue this area without using Shortcut Wurm
- (Optional) From the pond-exit fern, head right and follow the yellow flowers towards the wall, then turn left to find #25, guarded by a green snake and two monkeys.
- (Optional) From bauble #25, turn left to visit the Queen Bee Dog and Honeycomb. There is a barrel containing a
 Damage Boost on the ledge to the left of the entrance. Climb the tree by jumping onto the ferns sticking out from its trunk until you reach the flat platform nearby (D). Dig for
  Digging Spot #7.
 - (Optional) From bauble #25, turn right and hug the wall until you reach a dead-end amongst the roots (E). Dig for Digging Spot #8.
- (Optional) From bauble #25, turn left to visit the Queen Bee Dog and Honeycomb. There is a barrel containing a
- (Optional) From the pond-exit fern, turn right and follow the wall around the corner to the right, where you will find a monkey on a log and #26 on a rock. Enter through the door (F) to find Hidden Room 3 (Bachelor of Secrets, World 1: Ground level, before a checkpoint). This is the third Shop; see below for vendor details. Exit the shop and bomb the wall to the left of the big rock (G) for Hidden Room 4 (Bachelor of Secrets, World 1: Next to a shop) and #27–31.
- From the pond-exit fern, run forward inside the tree and climb the ferns, collecting #32–36 as you go. Exit the tree and jump across the branches and leaves to the right, towards a platform with a green snake, #37, and a barrel containing a
 Speed Boost.
 - (Optional) Climb onto the higher level of leaves and follow the branches until you reach a major fork, guarded by a monkey. Turn left and drop down onto a platform next to the wall. Locked Chest #2 can be found here for #38–39.
- Climb onto the higher level of leaves and follow the branches until you reach the Bouncy Mushroom by the far wall.
- (Optional) Drop down onto the ledge built into the wall just below the Mushroom (H) for Digging Spot #9.
- (Optional) Use the Bouncy Mushroom to reach the highest level of the canopy, then run across the branches towards the ledge next to the background. Follow the ledge to the right, backtracking past Checkpoint #2, until you come across an area thoroughly infested with spiders.
- (Optional) Drop down, using the Invisibility boost from the barrel if you'd rather avoid the spiders, and collect #40–47 before using the nearby Bouncy Mushroom to return to the ledge.
- Jump onto the branches and pick up #48–50 from two leaves and a mushroom, then enter the tree and climb until you exit it again. Jump onto the fern ahead of you (tricky jump; use the mushroom to your left as a stepping stone if you're struggling) and pick up #51.
- (Optional) Facing the wall, turn left and climb onto the adjacent platform. Digging Spot #10 can be found in the corner (I).
- Facing the wall, climb the ramp to your right and collect #52–57 from the rim of the treetop.
- (Optional) Drop down, using the
- (Optional) Drop down onto the ledge built into the wall just below the Mushroom (H) for
- From the Bouncy Mushroom in step #5, turn right and jump towards a second Bouncy Mushroom on an adjacent branch. Use it to access the highest level of the tree trunk and climb to the top, picking up #58 on your way.
- Collect #59 from the leaf below you, then run along the branch, past the monkey, until you reach another leaf. Jump onto the branch to your left, then jump down onto another branch with a monkey. Checkpoint #3 should be visible from here. Head towards it, picking up #60 from a mushroom on your way.
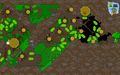
Map (ground level)
Map (canopy first level)
Map (canopy second level)
Map (canopy third level)

Map (Inside the wurm)

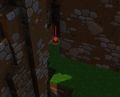
(A) Digging spot #6
(B) The way to Shortcut Wurm
(C) Digging spot #15 (In final area; only accessible via Shortcut Wurm)
(D) Digging spot #7
(E) Digging spot #8
(F) Hidden Room #3 (Shop #3): Ground level, before a checkpoint
(G) Hidden Room #4: Next to a shop
(H) Digging spot #9
(I) Digging spot #10


Shop #3 items[edit]
| Item | Cost | Description |
|---|---|---|
| 5 |
Restores one heart. | |
| 25 |
Used for opening chests. | |
| 100 |
Dig anywhere for a 10% chance to find buried treasures. | |
| 20 |
Grants one extra life. | |
| 150 |
Stuns foes. |
Checkpoint 3 to Checkpoint 4 (Improper water; glitch)[edit]
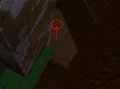
- (Optional) Before dropping down from the checkpoint, turn left and carefully follow the ledge until you come to a square platform (A). Dig for Digging Spot #11.
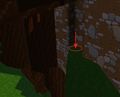
- (Optional) Drop down and approach the Shopkeeper, who will take a sip of water, comment on its "improper" taste, and promptly die. Enter the door (B) to access Hidden Room 5 (Bachelor of Secrets, World 1: This water tastes improper). This is the fourth Shop, but with the Shopkeeper dead, you can grab his wares—the Candle—for free.
- As hinted at by the Shopkeeper's death, the green "improper" water here is deadly. Touching it will remove half a heart per tick, so use the lily pads to avoid it. There is a barrel on the rock near the right wall containing a cake.
- (Optional) Chuck a bomb into the water just past the rock with the barrel (C). The water will drain through a hole in the ground, revealing
 Furniture Shop #1. Use the Bouncy Mushroom to exit.
 - (Optional) Follow the left wall until you reach a hole in the ground (D). Drop carefully onto the tree root below you; if you miss, you will disappear into the void and lose a heart before respawning. Jump to the root to your left, then onto a nearby root, and carefully around to the opposite side of that same root. From there, jump to the nearby ledge and enter the door to access Hidden Room 6 (Bachelor of Secrets, World 1: Low, underneath the trees). Climb the large root to your left to access #61, which is floating in the air. Exit the room and commit suicide.
- Approach the first tree and use the Bouncy Mushrooms on the side nearest the wall to reach the canopy. Avoiding the projectile barrages from the monkeys, follow the branches all the way to the end, taking a detour to the left to pick up a Damage Boost from the barrel if you wish.
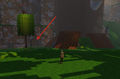
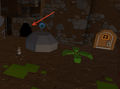
- (Optional) Drop down onto the platform to the left of Checkpoint #4 and dig at the spot between the tree and the wall (E) for Digging Spot #12.
- (Optional) Ooze Farmer can be found right next Digging Spot #12.
- Head over to Checkpoint #4. If you intend to visit the next two digging spots, take advantage of the boost it gives you to land on the platform above, with a Bouncy Mushroom and a monkey. You will not get another chance to access this platform.
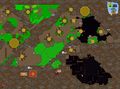
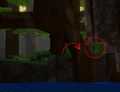
Map (ground level)
Map (canopy level)

(A) Digging spot #11
(B) Hidden Room #5 (Shop #4): This water tastes improper
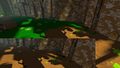
(C) Furniture Shop #1: Drain the improper water
(D) Hidden Room #6: Low, underneath the trees
(E) Digging spot #12


Shop #4 items[edit]
| Item | Cost | Description |
|---|---|---|
| 0 |
Creates light and heat. |
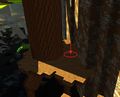
Checkpoint 4 to Boss (Final area)[edit]
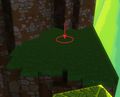
- (Optional) Take advantage of the boost granted by Checkpoint #4 to reach the platform above, then use the Bouncy Mushroom to access another platform containing Digging Spot #13 (A) and Digging Spot #14 (B). If you missed your chance to use the checkpoint boost, you will not be able to access these dig spots.
- Use the lily pad to safely access the hollow tree stump in the water, then use the Bouncy Mushroom inside to reach the top. Jump onto the horizontal log nearby, taking care not to get hit by the snake's attacks, and collect #62–64.
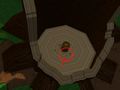
- Jump to the ledge on the wall and use the Bouncy Mushroom to reach the giant tree stump containing the Cage.
- (Optional) Jump back down onto the wall-ledge to the right to visit Betty Bauble and check if you've collected all the baubles in the level. Don't forget to backtrack to Shortcut Wurm if you haven't already!
- (Optional) Attack the shortcut Mushroom next to the boss Cage, then drop down onto the muddy square in the water below (C) and bomb the side of the tree to access Furniture Shop #2. Use the Bouncy Mushroom you spawned to return to the boss.
- Destroy the Cage, strafing around the rim of the stump to avoid Lord Vanquish's laser attacks.
- (Optional) If you have the bombs and about 30 baubles, there is an easier way to destroy the cage: Stand atop the smaller tree stump nearby, with the Bouncy Mushroom inside. Once you find the proper position to hit the cage, keep throwing until the cage is destroyed.
- (Optional) Alternatively, for a lazier but slightly slower approach, make use of the shortcut Bouncy Mushroom and your auto-attack to destroy the cage without the need to strafe. (Some timing on the initial bounce may be required to fully evade his lasers.)
- Upon destroying the cage, rainbow bridges will spawn nearby, allowing quick access to and from the boss platform. Try not to be standing on these when the timer runs out and you are teleported to the next zone, as they despawn and you will fall into the green water and lose a life during the loading screen.
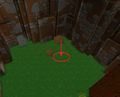
Map (ground level)
(A) Digging spot #13
(B) Digging spot #14

(C) Furniture Shop #2: Just when you thought it was over!


Achievements[edit]
- For Tribulation Mode achievements, see: Dark Woods/Tribulation Mode#Achievements
| Bachelor of Baubles, World 1 | Super Adventure Box: World 1 | 5 |
|---|---|---|
| Collect all of the baubles in World 1, Zone 2 in one playthrough. Baubles from foes aren't counted.Bubbles and bubbles of baubles. | Collect All Baubles in World 1, Zone 2 | 5 |
| Bachelor of Secrets, World 1 | Super Adventure Box: World 1 | 5 |
|---|---|---|
| Find all of the hidden rooms (excluding furniture shops) in World 1 Zone 2.Bombs not included. |
6 Hidden Rooms Found World 1, Zone 2 | 5 |
| Bachelor of Pioneering | Super Adventure Box: World 1 | 5 |
|---|---|---|
| Find the shortcut located in World 1, Zone 2Left, left, left, left...wait a minute. | Find the shortcut in World 1, Zone 2 | 5 |
Digging spots[edit]
A total of 245 baubles can be dug up in Dark Woods per day.
| # | Image | Last Checkpoint |
# of Baubles | Notes |
|---|---|---|---|---|
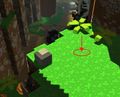
| #1 |  |
Start | (5) |
In the waterfall by Hidden Room 1. |
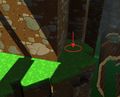
| #2 |  |
Start | (20) |
Before the first checkpoint, in the left side of the dark woods, dig by the tree roots in the area with the rock and plants. |
| #3 |  |
1 | (10) |
Upon reaching the hollow log lying on the ground with another leaning on it, there is a small hill against the right wall of the area. Dig at the top of the hill. |
| #4 |  |
1 | (5) |
After the hollow log, dig in the open tree stump with the brown barrel in it. |
| #5 |  |
1 | (10) |
Before the second checkpoint, dig in front of the store by the small pond. |
| #6 |  |
2 | (20) |
Just after the second checkpoint, dig under the plants at the water's edge by the lily pads. |
| #7 |  |
2 | (50) |
In the area with the Queen Bee Dog, climb the tree along the back wall and jump to the nearby grassy platform. |
| #8 |  |
2 | (20) |
Upon exiting the room with the Queen Bee Dog, head straight along the wall, and dig in the area by a tree root, just after a small green ledge. |
| #9 |  |
2 | (20) |
Head up high into the canopy after the second checkpoint climbing up the leaves and branches. Before the bouncy mushroom you can drop down to a ledge. |
| #10 |  |
2 | (20) |
Head up high into the canopy again to where you dropped to the previous digging spot and use the bouncy mushroom to the left; backtrack past the second checkpoint. Continue through the canopy, backtracking past the first merchant shop. Jump into an opening in a large tree trunk, ascend, and exit the back of the trunk. Jump across to a grassy platform, and then jump over to a second grassy platform. Dig in the corner area. |
| #11 |  |
3 | (20) |
At the third checkpoint, turn left and follow the ledge until you reach a square platform. |
| #12 |  |
3 | (10) |
Right before the fourth and final checkpoint, dig behind the large tree. |
| #13 |  |
4 | (20) |
At the last checkpoint, use the bounce from stepping on the checkpoint to reach the platform above it, then use the Bouncy Mushroom Pad to reach a higher platform with a first dig spot where you initially land. (The checkpoint bounce is the only way to reach this and the next chest.) |
| #14 |  |
4 | (10) |
From the previous chest, move further towards the boss for a second chest. (The checkpoint bounce is the only way to reach this and the previous chest.) |
| #15 |  |
4 | (5) |
If you have used the Shortcut Wurm, the area where the wurm leaves you. |
Glitch location[edit]
- Primary article: Unintended Coursework
Rewards[edit]
Exploration Mode[edit]
- 15
 Baubles
Normal Mode[edit]
- 15 Baubles
- Glorious Chest (Once per day) containing:
- 2
 Bauble Bubbles
 - 1
 Continue Coin
 - A chance to get a Super Weapon Box
- A very rare chance to get a Kaiser Snake Weapon Box
- 2
- Glitched Chest (Once per day, only if this zones glitch has been destroyed)
- Bonus Reward Chest
- 25-75 Baubles (random amount)
- 25-75
Tribulation Mode[edit]
- 250 Baubles
- Glorious Chest (Once per day) containing:
- 2 Bauble Bubbles
- 1 Continue Coin
- A chance to get a King Toad's weapon skin
- A very rare chance to get a Kaiser Snake Weapon Box
- 2
- Glitched Chest (Once per day, only if this zones glitch has been destroyed)
- Bonus Reward Chest
- 1
 King Toad Z-2
 - 25-75 Baubles (random amount)
- 1
NPCs[edit]
Allies[edit]
- Betty Bauble
- Choya Miner
- Fancy Proprietor
- Gourdon the Racing Choya (Normal Mode only)
- Shopkeeper
- Shortcut Wurm
- Ooze Farmer
Foes[edit]
- Bee Dog
- Bunny
- Bun-nado (if all bunnies are killed)
- Cage
- Monkey (brown)
- No Cloud (Tribulation Mode only)
- Piranha (Only upon draining the Improper Water)
- Snake (orange)
- Snake (green)
- Spider
- Turtle
- Queen Bee Dog
- Tribulation Cloud (Tribulation Mode only)
- Ooze
Objects[edit]
- 1-Up
- Barrel
- Bouncy Mushroom
- Cloud Flag (Tribulation Mode only)
- Flower Bomb (Tribulation Mode only)
- Furniture
- Honeycomb
- Helping Hand
- Happy Cloud (Exploration and Tribulation Mode only)
- Jumping Rock (Tribulation Mode only)
- Spikes
- Spears (Tribulation Mode only)
Trivia[edit]
- Originally this was the first zone to have the Bouncy Mushroom Pads, but in 2016 one was put in Zone 1 to be able to leave the Hidden Furniture Shops there.
Bauble (1 ![]() • 5
• 5 ![]() • 10
• 10 ![]() • 20
• 20 ![]() • 50
• 50 ![]() ) •
) • ![]() Bauble Bubble
Bauble Bubble
Continue Coin • Infinite Continue Coin • ![]() Fancy Furniture Coin
Fancy Furniture Coin
| Skills and Upgrades |
• Purse
|
|---|---|
| Hub | World 1 House • World 2 House • World 3 House • World 4 House |
| World 1 | Z1: Sunny Glade (TM) • Z2: Dark Woods (TM) • Z3: Kingdom of Fungus (TM) • B: Cart |
| World 2 | Z1: Rapids (TM) • Z2: Pain Cliffs (TM) • Z3: Storm Top (TM) • B: Robbers |
| World 3 | Z0: Test Zone • Historical: Sparkling Pools |
| Adventures | Super Adventure Hub Super Adventure 1-1 • Super Adventure 1-2 • Super Adventure 1-3 Super Adventure 2-1 • Super Adventure 2-2 • Super Adventure 2-3 Super Adventure Test Zone |
| Achievements |